PIES Studio Registration Guide
Logging In
Welcome to PIES studio registration guide. This guide explains how users can register a new license for PIES studio.
In PIES Website, when users click on START FREE NOW, they will be redirected to the license portal/registration page.
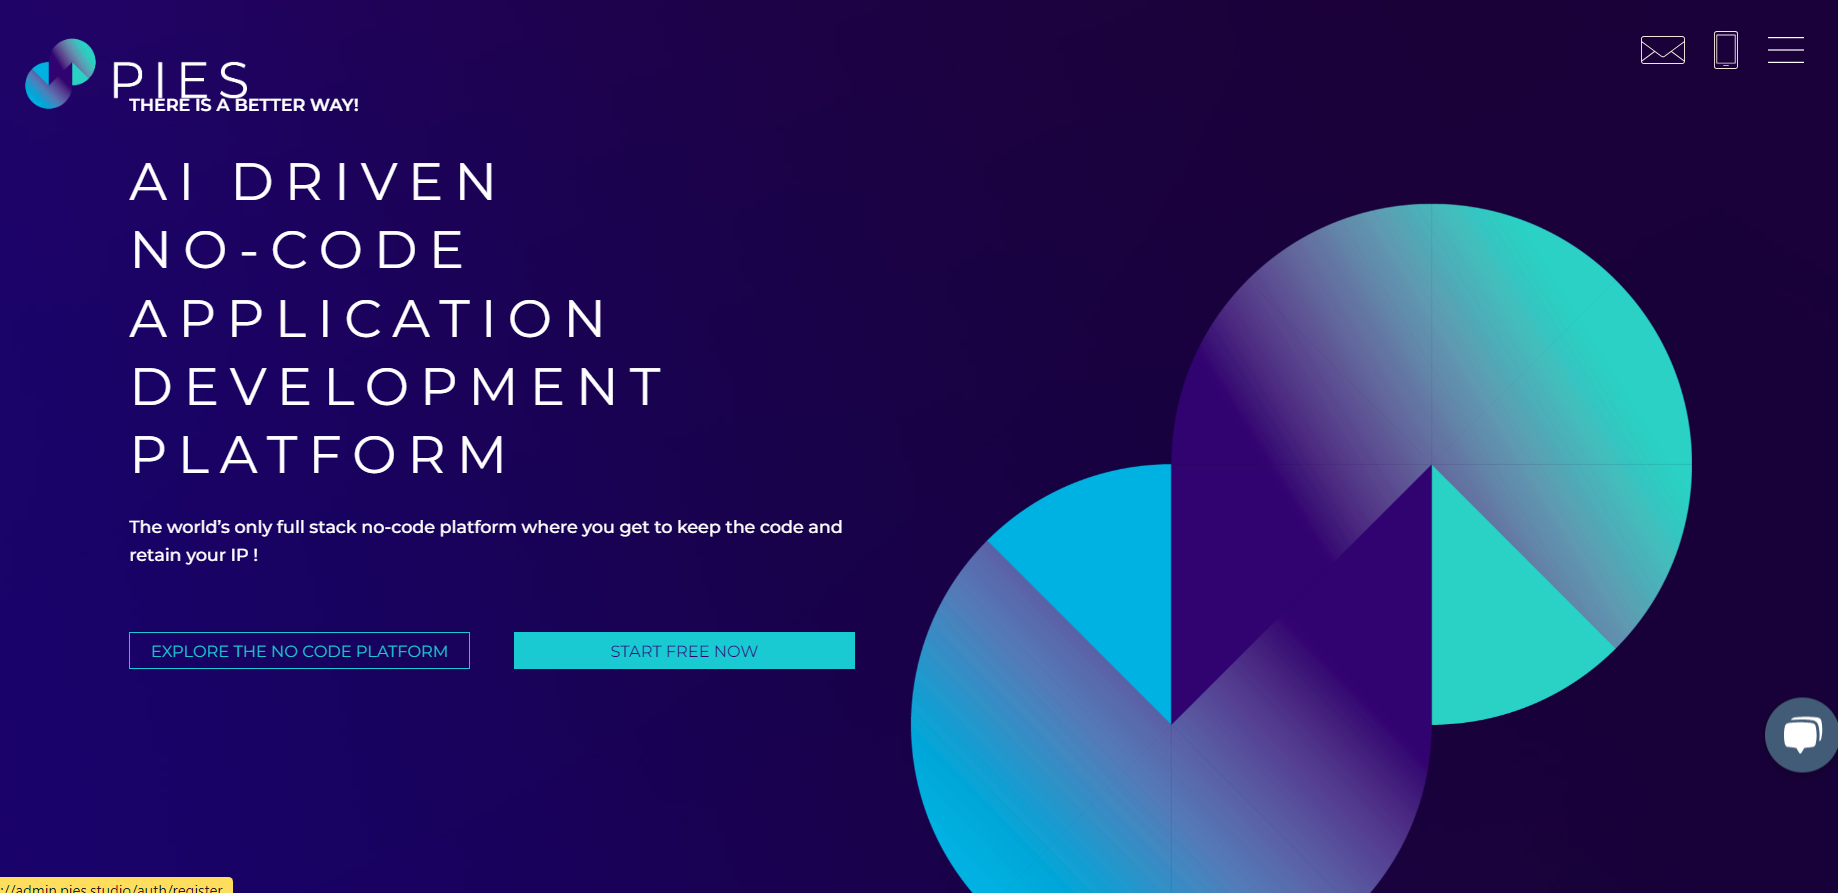
Fig 1: PIES Website
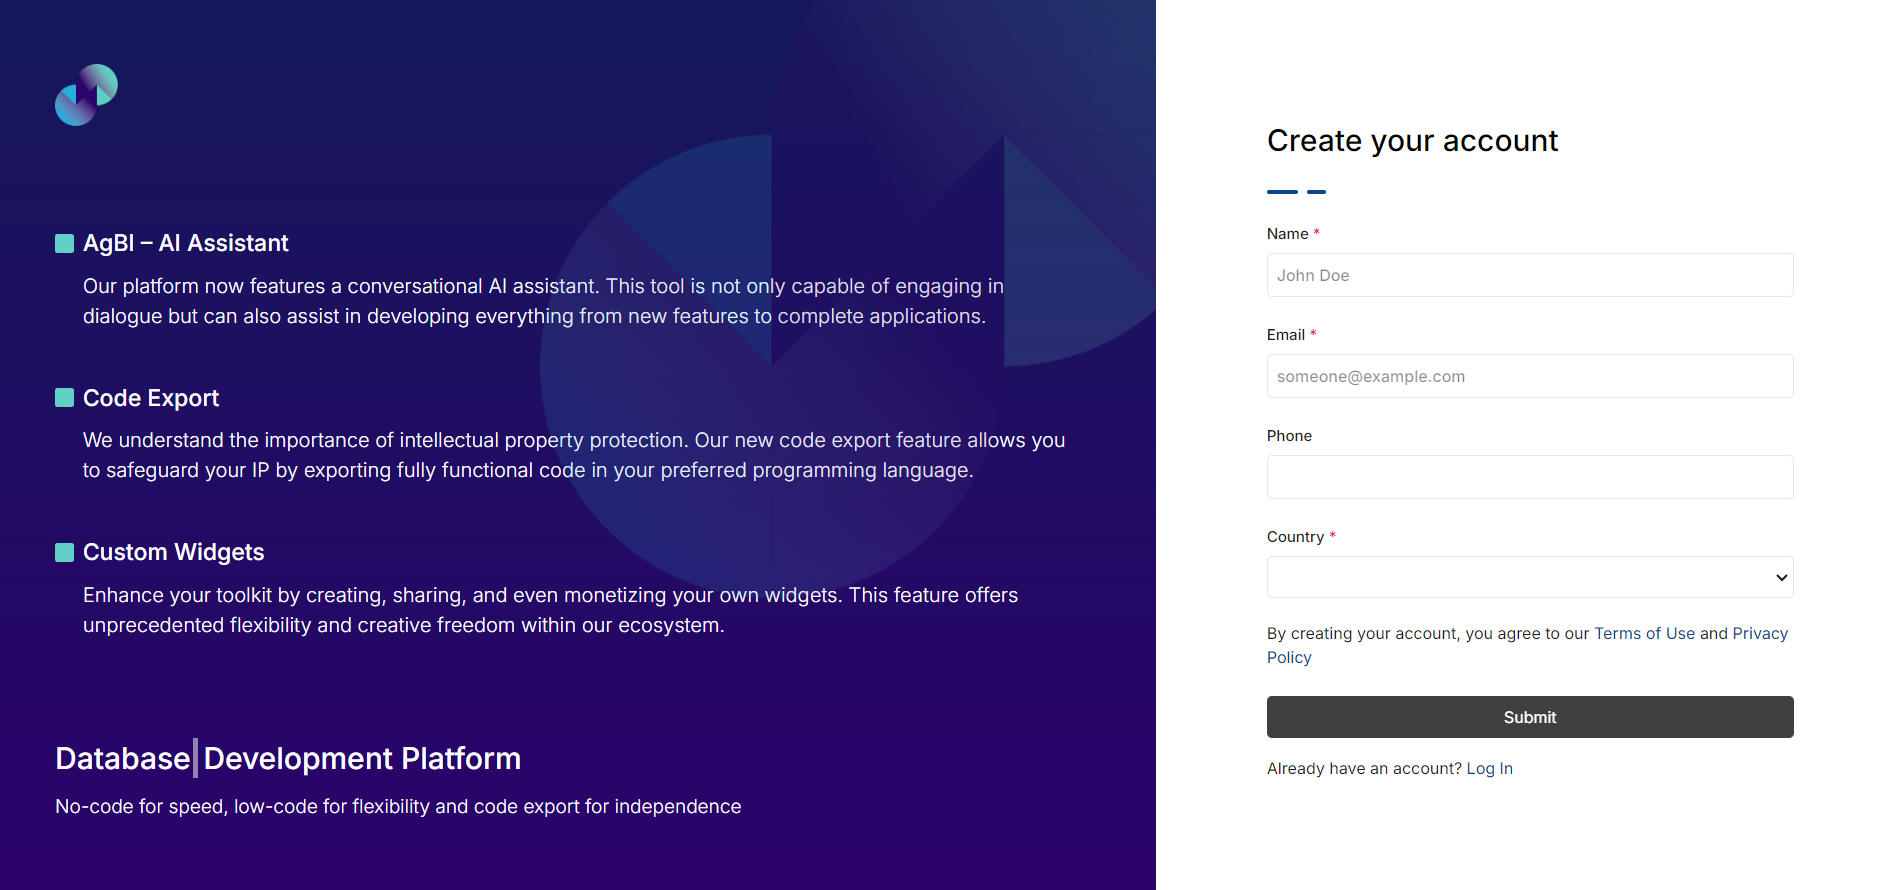
Fig 2: Registration Page
Users have to sign up for the new license in the registration page by providing below user details.
Name (mandatory)
Email (mandatory)
Phone (Optional)
Country (mandatory)
Once you click Submit, you will get a success message stating Your account has been created successfully.
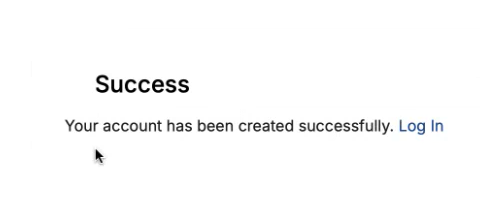
Fig 3: Account Creation Success
Upon successful account creation, created user will get an email with instruction and a link to set password. Click on the link and enter a desired password in Password and Confirm Password fields. Click Submit button. Make sure you use a strong password, with at least 1 uppercase, 1 lowercase, 1 numeric and 1 special character. You will get a success message that your password is reset successfully, and you can login with the new credentials.
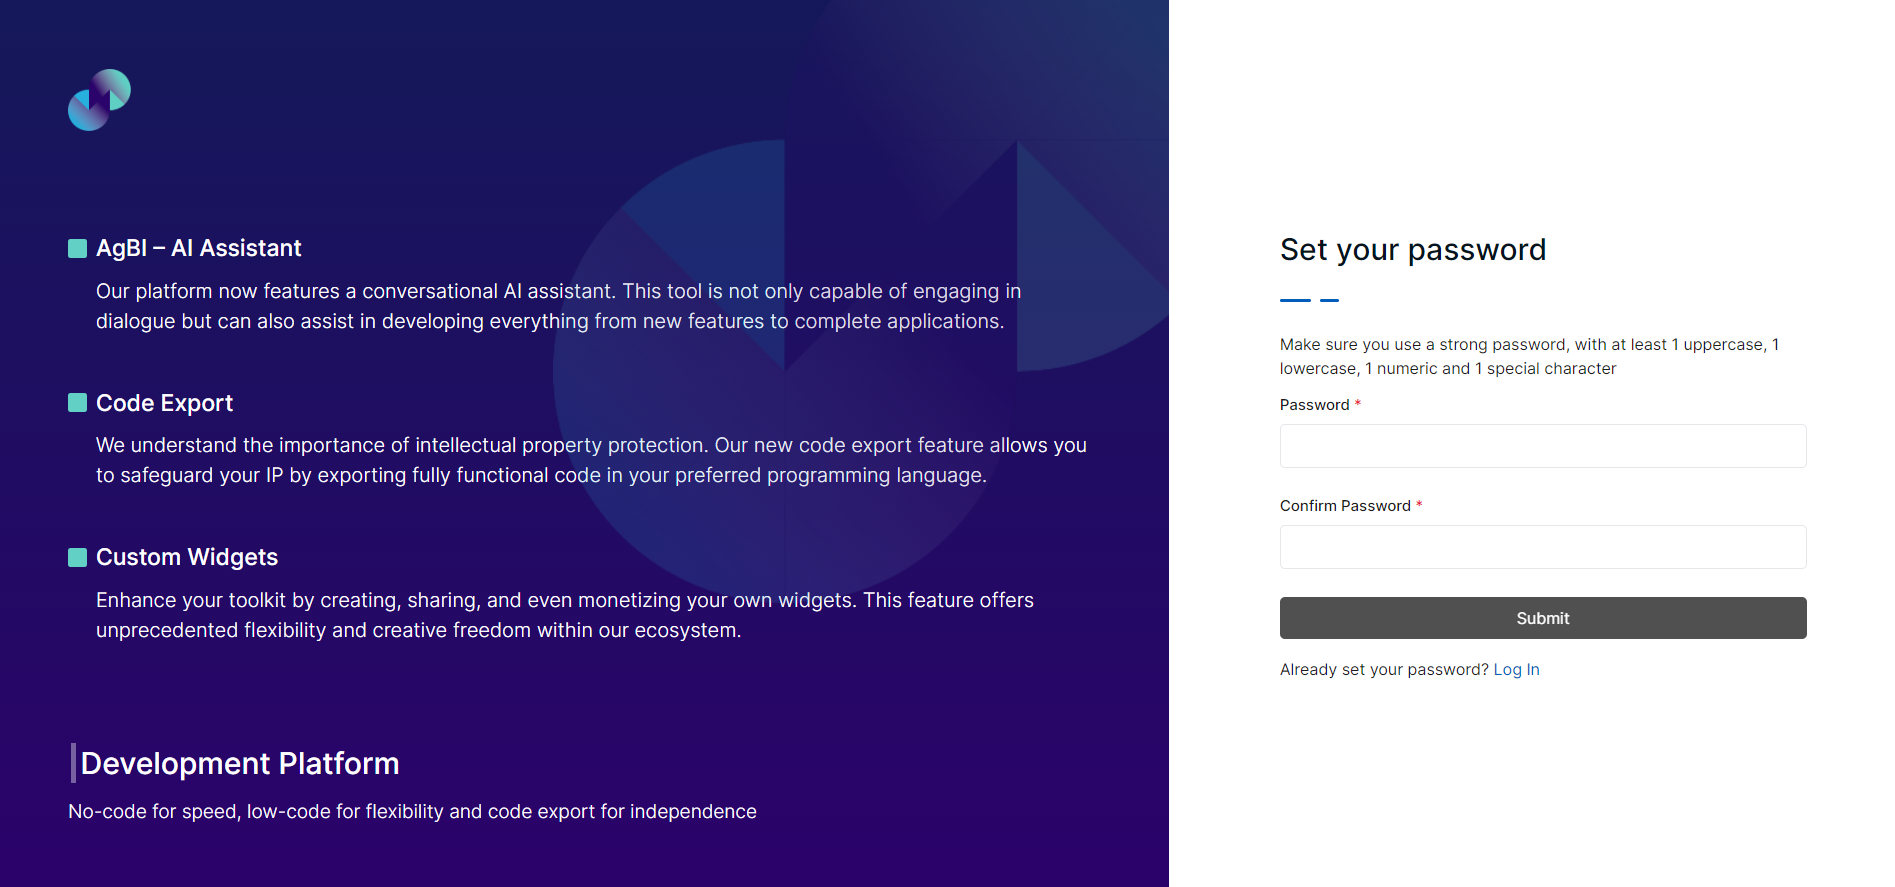
Fig 4: Set Password
You can now login using your set password. Once you login, you will be taken to the landing page of admin portal where you can add new license under Dashboard, create environments under Environments & view billing related information under Billing.
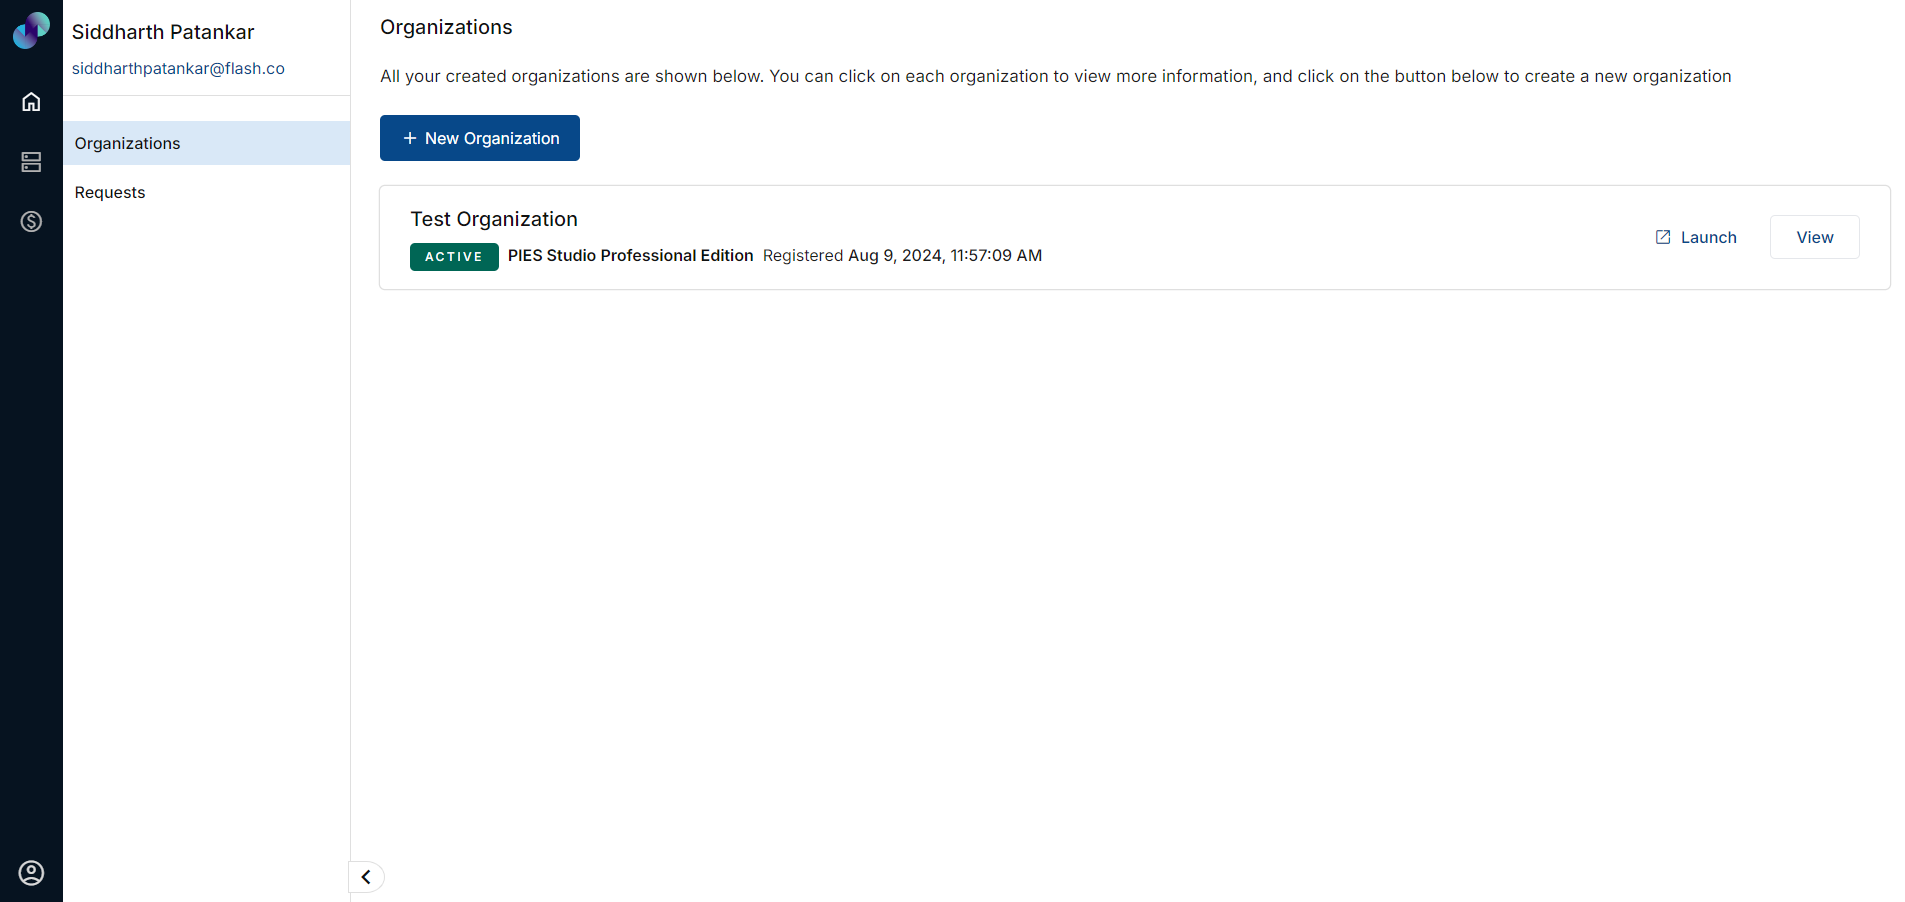
Fig 5: Admin Portal
https://youtu.be/6NC-otAFoVs?si=SbMz2G99_sKwH-q0
Dashboard
In this section, you will be able to create new license & create or view support requests.
Organizations
To create a new license, you can click on New Organization icon. On clicking this icon, you will be taken to pricing details page.
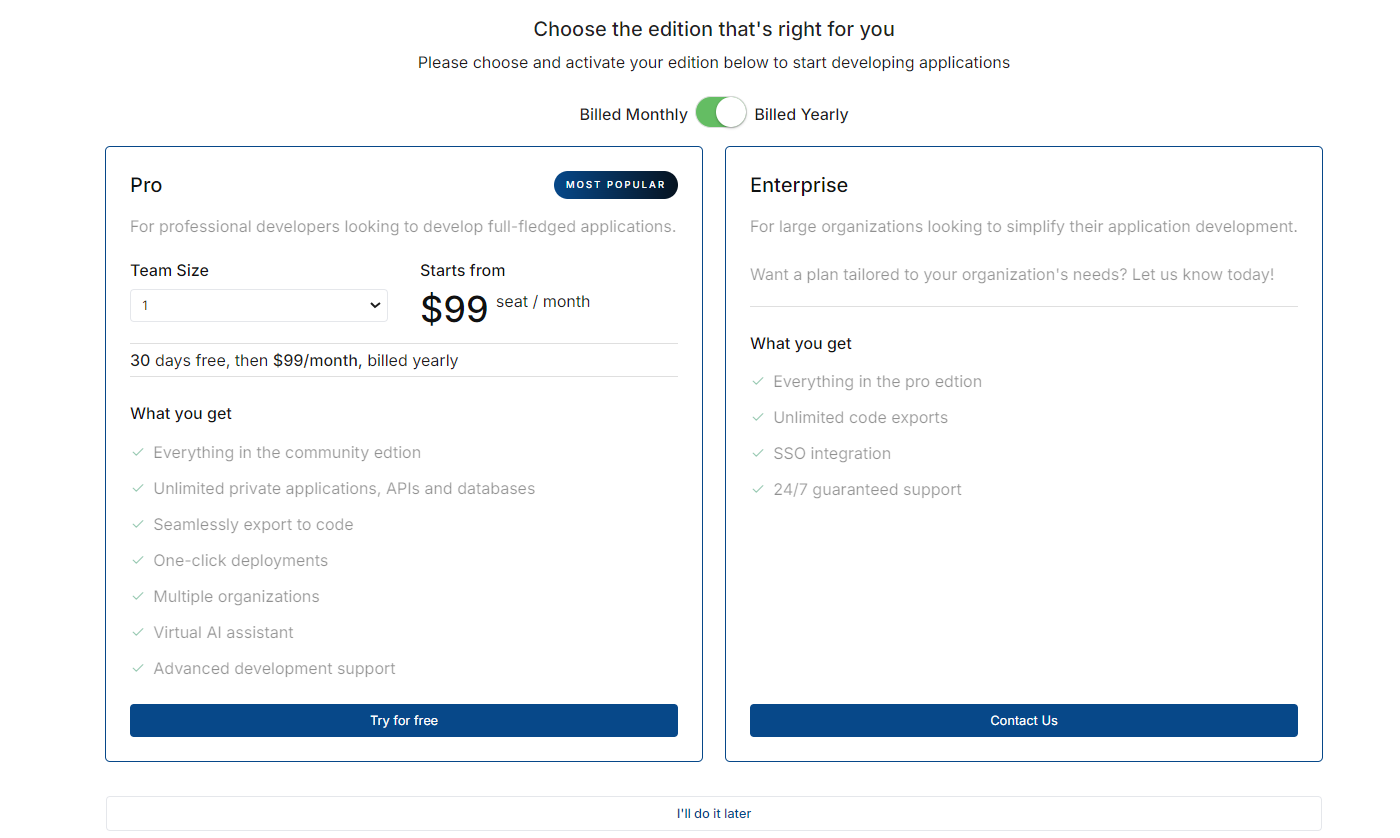
Fig 6: Pricing Details
You can choose between Monthly & Yearly billing using the toggle switch in this page. We support two types of pricing editions. Pro & Enterprise versions. At the moment, you can straight away try Pro edition and if you are an organization who needs support in simplifying application development, with SSO Integration & 24x7 support, you can contact us for Enterprise edition.
Pro license will be linked to an organization. You can create multiple licenses on organization level.
Under Pro Edition, you will be billed based on team size, which will be an X amount per user per month. The standard team size that we support is, 1,5,15,30 & >30. The pricing will change depending upon the number of users you select under Team Size dropdown. If you select 1, the user will get a 30 days free trial, post which the said charges will be applicable and the users will have to subscribe for it.
When you click Try for free or Subscribe Now button, a popup will appear to provide below subscription details.
Organization Details:
Name - An input field to provide your organization name. Providing an organization name will help you differentiate between organizations, when you have multiple such organizations.
Domain - An input field to specify a domain name for your PIES studio portal. When you provide a domain name, system will check for name availability. If the domain name is available, you can go ahead with the subscription. Else, you need to try different domain names. When license purchase is successful, PIES studio environment will be available at domain@pies.studio.
Billing Details:
This section will show you the number of users or the team size that you selected in the pricing details page.
Plan Details:
In this section, you can verify the selected plan or edition, billing cycle and the total cost.
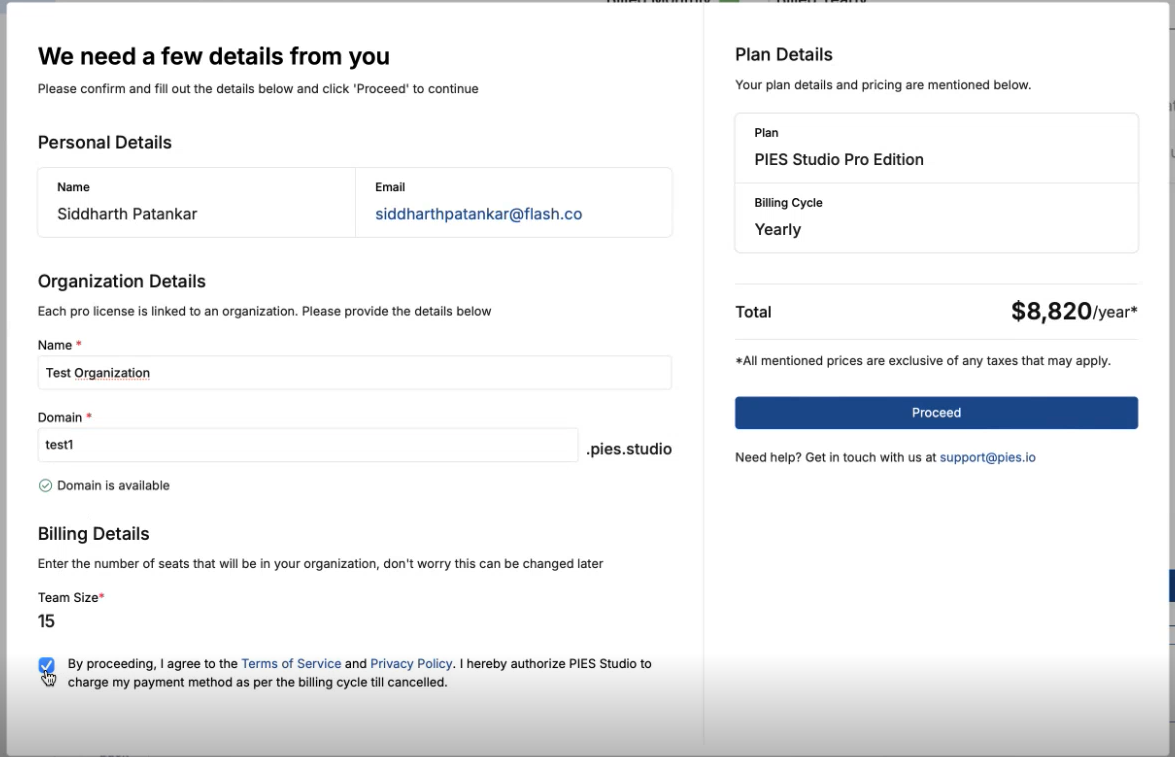
Fig 7: Subscription Details
When you accept the license terms & click Proceed button, you will be redirected to payments page to provide card details and complete payment.
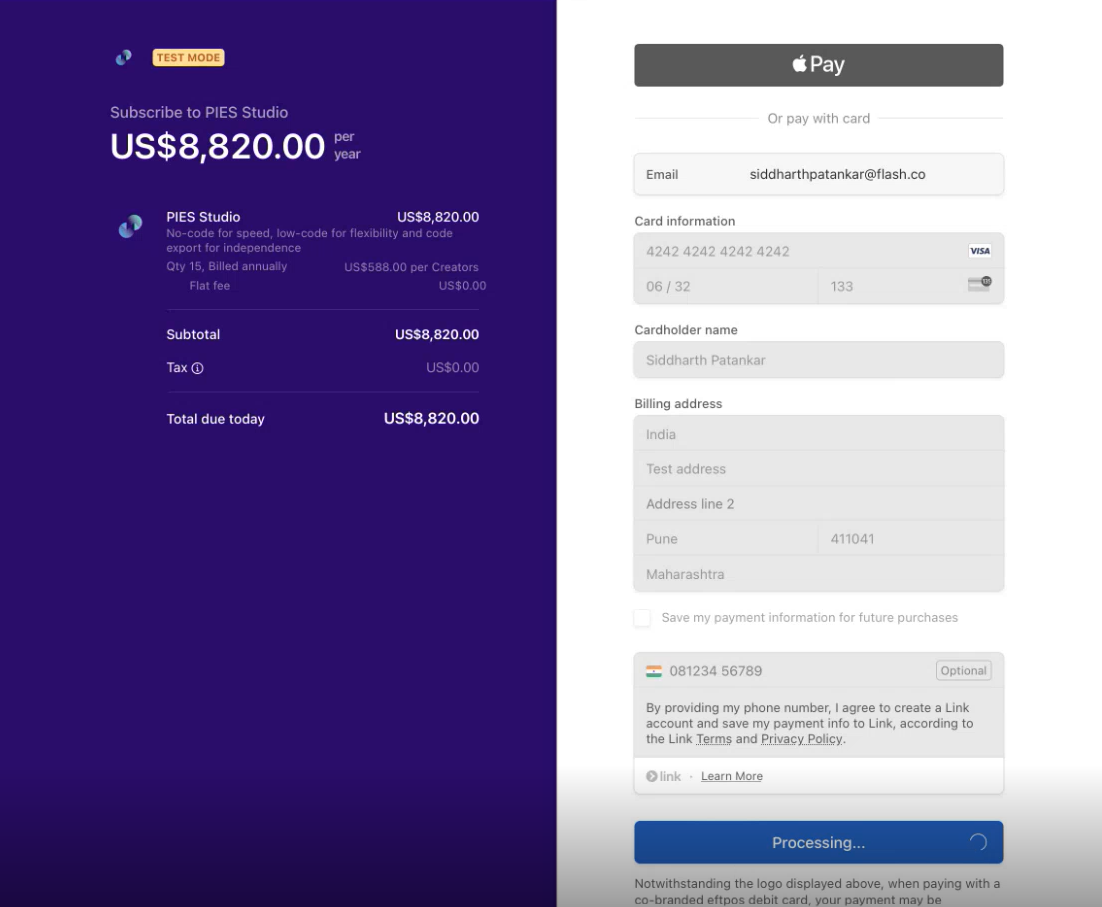
Fig 8: Payments Page
When invoice is generated, you will get notification email regarding your purchase. Once payment is successful, you will be redirected to admin portal. Here, under Organizations, you will be able to find the activated license.

Fig 9: Activated License
When you click on Launch button against a desired license, system will launch the created environment. When you click on View against a desired license, you will be taken to license details page.
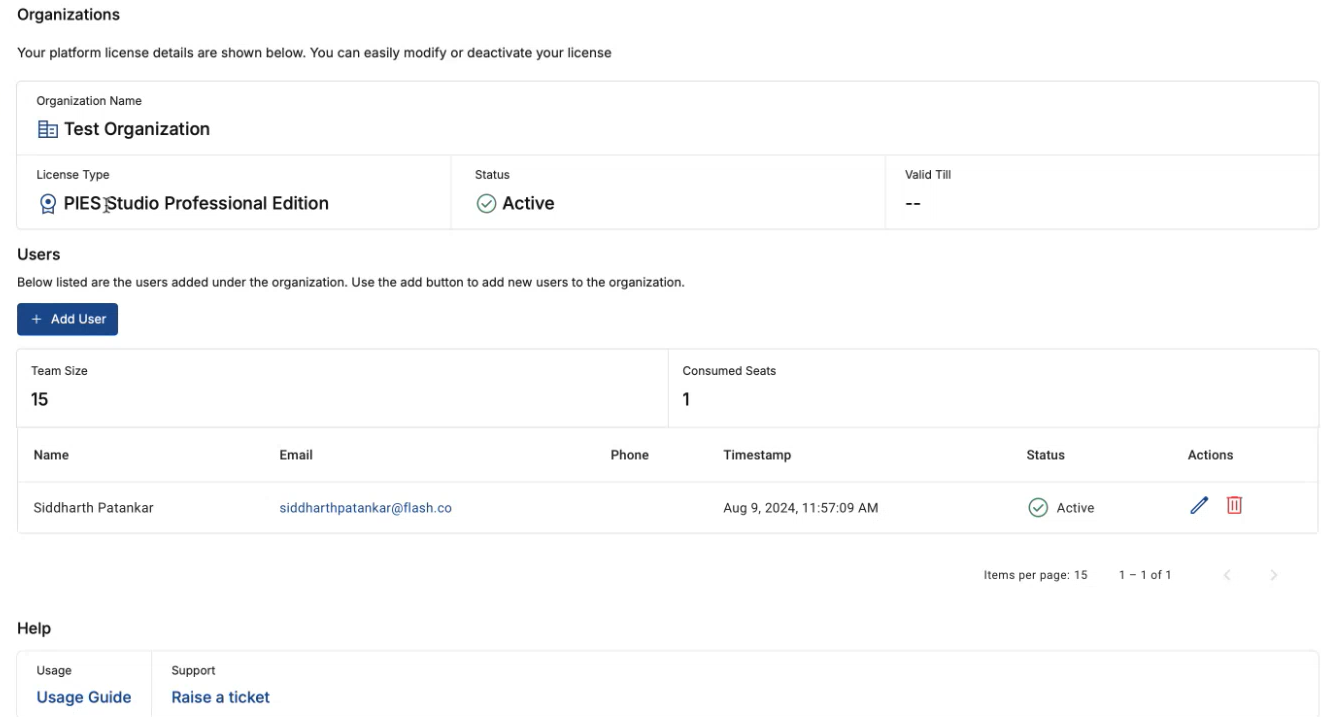
Fig 10: View License Details
View License Details
Users
In this section, you will be able to add users and view the number of users added under the selected license/organization. Team Size is the total number of users you selected during license creation. Consumed Seats represent the active users in the organization.

Fig 11: Users
To add a new user, click on Add User button. Add User popup will appear. Enter the email address of users under User/s field and select Invite “email address” from the dropdown. You can add multiple email addresses in this field. Choose user role in Role dropdown. You will get two options here - Administrator & Developer. If you choose Administrator, the selected user will have all the admin rights to the PIES studio environment with which they can create, edit or maintain the same. If you choose Developer, you will get one more field called Purchases. Here, you can choose to allow purchase access to the users or restrict based on requirement. Using this purchase access, developers will be able to make purchases from PIES studio like, deploying application or exporting code.
You can only add users using their email address.
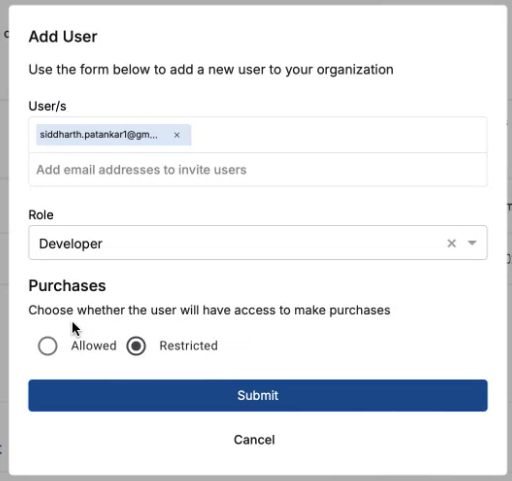
Fig 12: Add User popup
When you click Submit button, user will be added to the organization and Consumed Seats count will increase based on the number of users added. Added user will receive an invite to join PIES studio in the provided email address. The added user must register, in order for the user’s account to be activated. Until then, the status of user will be Pending.
You can also edit the user access by clicking pencil icon against desired user or delete the user by clicking delete icon against desired user.
When the number of users added is almost equal to the team size, admin will get a warning on the increased number of users and they will get an Upgrade button to increase the team size. Admins can use this option to increase team size or upgrade license.

Fig 13: Consumed Seats
Help

Fig 14: Help
Usage - Here, you will be able to find Usage Guide link. Clicking on this link will direct you to PIES Studio User Guide
Support - Here, you will get Raise a ticket link, with which you will be able to raise tickets in case of queries or if you wish to deactivate license or upgrade license. On clicking this link, Create Request popup will appear with below fields,
Type - A dropdown field to choose the type of request. You will have three options to choose from, Support, Upgrade & Deactivate. You can choose the type depending on your request.
Description - An input field to provide a brief description to your ticket.
On clicking Submit button, request will be sent to PIES support team and addressed. You can track your requests under Requests section.
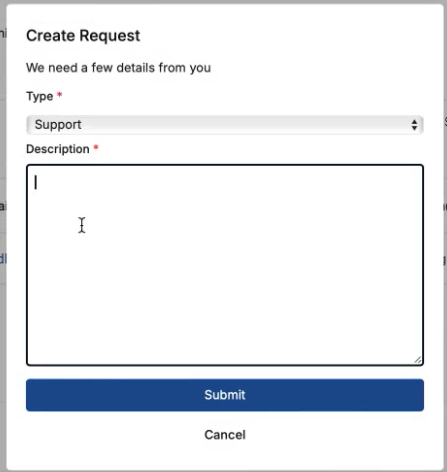
Fig 15: Raise a ticket
Requests
In this section, you will be able to raise tickets in case of any query or if you wish to deactivate license or upgrade license - same as Raise a ticket under Help section when you view an existing license. To create a ticket, click on New Request button.

Fig 16: Requests
Create Request popup will appear with below fields,
Type - A dropdown field to choose the type of request. You will have three options to choose from, Support, Upgrade & Deactivate. You can choose the type depending on your request.
Description - An input field to provide a brief description to your ticket.
On clicking Submit button, request will be sent to PIES support team and addressed.
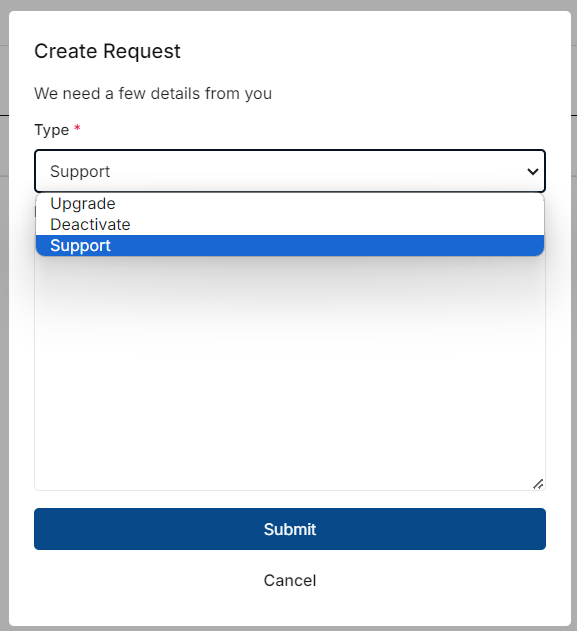
Fig 17: Create Request popup
Raised requests will appear right below New Request button. You can track your requests in this section itself.
https://youtu.be/w_ec6S99B_g?si=amL3beEK38OPoLOi
Environments
Environments are virtual machines that gets created on PIES cloud infrastructure. You must create environments in order for the developers to deploy applications in created environments. You can deploy multiple applications in an environment depending upon its storage capacity.
During license registration, if you have chosen 5 or more users under team size, you will get a default environment created which can be reused. This is not applicable if you choose 1 as the team size because, the user will have 30 days free trail & during this period, they won't be charged. Once free trial is over, they can go ahead and create new environments.

Fig 18: Default Environment
Create Environment
In order to create a new environment, click on Environments in menu bar. Under Overview, click on Create Environment button. You will be taken to environment details page to provide below details,
Location
A dropdown field to choose a desired location where the environment or virtual machine gets deployed.
Environment Type
We support environments with different specifications varying from XS to XL based on storage capacity. You can choose a desired environment type based on the number of applications you will deploy in the environment or in simple words, based on the capacity you require.
Specifications
When you select a type under Environment Type, the resource specification for selected environment will appear in this section. Specifications include,
Memory
CPUs
Storage
Below are the resource specifications for different environment types:
XS - Memory 1GB RAM, CPUs 1vCPUs, Storage 4GB
S - Memory 2GB RAM, CPUs 1vCPUs, Storage 4GB
M - Memory 4GB RAM, CPUs 2vCPUs, Storage 8GB
L - Memory 3.5GB RAM, CPUs 1vCPUs, Storage 7GB
XL - Memory 3.5GB RAM, CPUs 1vCPUs, Storage 7GB
If you try to deploy applications which doesn’t have enough storage, the deployments will fail.
IP Address
You can find the public IP address for selected environment in this field. This feature is not fully functional yet.
Details
You must provide an environment name under Name field and a brief description to your environment can be provided under Description field. Description is optional field.
Pricing
Pricing for the selected environment will be displayed in this section. Pricing will vary based on the selected location & type of environment you chose. Billing will be done on monthly basis.
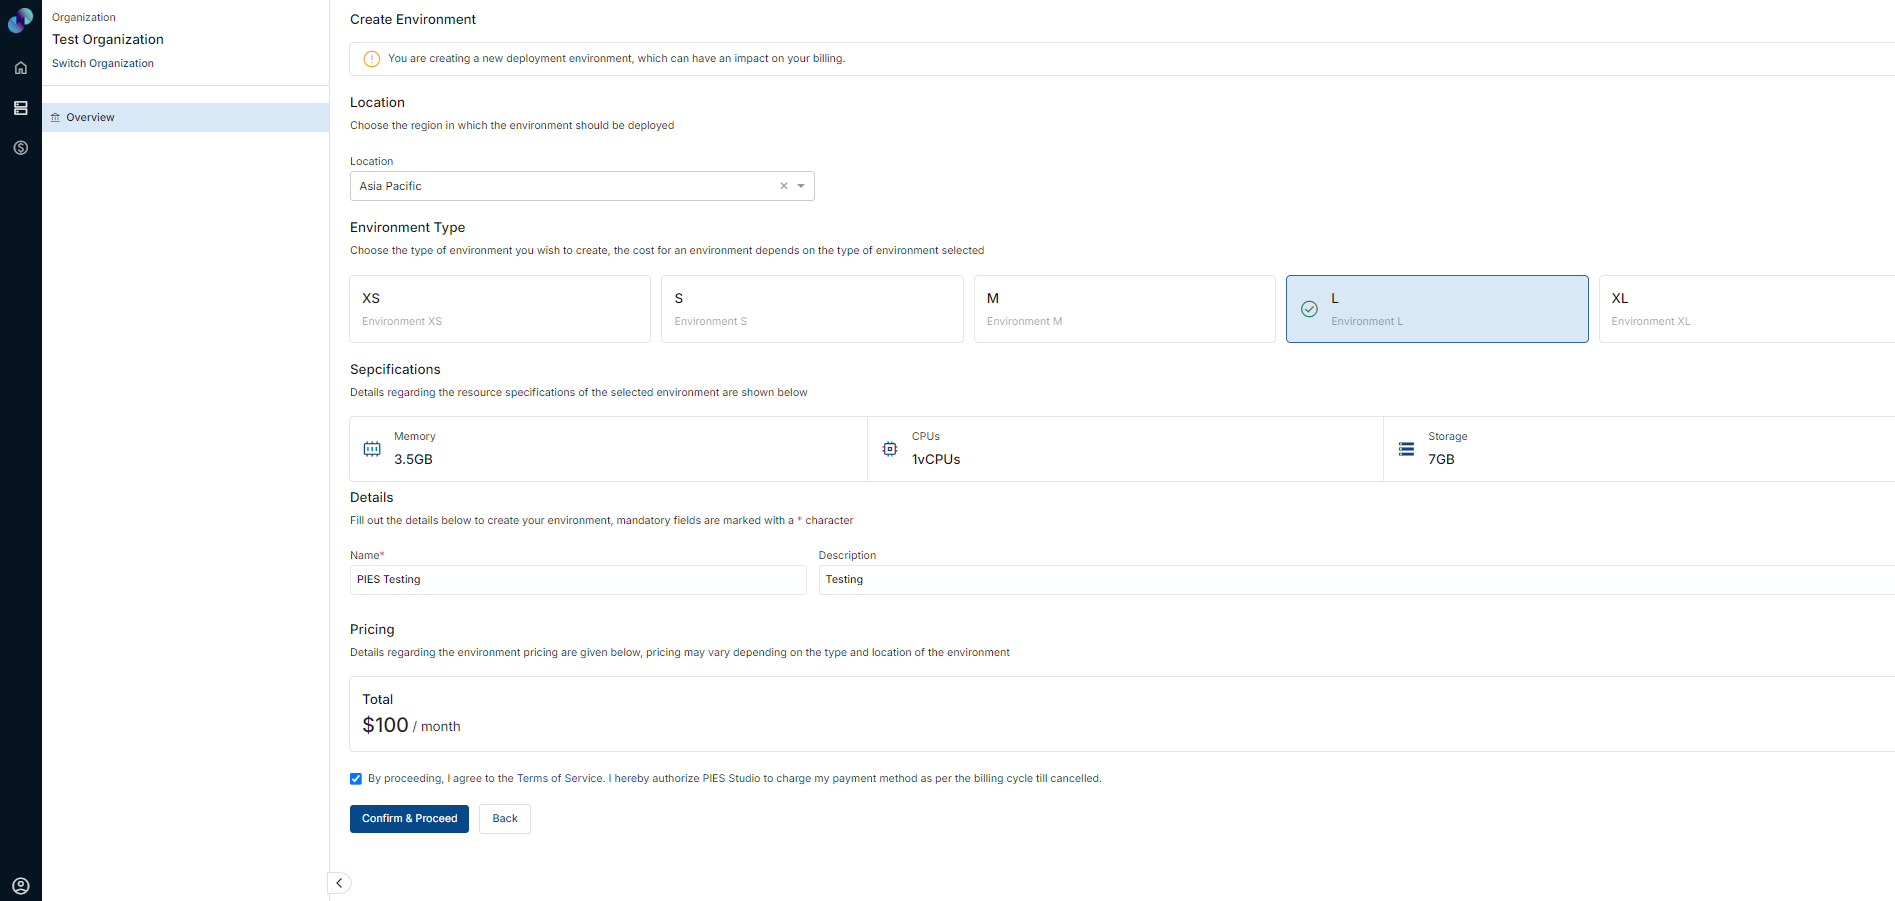
Fig 19: Create Environment
When you click Confirm & Proceed button, you will be redirected to payments page to provide card details and complete payment.
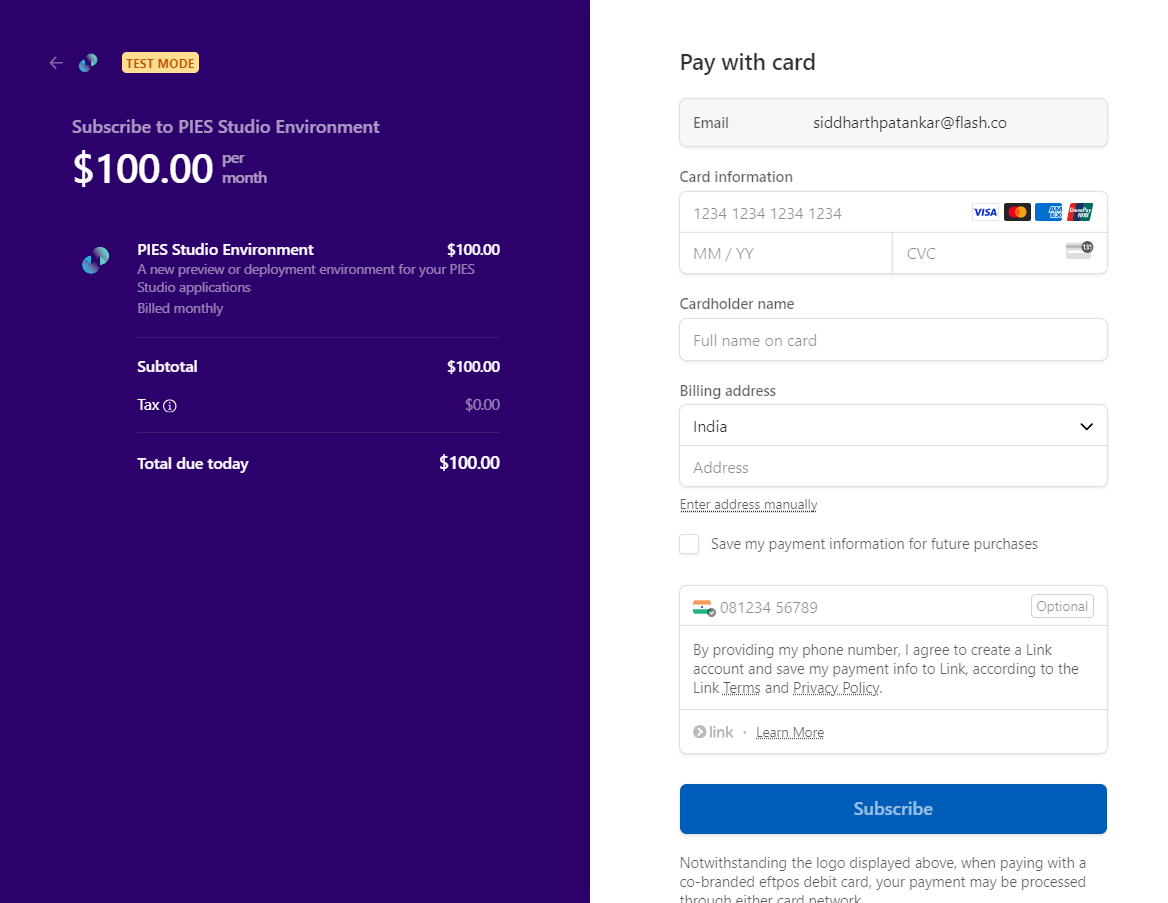
Fig 20: Payments Page
When invoice is generated, you will get notification email regarding your purchase. Once the payment is successful, you will be redirected to admin portal with a success message stating, your purchase was successful. You can view the created environment under Environments. Status of the environment will be Activating. Status will automatically change to Active in a couple of minutes, once the environment is completely setup.

Fig 21: Environment Payment Success
If your environment doesn’t get created for some reason, you can also recreate the failed environment using Retry option.
Environment Details
When you click on View Environment icon under Actions, you will be taken to the selected environment details page. Here, you will be able to see all the specifications related to selected environment.
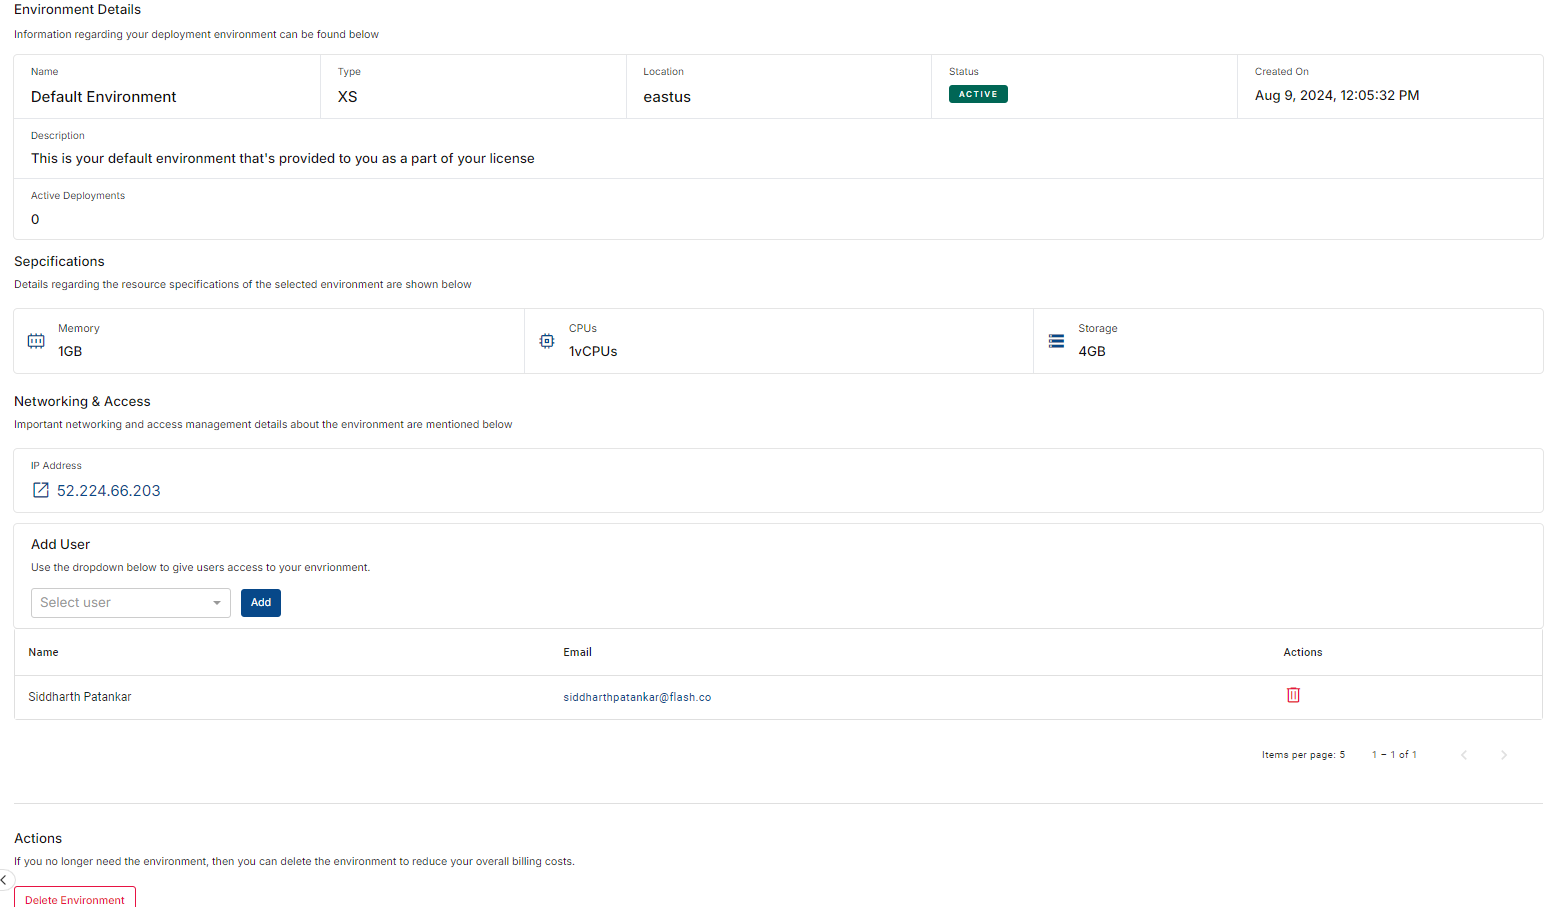
Fig 22: Environment Details
Add User
This is the access control section of your environment. Here, you will be able to add new users to the environment or delete existing user.
To add a new user, select a user from Select User dropdown. This dropdown consists of all the users from selected organization. Click Add. The selected user will get added and granted access to this environment. Users will be able to deploy applications in an environment, only if they access to the selected environment.
To delete a user, click on delete icon against desired user. You will get a confirmation popup. Upon confirmation, the selected user will no longer have access to the environment.
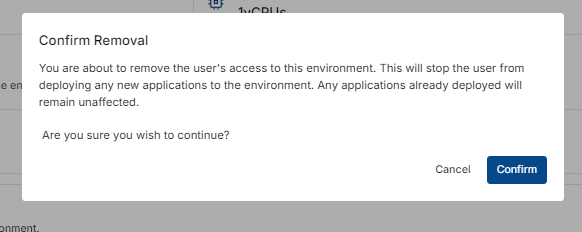
Fig 23: Delete User Popup
Actions
You can delete the selected environment using this section, if you are no longer using it. When you click on Delete Environment button, you will get Confirm Deletion popup. Upon confirmation, the environment will be scheduled for deletion. You will still be able to use the environment until your current subscription ends. From your next billing cycle, your environment will be deleted completely and can’t be used.
Deleting an environment will also delete all the applications deployed in the environment. You can backup your applications during the period when an environment is scheduled for deletion.
You will see the below message in Environment Details page when it’s scheduled for deletion.

Fig 24: Scheduled for deletion
If you wish to cancel deletion or restore the environment before next billing date, you can do so by going to Environment Details page of the desired environment and under Actions, you will find a button called Restore Environment.

Fig 25: Restore Environment
When you click on Restore Environment button, you will get a confirmation popup. Upon confirmation, the environment will be restored and scheduled deletion will be cancelled. Restoring an environment will also resume its billing from upcoming billing cycle.
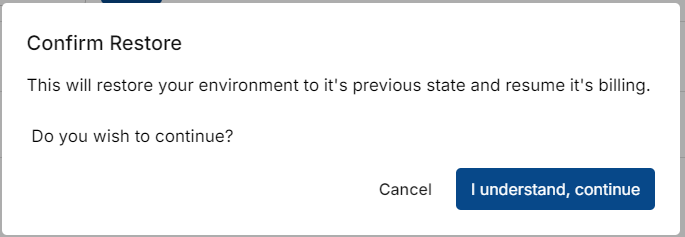
Fig 26: Restore Confirmation
https://youtu.be/M7G0fTPdyXA?si=5qdvxWb9_YX_1zzv
Billing
In this section, you will get the billing cycle of your subscription & transaction history. You can also cancel your subscription from this section.
Overview
This section gives you an overview of subscription details & all the transactions performed in your organization or license.
Billing Overview
Here, you can find your subscription details along with below information,
Subscription ID - This is a unique reference number of your subscription
Edition - The PIES edition that you selected during license creation (Pro or Enterprise)
Next Billing Date - This will be your next billing date by which you have to make payment in order to continue with your subscription
Billing Cycle - This field will give you the type of billing cycle e.g. Annual, Monthly etc
Seats - This is the team size that you selected during license creation. If you have upgraded the team size post license creation, you will get the upgraded count here
Status - Here, you will be able to see the status of your subscription
Transaction History
You can find the history of all the transactions performed in your license or organization. This includes transactions performed in admin portal and also the transactions performed in PIES studio by developers like code export & application deployments.

Fig 27: Billing - Overview
Settings
Here, you can see the payment methods added so far. Upto 5 payment methods are allowed, however, you need to have atleast 1 active payment method.
Actions
In this section, you will be able to cancel your subscription. When you cancel your subscription, all the deployed applications and environments you created in the selected license will also be deleted.
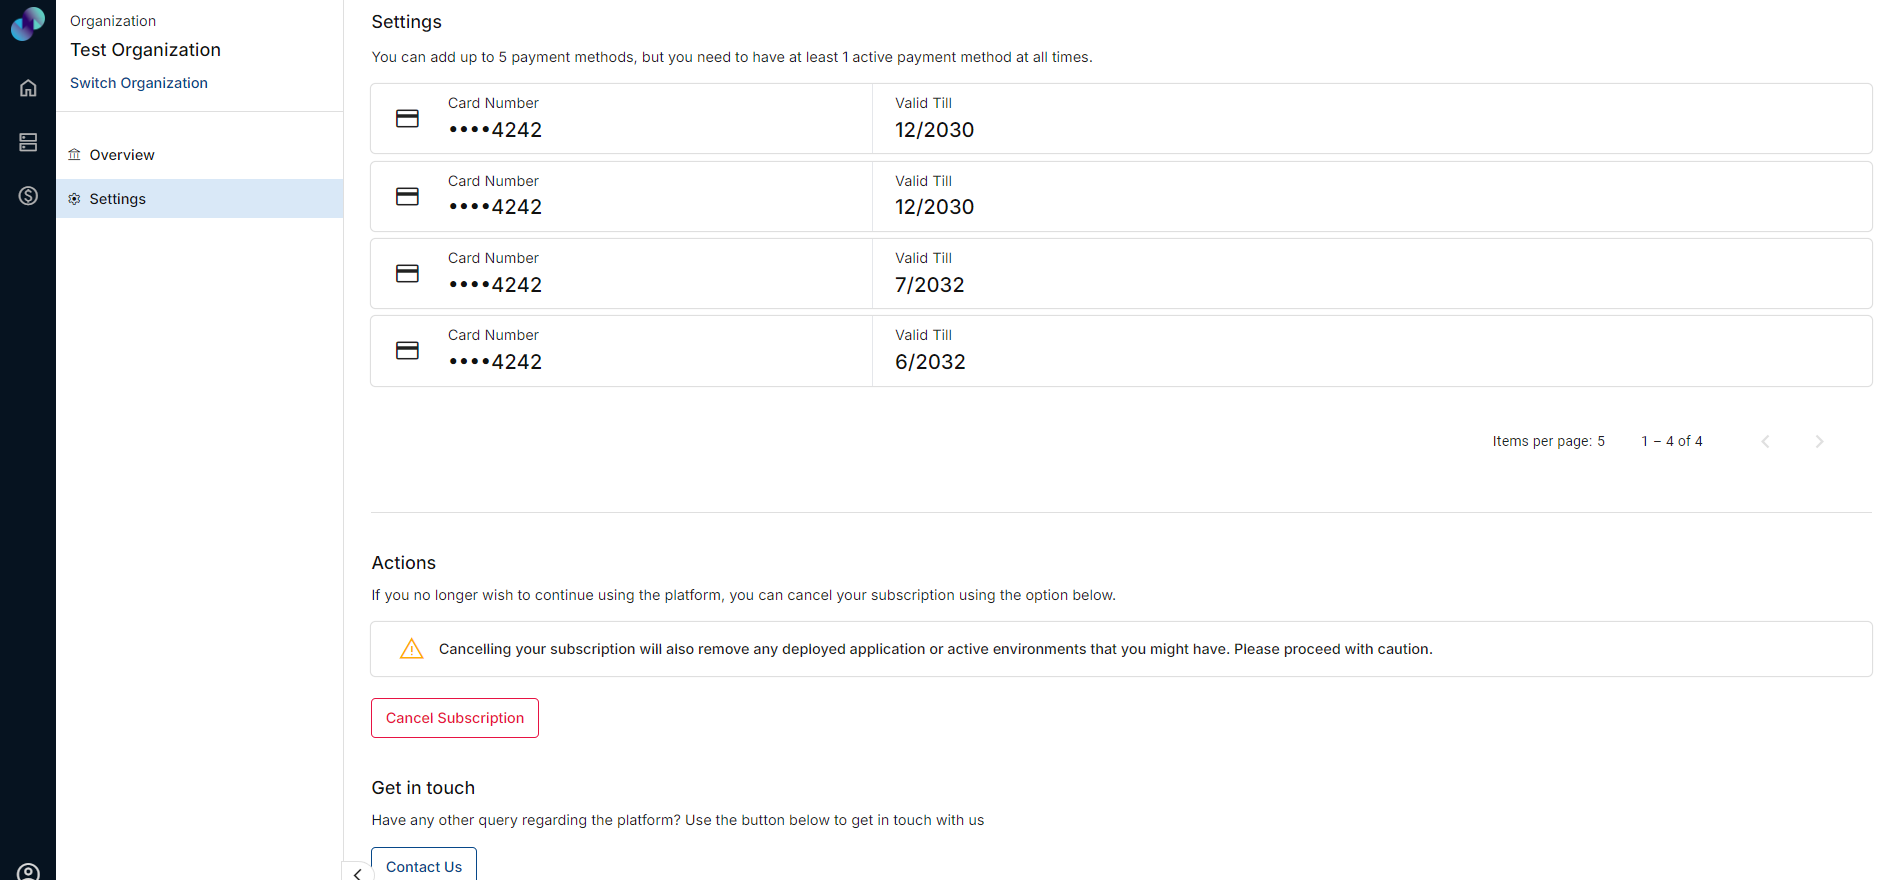
Fig 28: Billing - Settings
When you click on Cancel Subscription button, you will get a confirmation popup stating, cancelling the subscription will also cancel active deployments and delete the deployment environments in the license. On clicking I understand, cancel my license, your license will be cancelled and all the active deployments and environments will also be deleted.
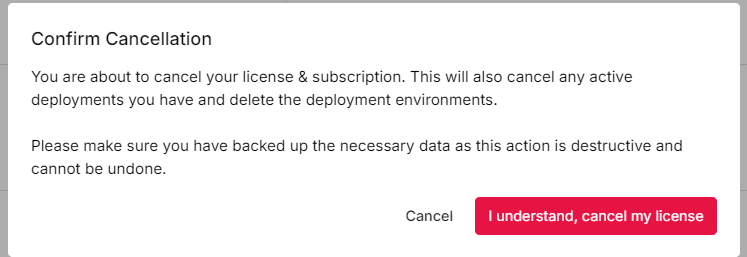
Fig 29: Cancellation Popup
Cancellation is prorated. If you cancel an active license, you will be able to use the license until next billing date and the license gets cancelled from next billing cycle.
Get in touch
You will be able to raise tickets in case of any query or if you wish to deactivate license or upgrade license in this section. If you click on Contact Us button, you will get Create Request popup with below fields,
Type - A dropdown field to choose the type of request. You will have three options to choose from, Support, Upgrade & Deactivate. You can choose the type depending on your request.
Description - An input field to provide a brief description to your ticket.
On clicking Submit button, request will be sent to PIES support team and addressed. Raised requests will appear right below New Request button. You can track your requests under Dashboard - Requests section.

Fig 30: Get in touch

Fig 31: Create Request Popup
