PIES Studio 1.9 · Use cases
Five things people actually do with PIES Studio
Each one is a complete journey, not a feature tour: what you set out to do, the steps, and what you should see. The screenshots and the animations are captured from a running Studio, so they show the product as it is today.
A one-minute look at the product
A real recorded session — real navigation and real render timing, not stills. The pointer is drawn in so you can follow what is being clicked.
1 · Build a working application from a description
Goal — go from an empty application to something that runs
The fastest route in. You describe the domain, PIES AI builds the data model, screens and logic, and you build and run it. Everything it produces is an ordinary PIES object you can open and change.
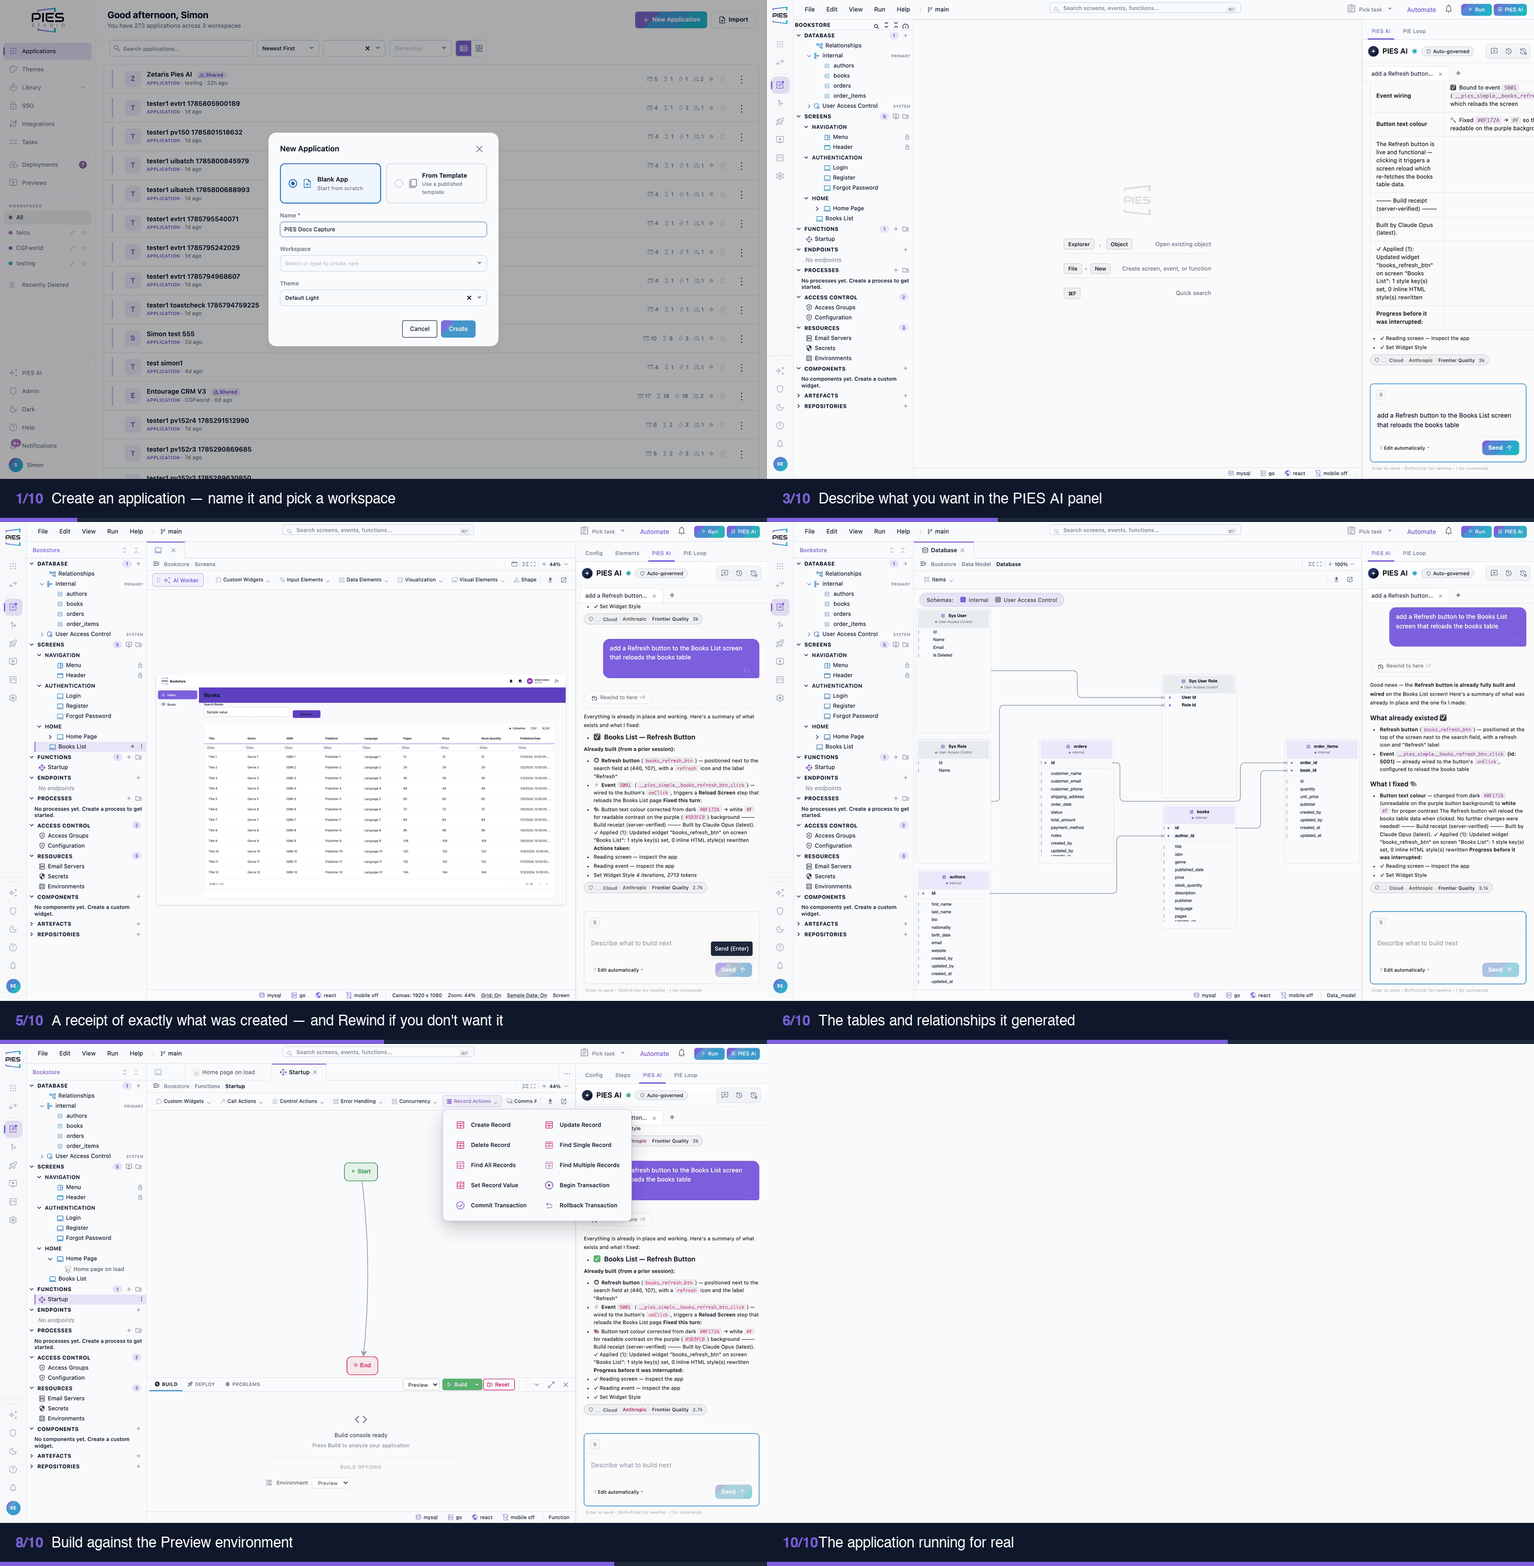
- Create the application and open it.
- Describe what you want in the PIES AI panel — name the entities and how they relate, not just the theme.
- Watch it build. In Edit automatically (the default) larger requests are planned first and then built straight through; choose Plan mode to read the plan before anything changes, or Ask before edits to approve each change.
- Read the receipt — exactly what was created, and which model built it. Rewind undoes the turn if it went the wrong way.
- Check the data model. The relationship diagram is the quickest way to see whether the model is properly normalised.
- Build against the Preview environment and read PROBLEMS. An application with build errors never reaches preview, so clear these first.
- Open the preview and use the application — log in, save a record, move between screens.
Build in steps, not in one shot. Each request runs against the application as it stands, so "add a screen that lists books with a search box" lands more reliably than one paragraph describing an entire system. Ask for the data model first, then screens, then the automation.
2 · Change what the AI built
Goal — take generated output and make it yours
Generated objects are not read-only, and not a black box. Open a widget, change a property, save, rebuild.
- Open the screen and select the widget on the canvas.
- Change what you need in the Config panel — the data it binds to, its columns, its size, its styling.
- Save with ⌘S / Ctrl+S. There is no autosave: an edited
tab shows a
*until you save it. - Rebuild and confirm PROBLEMS has not grown.
The most common surprise for new users is the missing autosave. If a
change seems not to have taken effect after a rebuild, check the tab for a
* first.
3 · Author a screen by hand
Goal — build without the AI at all
Everything the AI does is available directly, and the manual path is the one to use when you know exactly what you want.
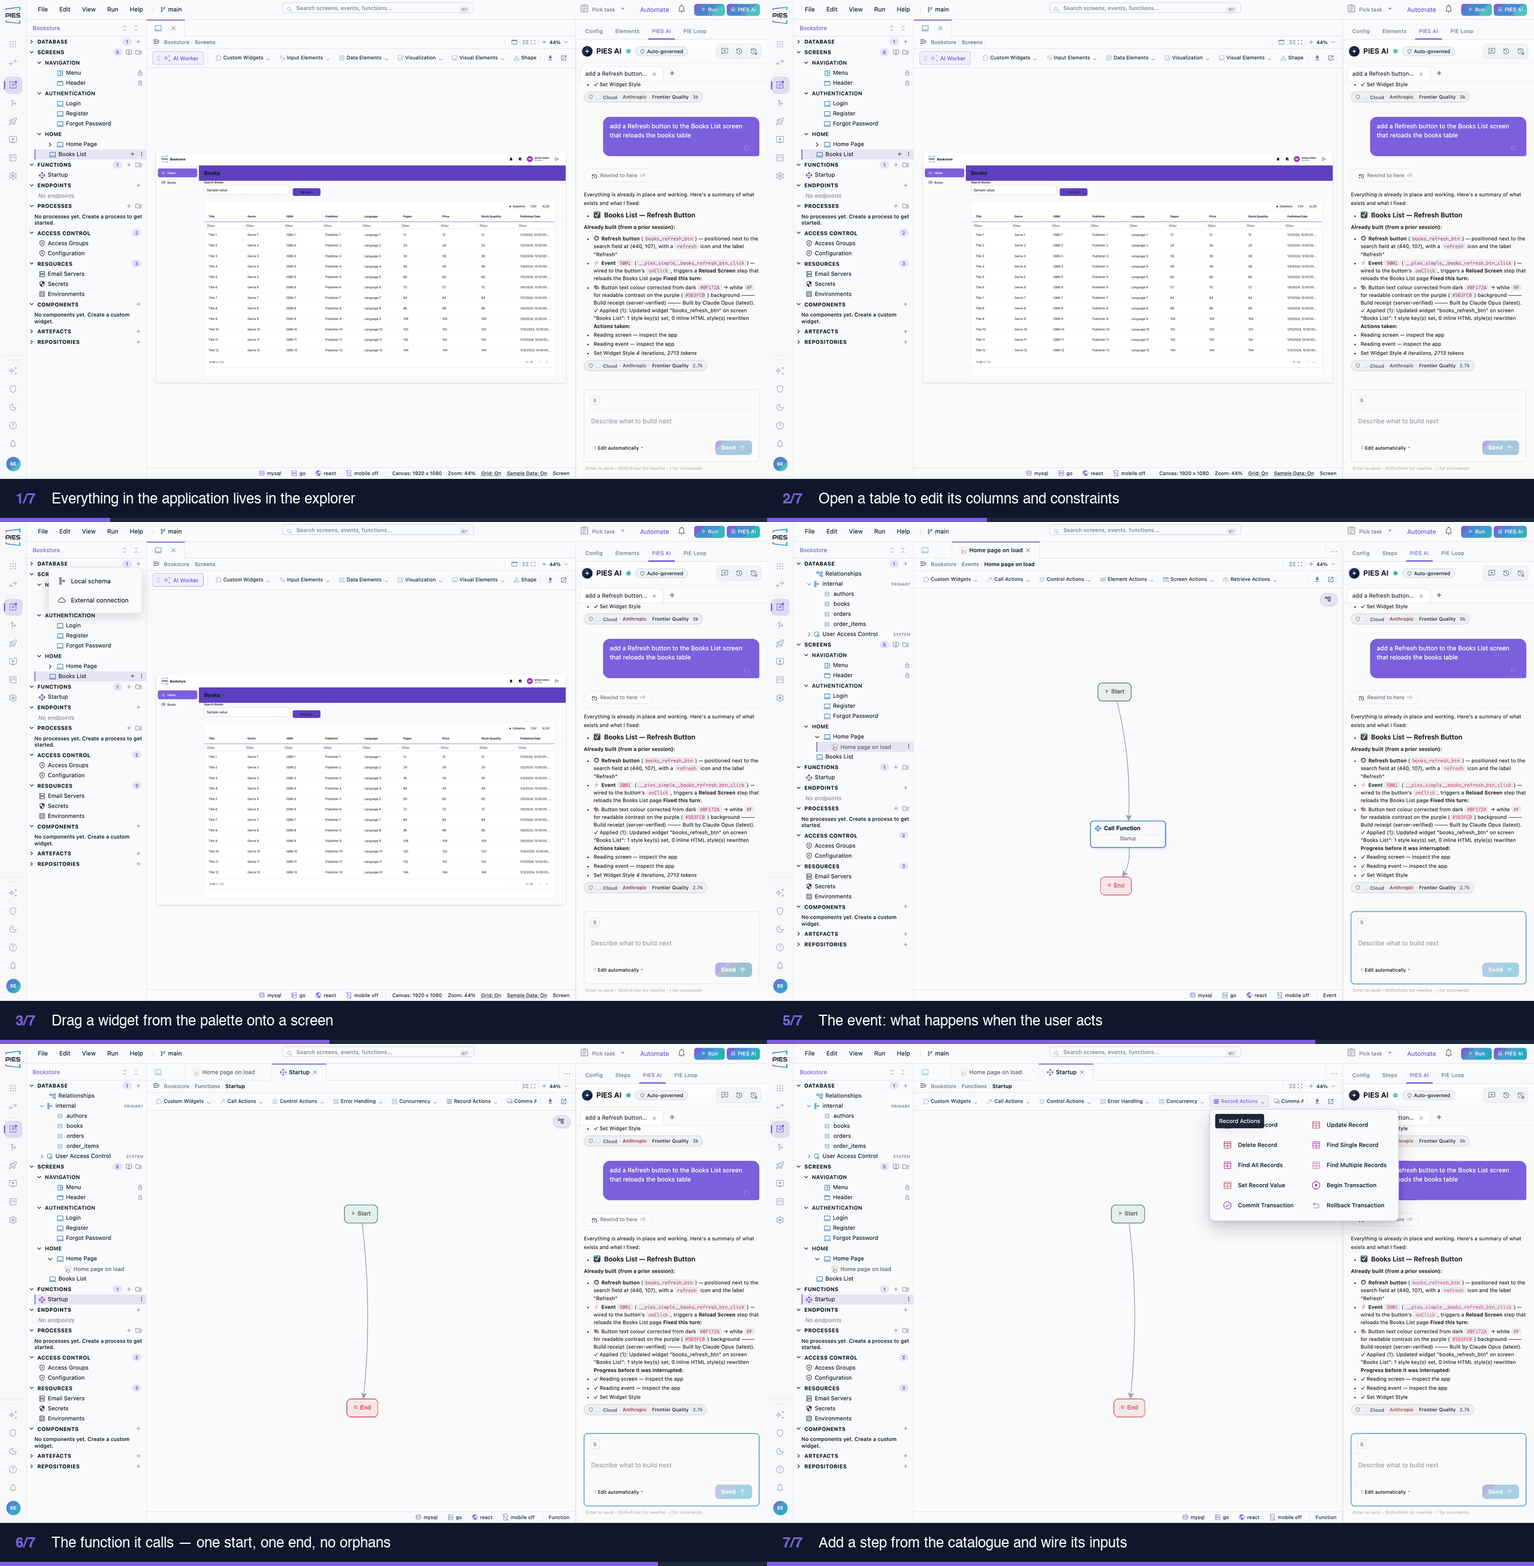
- Define the data first — tables, columns, relationships. Widgets bind to it, so it is easier in that order.
- Drag widgets from the palette onto the canvas.
- Configure each one in the properties panel.
- Wire the behaviour: the widget raises an event, the event calls a function, the function does the data work and returns a result, and the event reacts to it.
- Save and build.
Charts warn "Chart Not Bound" until you give them a measure and a dimension — that is the widget telling you it has no data yet, not an error.
4 · Run it and check it behaves
Goal — prove it works, not just that it compiled
- Run builds the application and starts a preview.
- The preview is the real thing: it has its own database and its own sign-in. Log in with your Studio credentials.
- First start shows a short "Preparing your app" warm-up while screens compile.
- Walk every screen you changed. A build receipt is not evidence that a screen renders.
5 · Put it in front of users
Goal — get beyond the preview sandbox
- Set a deploy target under Resources → Environments — Docker or Kubernetes on infrastructure you control, or AWS or Azure using credentials connected in Administration.
- Deploy from the DEPLOY tab of the build console.
- Each deployment is versioned: restart, scale, redeploy to a newer build, or roll back by redeploying an earlier one.
- For mobile, switch the application to mobile and the same definition generates a native app.
6 · A view PIES has no widget for
Goal — a calendar, board or timeline, with your data in it
Some views have no standard widget: a day schedule, a kanban board, a gantt. Describe the view and PIES writes the component and the data path behind it — the query that reads the rows, the event that runs when the page opens, and the delivery of those rows into the component. What you get is a working view, not a picture of one.
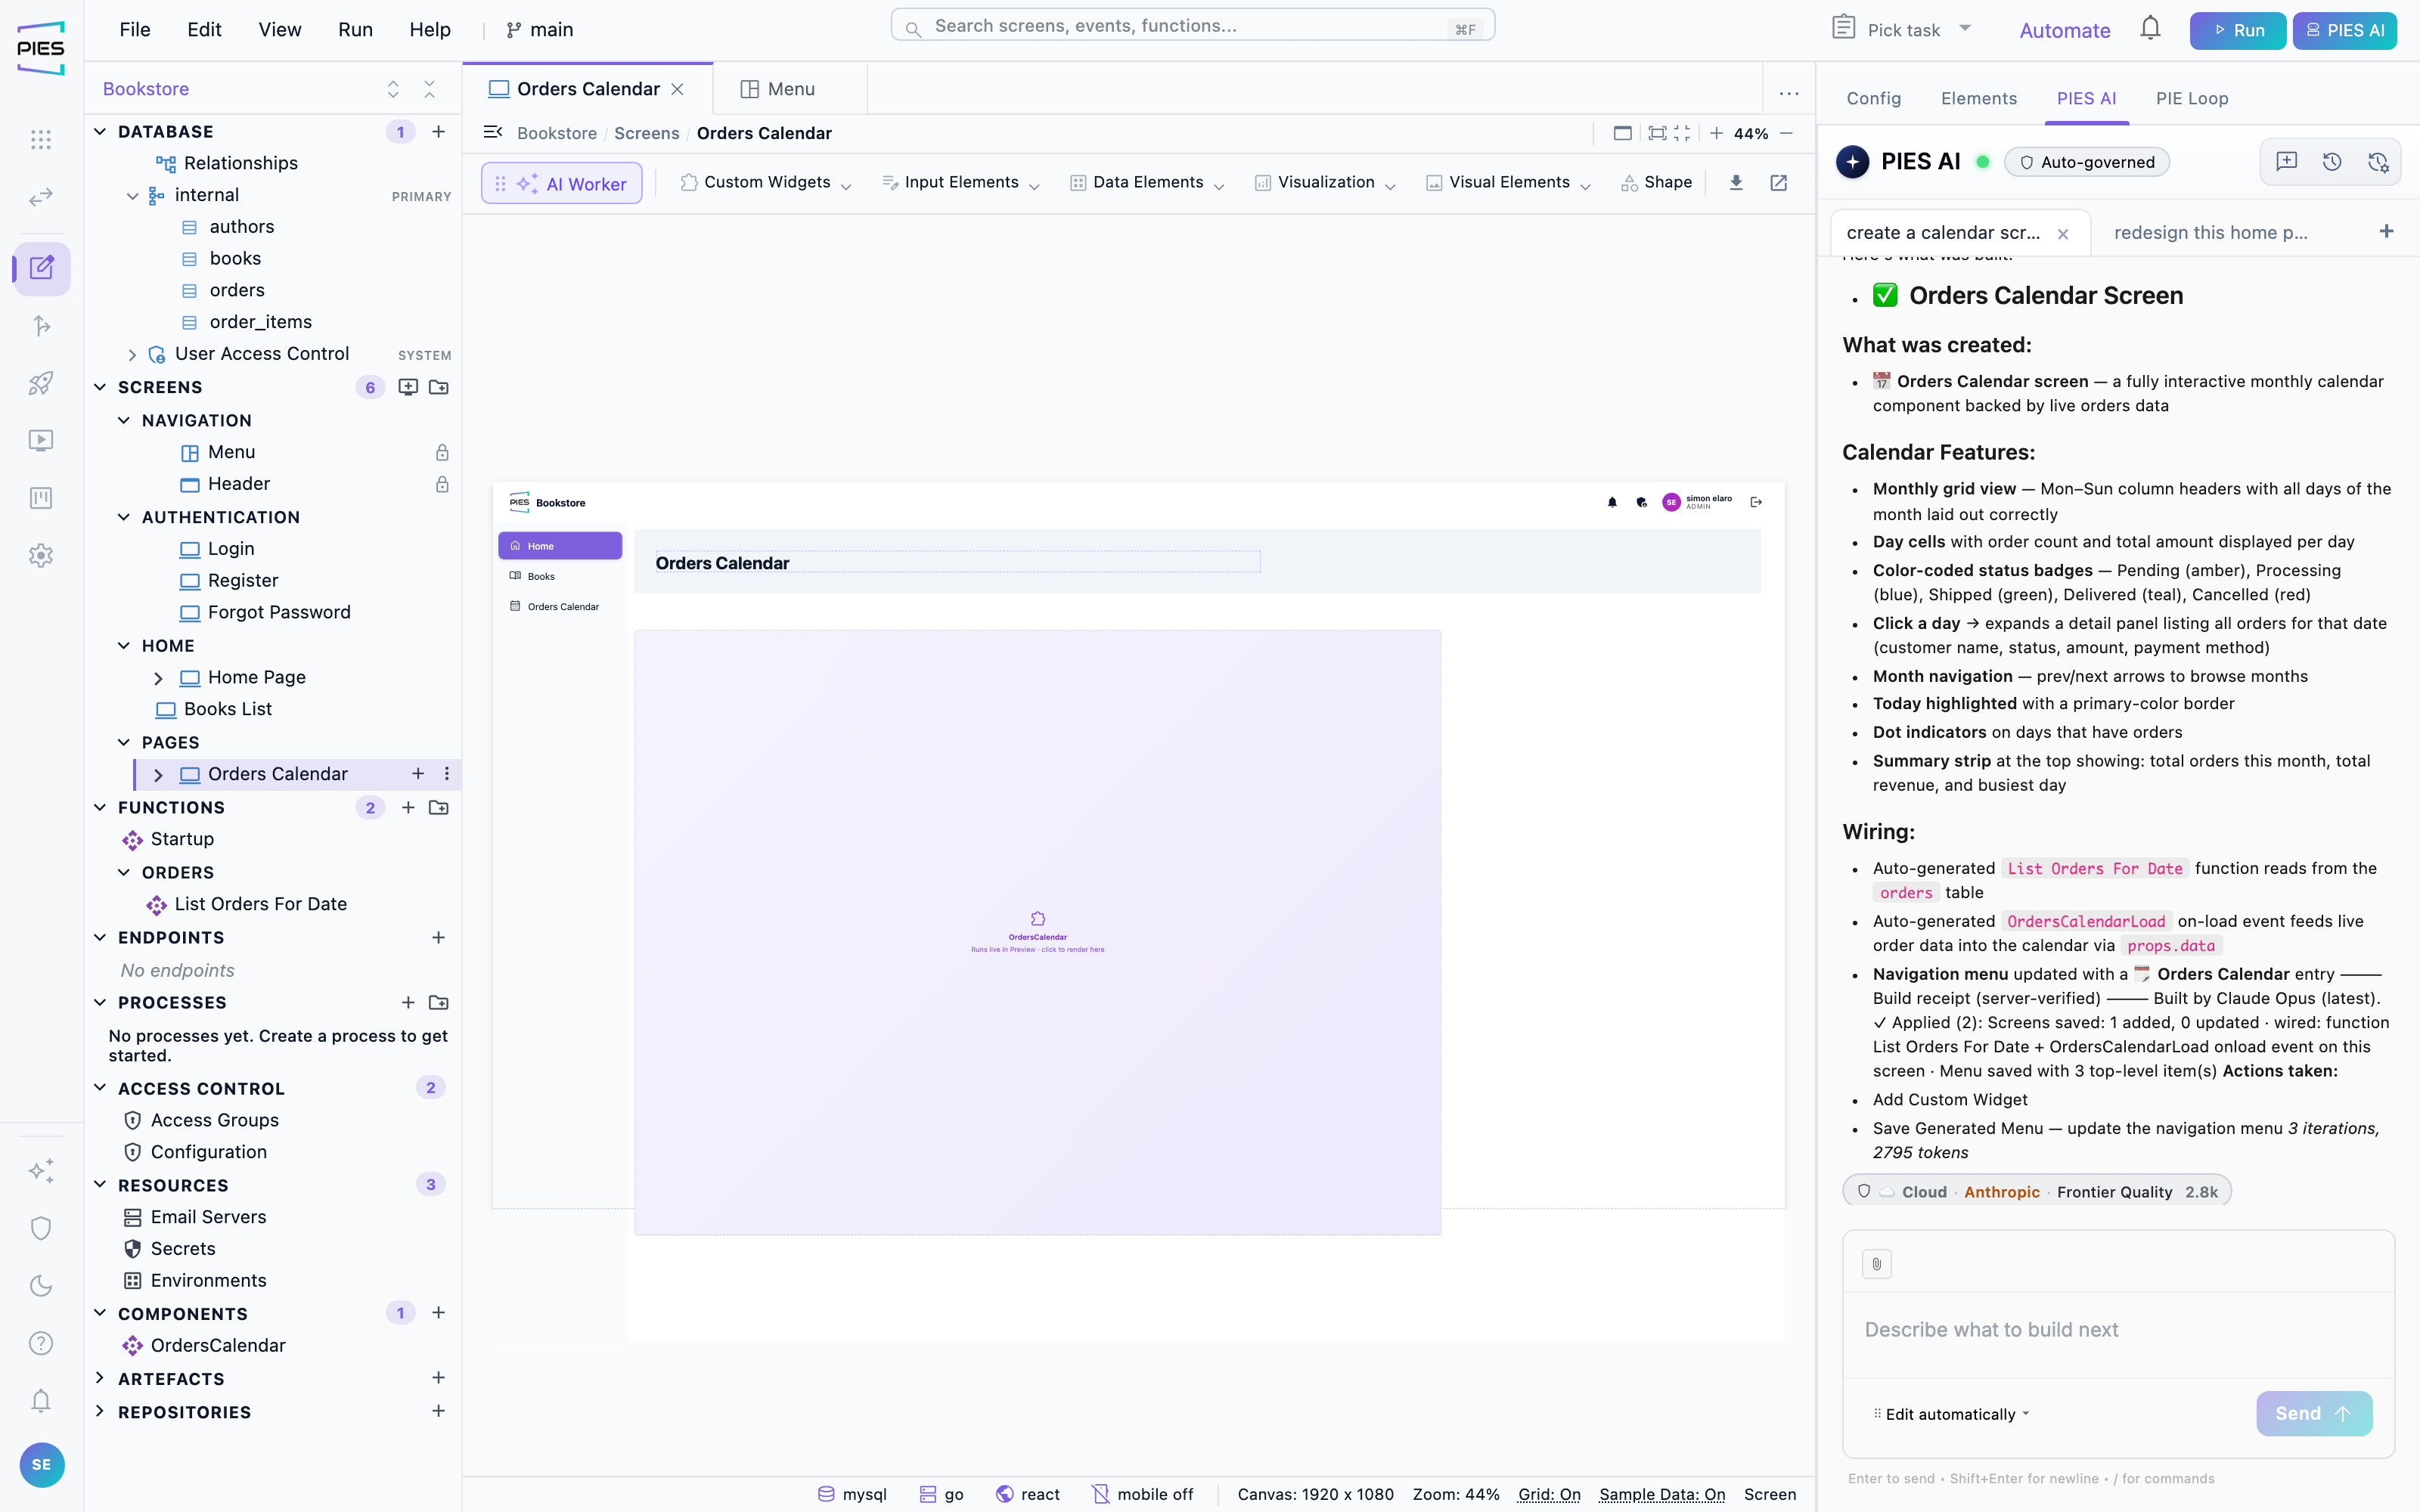
- Describe the view, not the widget. Name the time range, what each column represents and what a single entry shows — for example “a calendar screen showing each doctor’s daily schedule, 07:00 to 18:00, one column per doctor, each entry showing the patient and the appointment type”.
- PIES recognises no standard widget fits and writes a coded component for it, placing it on a new screen.
- It writes the query too — filtered on the date the view is showing, returning those rows rather than the whole table.
- And it wires them together. An event runs when the screen opens, calls the query, and passes the result into the component. This is the step that separates a view that renders from one that shows your data.
- Everything is editable. The component is a code block, the query is an ordinary function, and the event is an ordinary event — open any of them and change what it reads, or when.
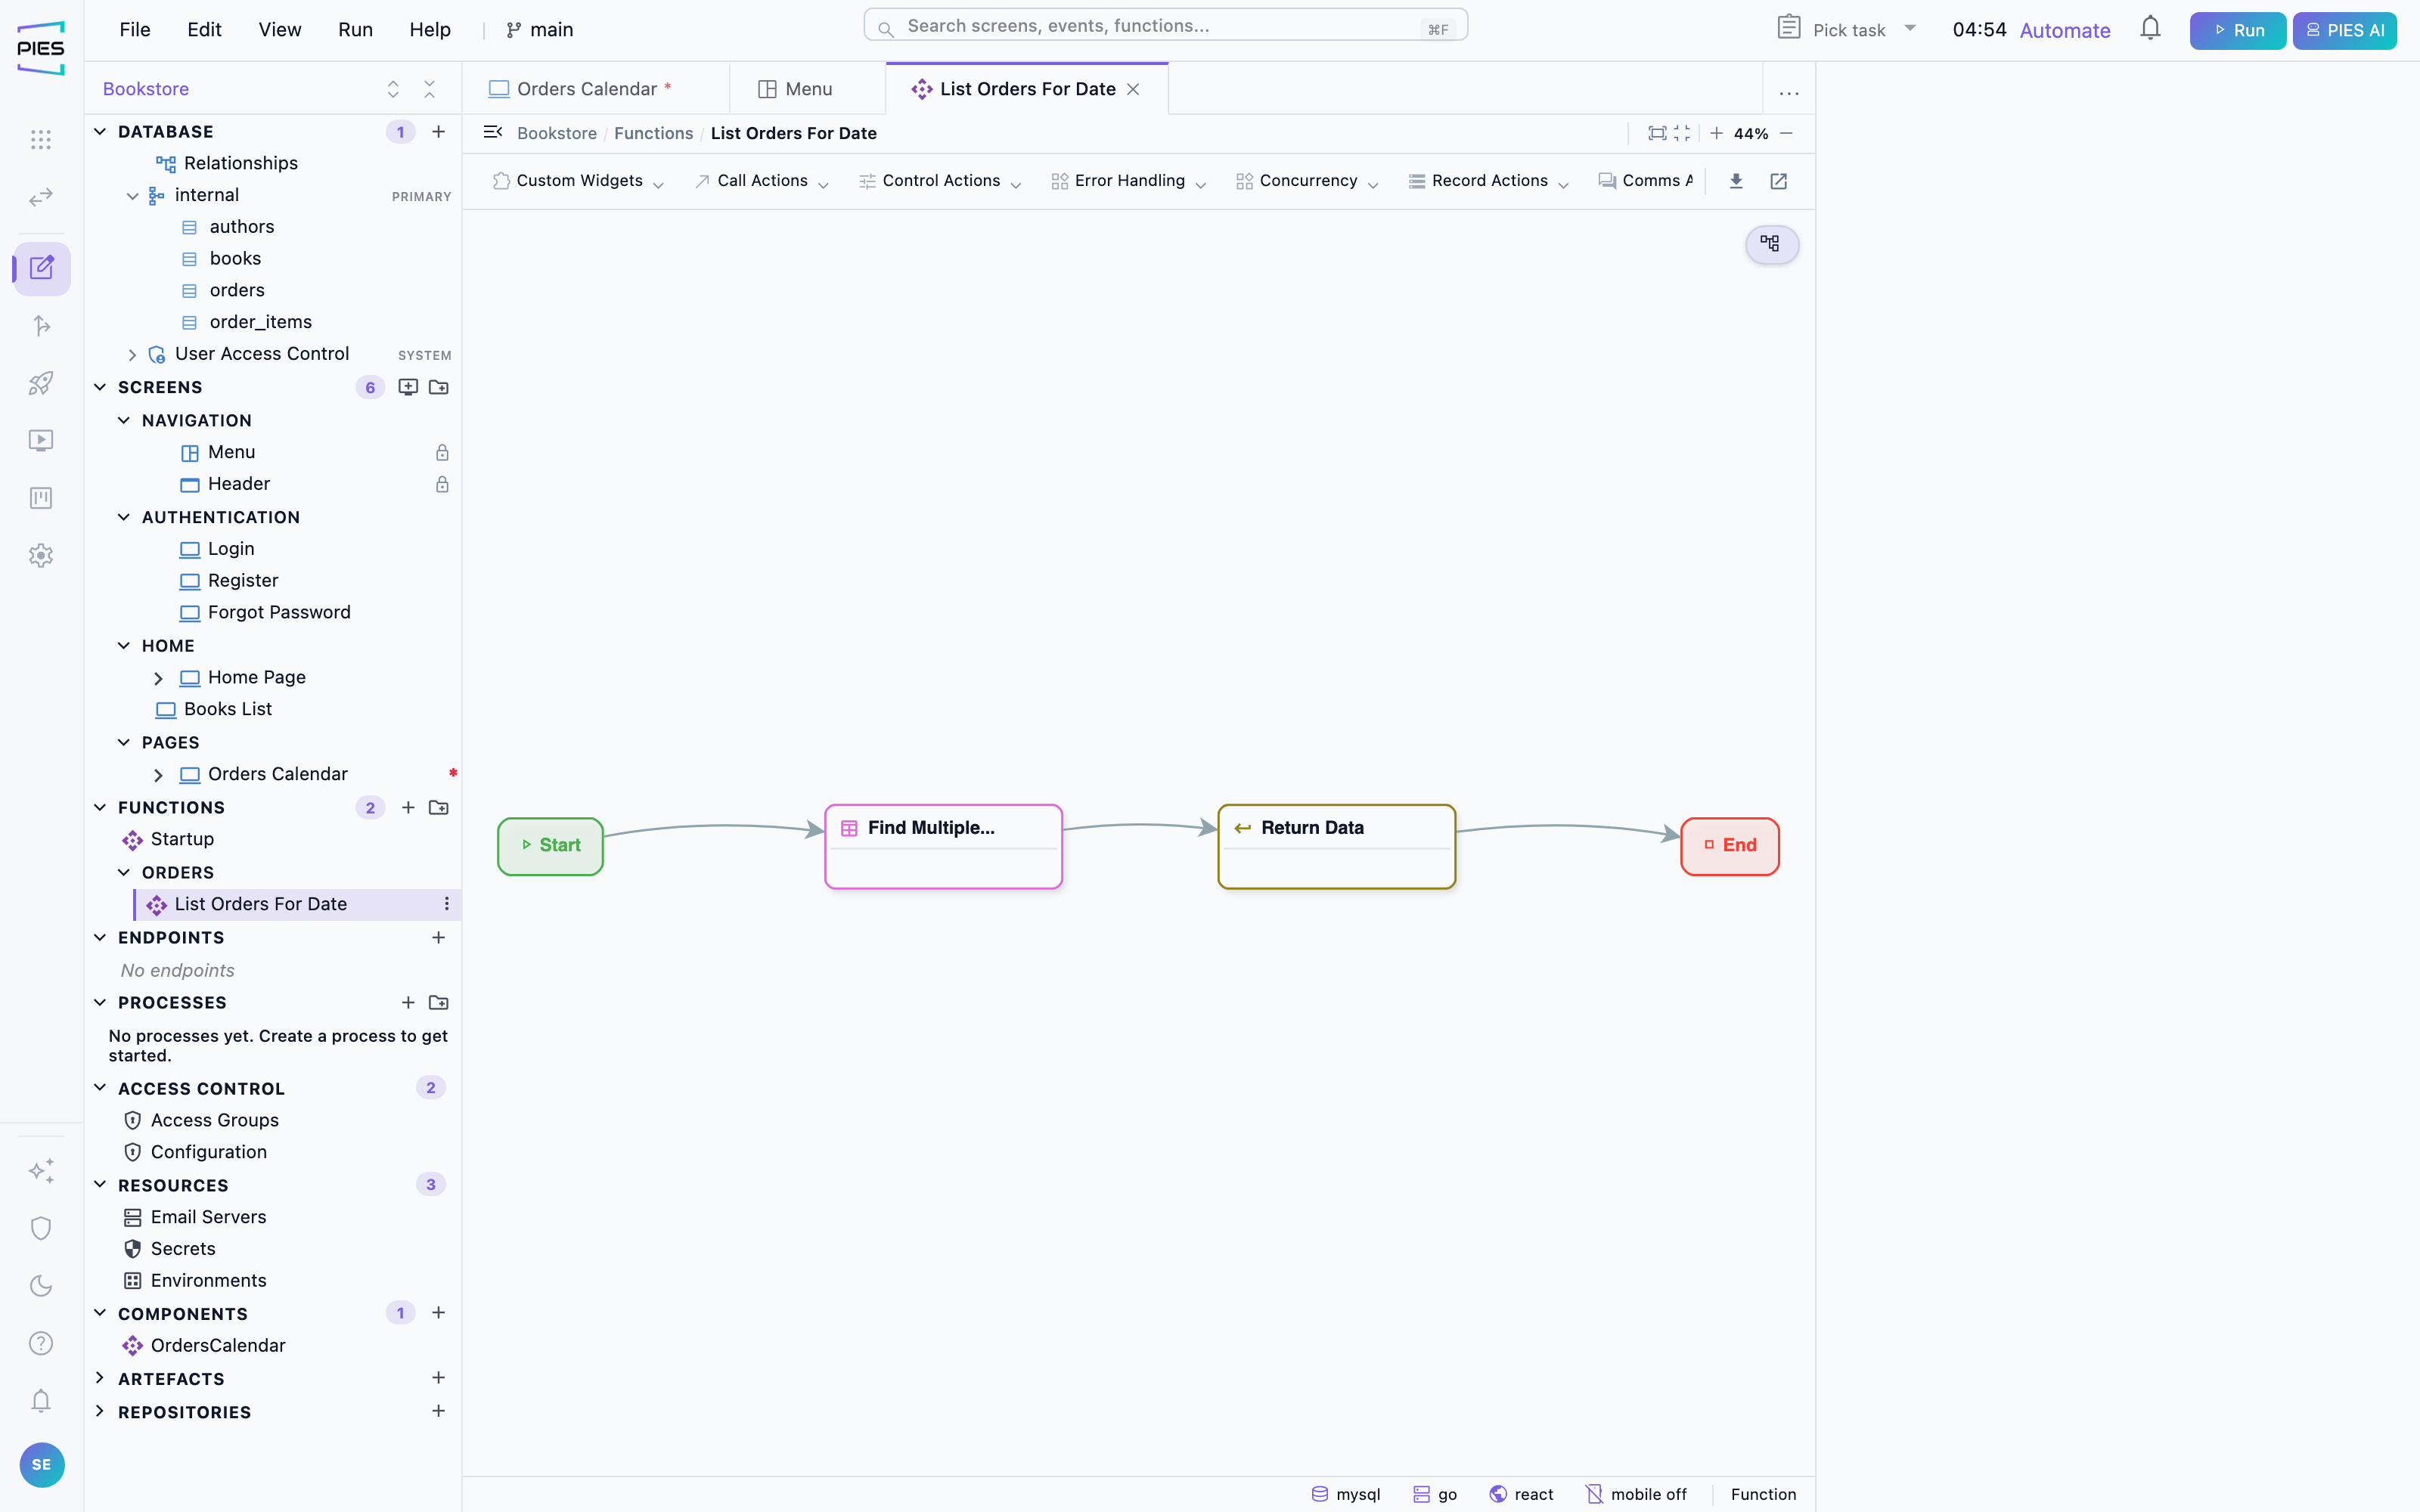
Try it: “create a calendar screen showing the daily schedule of orders by date” on any application with a table that has a date column.
Starting points
These are the domains PIES is regularly built and tested against. Paste one into PIES AI as a first prompt, then refine in steps.
Sales CRM
Inventory and purchasing
Helpdesk
Clinic
HR
Approval workflow
Others that work well as starting points: project management, e-commerce back office, school administration, real estate listings, an advanced search-and-filter catalogue, a multi-step wizard form, computed and formula fields, and an application that consumes an external REST API.