Access Control
Overview
User Access Control is used to enforce role-based access control in an application. This helps developers to align with their organization's information security policy and define access controls accordingly.
In PIES Studio, Access Control is enabled by default for an application to ensure maximum security to the deployed application. However, you can configure public screens to make certain screens available to public.
There are two sections under User Access Control module,
Access Groups
Configuration
Access Groups
Access Control in PIES Studio is group based. Users can be a member of one or more groups, with access to their defined groups. User access rights cannot be granted to individual users. Assigning access to groups is the best way to avoid the task of assigning, adjusting, and removing controls for users individually.
Under this section, you can create and define various user groups in the application and associate functionality for each user group, thereby controlling access to members of the groups.
By defining various user groups with access controls for each group, the developer will be able to control the access permissions.
Create, Modify & Delete Access Groups
To create an access group,
Click Access Groups under Access Control of Explorer pane
You can see that Administrator group is created by default and you cannot edit or delete it
Click Create New Group and enter a group name in the input field
Once you click Save, you will be able to see the created group just below the default admin group or the previously added group
To configure or modify an access group,
Click on the pencil icon against the access group
Here, under Group Name field, you can modify the existing group name
Under Access Configuration, you can configure the access to screens, functions & menu
Under Screens, Functions & Menu you will be able to see the list of all created screens, functions & menu items
You can click on the checkbox across each screen/function/menu item to provide access to the same
Ensure to allow access to all the functions required for selected screens for the application to work as expected.
You can also allow access to all screens, functions & menu items by clicking, Allow access to all checkbox
Allowing access to all screens, functions & menu items will automatically allow access to the screens, functions & menu items that are yet to be created. You don’t have to allow access every time you create a screen, function or menu item.
Click Save Changes, you will get a success message stating, Changes saved successfully
To delete an access group,
Click Access Groups to view the created access group
If you wish to delete a group, click on delete icon. You will get Delete Group popup
Click Confirm and the group will be deleted successfully
Whenever a group needs to be modified or removed, developer must redeploy the application and publish a new version.
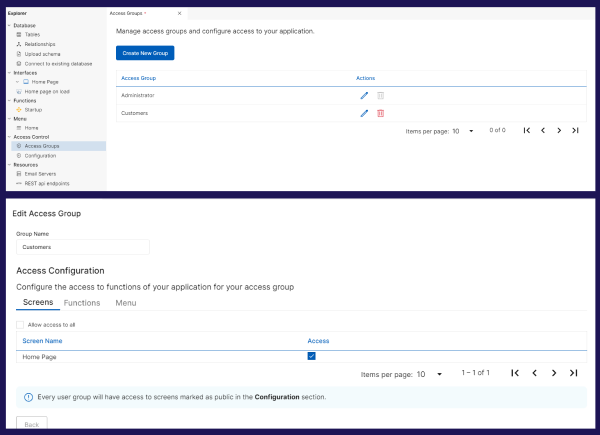
Fig 1: Access Groups
Configuration
In this section, you can set a default administrator for your application & also configure public screens.
Default Administrator
To set a default administrator to your application,
Click on Configuration under Access Control of Explorer pane and go to Default Administrator section
Under Name & Email address fields, provide username & email address of the user who you wish to set as the default administrator when application is deployed for the first time. This person will get an email to set password and will be the first person to login to deployed application. They will also be the one to onboard other users to the application
This information will reflect in the deployment form as well. You can also modify the details in deployment form if desired
Public Screens
To configure public screens,
Under Public Screens, click on Configure Public Screens
You will get a warning popup, click Continue to proceed with the configuration or click Cancel to go back
Anyone can access the screens that are marked as public without having to login. i.e. Public screens will have unrestricted access irrespective of the created user groups
Select one or more desired screens which you wish to mark as public & click Save Changes. You will get a success message
Click Access Groups and go to one of the created groups. You will see that public screens are automatically removed from the list of screens as they have unrestricted access. You will not be able to provide access based on user groups for public screens
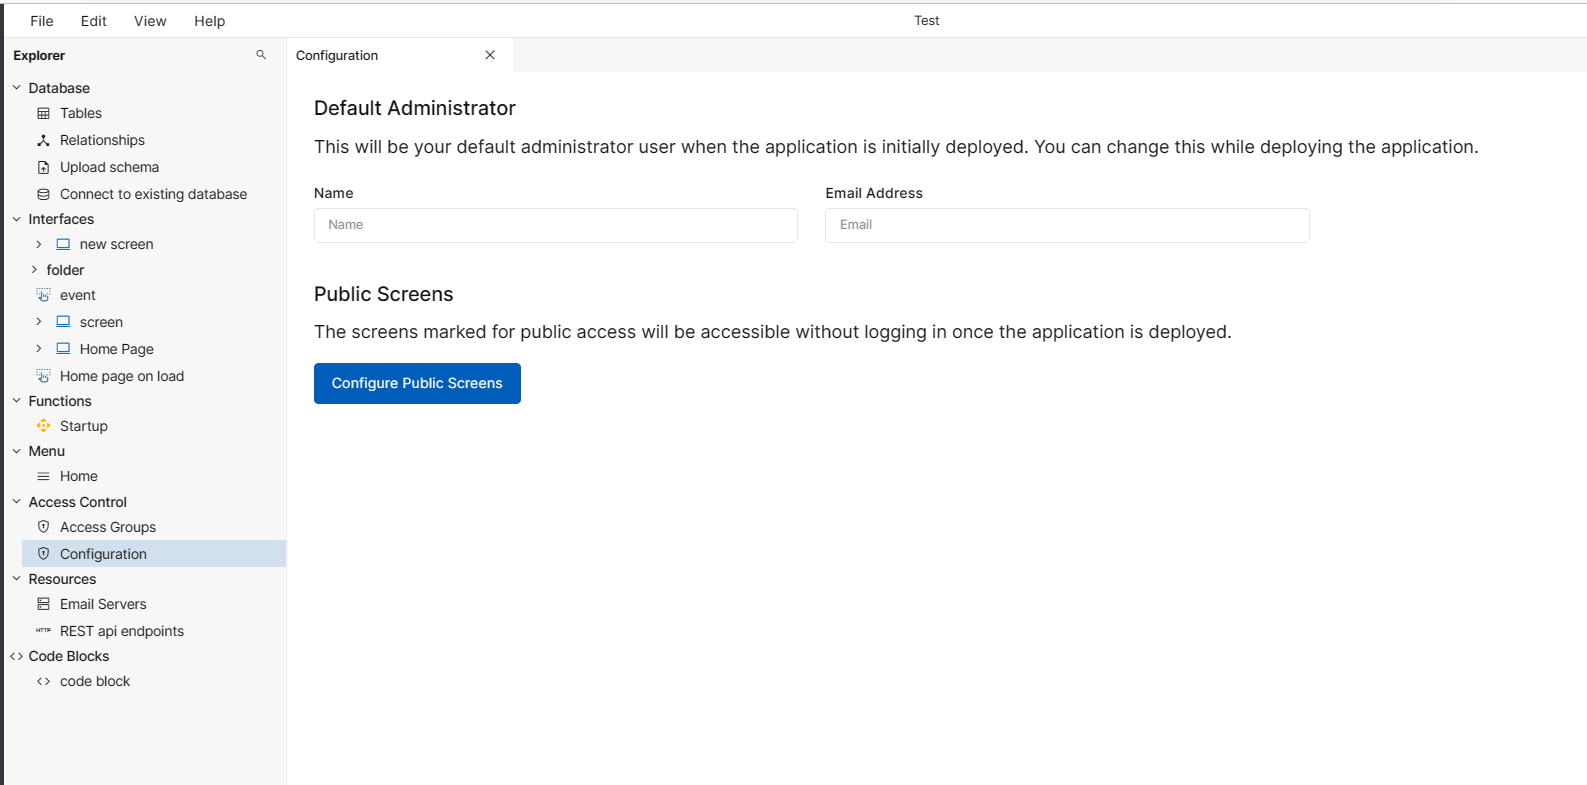
Fig 2: Configuration
Access Control Database
We have a separate set of tables and indexes to maintain the Access Control data. In Database section, the following tables are system generated Access Control tables - Sys User, Sys Role & Sys User Role
Access Control data like groups and access permissions of groups are maintained in the application database
User ID and access group mappings are also maintained within the application database after the admin onboards users and associates the user to a user access group
Deployment Phase
Once the configuration is complete, developer can proceed with application deployment.
Under Deploy & Export section, click Create Deployment
Select the desired type of deployment from dropdown
Application build will start automatically. Only when the build is successful, you will get a deployment form
Provide a version to your application
Deployment Name, Target Platforms & Description will appear automatically. You can modify if required.
Under Admin Details, default admin added in Access Control - Configuration section will reflect automatically. If you have missed to add it in Access Control section, you can provide the admin details here
Name and Email Address are mandatory fields. The Group Name is Administrator by default. Best practice would be to add admin details under Access Control - Configuration section, as you don’t have to add the details for every deployment
SMTP details added under Email Servers will appear in SMTP Details dropdown. Select the desired SMTP details from dropdown. It is mandatory to provide email server SMTP details. Once the application is deployed, system will use the selected SMTP server to send emails
Once you have selected SMTP details, connect to a new or existing database and choose a deployment option
Click Start Deployment. Deployment Details page will appear
Towards the end of deployment, admin will receive Set Your Password email to set password
Ensure that the admin details are entered correctly in deployment form. Admin will not receive Set Your Password email if incorrect information is provided
Click on Set Password button or the link mentioned in email
Admin will be redirected to Set Your Password page
Provide a password that meets the specified criteria and click Set Your Password button, you will be taken to the application's login screen
Login screen is automatically generated. It is not developed as part of application builder in the development phase.
As Admin, enter the email address & enter the set password. Click Login
Landing screen will be the Admin Console. Here, you will be able to add users & view or modify the existing users
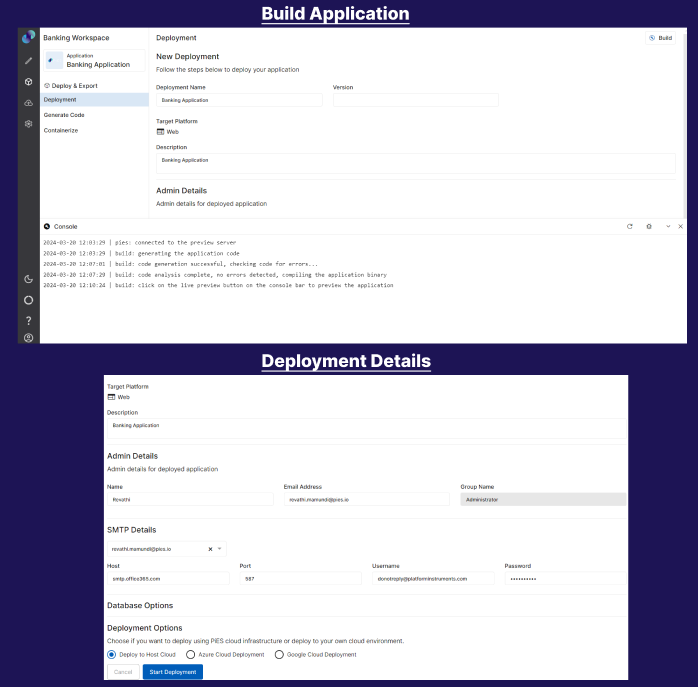
Fig 3: Deployment Details
Onboarding Users
Once application is deployed, the default admin can onboard users and assign onboarded users to the created user groups as per business requirement. The user will then be able to access all or specific features based on their access group.
When administrator logs in to application, landing screen will be the Admin Console - Manage Users. Here, admins can add users and assign them to created user groups, edit existing user information or delete users.
Add User
Click Add Users
Add User pop-up will appear on the screen. Enter the name & email address of the user you are about to add in Name & Email address fields
Click Access Group Assignment. You will get the list of groups created during development
Select the groups you would like the user to be a part of, based on their role
Click Ok and click Save. You can see the newly added user under Registered Users
Multiple users can be assigned to same group as functional overlap of the group is permitted.
Edit User
Click on the pencil icon. Edit User popup will appear
Click on Access Group Assignment. To remove existing access, uncheck the checkbox of desired group
To provide additional access to existing user click on Access Group Assignment & click on the checkbox of desired group
Click Ok and click Save
You can also modify the name & email address of users
Delete User
Click on delete icon against desired user
You will get a confirmation popup. Click Confirm to delete the user or click Cancel to go back
Upon confirmation, user will be deleted and will be removed from Registered Users list
End User Login
Once a user is added, you can click on mail icon in Actions to send welcome email to the user. This email will contain link to set password & login
The user will receive a welcome email link to set the password. User can click on the link & they will be redirected to Set Your Password page
User can enter a new password that meets the specified criteria in Enter your new password
Re-enter the new password in Confirm new password field
Click Set Your Password
After setting the password, user can log in to application and perform various tasks depending on their user group
Forgot Password
When administrators or users forget their password
Click Forgot Password? in the login page
Forgot Password pop-up will appear
Enter the email address and click Send Reset Instructions
The administrator or user will receive an email with a password reset link
Click Reset Password button or the link in email
You will be redirected to the password reset page where you can set your new password & login to application