Explorer - Functions
Functions allows users to create custom workflows to perform simple & complex backend tasks/processing for the application.
Function Overview
Function Lifecycle
There are five ways of managing functions in PIES Studio: creating, editing, duplicating, switching, and deleting.
Create Function
"Create Function" is a feature that allows users to generate new functions within the platform.
Functions created are visible within the Functions section on the Explorer panel. There are three ways to create a new function. Here are the steps to create a function, along with explanations for each step:
Hovering over the Functions section or any folder within the Functions section, on the Explorer panel reveals an icon (
). Clicking on this icon opens a text field in the Functions section. Here you need to type out the name of the function. After entering the function name you must hit the “Enter“ key on the Keyboard. The changes can be saved by clicking on the “Save changes” button.
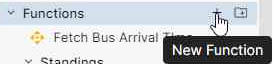
Fig 1: Creating a New Function
Creating a function from the File dropdown on the top left side of the screen. In this dropdown clicking on “New Function“ opens a popup, which asks for the Function name. After entering the function name click on “New Function“.
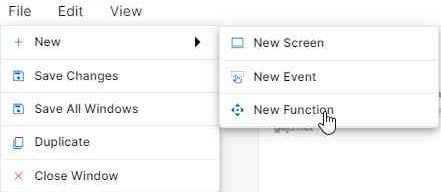
Fig 2: Creating a New Function
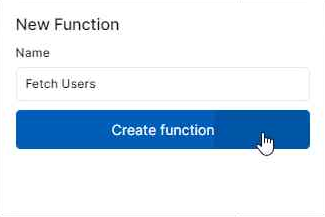
Fig 3: Create Function Pop Up
Functions can be created using the Automate feature as well. You will learn more about this feature in the Explorer Overview.
Edit Function Name
Functions assigned with a certain name can also be edited later. To use this feature, click on the function on the explorer panel which reveals an icon (). Clicking this icon makes the function name editable, after renaming the function, click on “Enter“ key on the keyboard. The changes can also be saved by clicking the “Save changes” button under File.
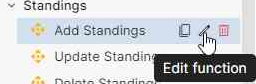
Fig 4: Click on the Edit function Icon

Fig 5: Enabled Text Field to Edit Function Name
Duplicate Function
"Duplicate Function" is a feature that allows users to create a replica or copy of an existing function within the platform. This functionality is useful when you need to create a new function that shares many similarities with the existing one. Instead of manually entering all the function details again, you can duplicate the existing function, thereby saving time and effort. To use this feature click on the Duplicate function icon ().
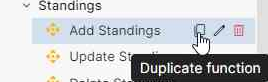
Fig 6: Click on the Duplicate function Icon

Fig 7: Created Copy of the Selected Function
After duplicating the function, you can make any necessary modifications or adjustments to the copied function details. This includes changing the function’s name, description, or any other relevant information to suit the new function’s requirements.
Delete Function
"Delete Function" is a feature that permits users to remove or eliminate an existing function from the system. When you select "Delete Function," it initiates a process that permanently removes the selected function from your function management system. To use this feature click on the Duplicate function icon ().
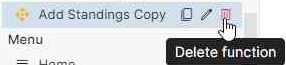
Fig 8: Click on the Delete function Icon
Deleting a function is typically irreversible. Once a function is deleted, it cannot be recovered, and all associated data and information related to that function are permanently erased. Therefore, exercise caution when using this feature to avoid accidental deletions. The system will ask for confirmation before proceeding with the deletion. This is an additional precautionary step to prevent accidental deletions.
Switch Function
This feature allows you to seamlessly transition from one function to another, enabling you to efficiently manage multiple functions based on your needs. You can easily switch between them by selecting their respective names from the explorer panel.
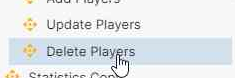
Fig 9: Clicking on a Function

Fig 10: Switching Using the Tab
Saving Changes
This functionality allows you to preserve the current state or progress of a function, typically within the system. When you use the "Save Changes" feature, it records and stores all the data, changes, or modifications made to the function up to that point.
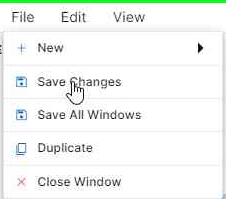
Fig 11: Saving Changes
Function Details
On creating a function, the function workflow will be visible on the right canvas. Clicking anywhere on the canvas will reveal function details which will appear on the right side of the screen canvas. Here, you can see the Function Name, Description, and the parameters required.
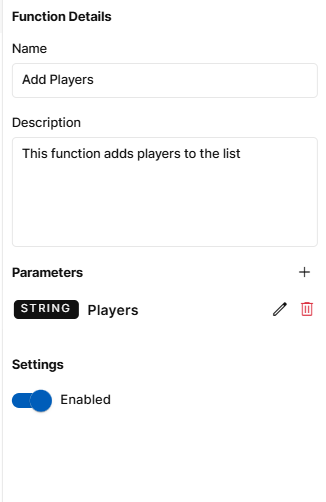
Fig 12: Function Details
Function Name and Description can be changed from the text fields provided. After the changes are made it is mandatory to save the changes made.
Parameters are inputs that are required for the function. These parameters can be used in the Function Steps on the canvas. To add a new parameter, click on the “+” icon. This opens a popup with fields to enter the name of the parameter and its type. After providing the necessary details, click on “Save” to add the parameter to the function.
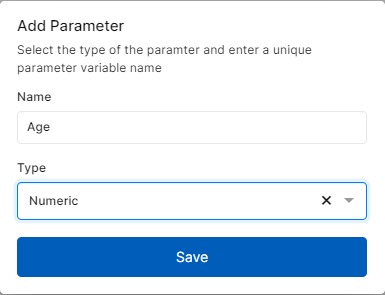
Fig 13: Add Parameter Popup
Settings - This feature allows users to temporarily deactivate a function within PIES studio. All the functions will be enabled by default and you can disable the functions if required. When you disable a function, that particular function will not be considered during application build or while deploying your application. This functionality is valuable when you want to pause or temporarily halt an event for various reasons. For instance, if you want to debug the created function, you can try disabling functions one after the other to conclude on the function that’s causing issues in development. Unlike deleting a function, disabling does not result in permanent data loss. Functions details and settings will be retained, making it easy to reactivate the event, when necessary, without re-entering all the information.
For your application to run as expected, you need to make sure all necessary functions are enabled. Enable & Disable is an auto save feature. Whenever you turn on or turn off the toggle switch, changes will be saved automatically.
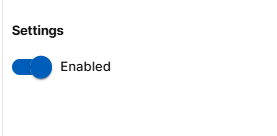
Fig 14: Settings Section
Function Steps
Below are the different types of functions in PIES studio:
Custom Actions
Code Block
This is your golang code block where you can write your own custom code which
can be later used in your applications.
Each code block is essentially a public function, which can have multiple inputs, but can return only 2 outputs - of which one represents your custom output value, and the other represents any error that occurred during the function execution.
You can add as many functions as you want to the code block, but every code block should belong to the custom package and have one public function with the same name as the code block in pascal casing.
Code blocks involve injecting custom code into your applications. Please proceed with caution, and do not add random or untested code without verification.
PROPERTIES
When you drag this function step to the canvas, you will get the properties list to select the function name. The following items are available in the properties panel:
Code Block: A dropdown menu that allows you to select an appropriate code block. You can choose from the list of code blocks that were already created under the “Code block” section of the Explorer panel. You can also edit the code block by clicking on Edit Code Block button. A pop up window appears where you can edit your code in created code block and click Save Changes to successfully save the changes.
Parameters: If the selected code block in the dropdown has any defined input parameters, an input field called ‘Value’ will appear for each parameter. This field allows you to provide necessary input values. The parameter used in the selected code block will also be visible just above the “Value” field to verify before providing input. If the selected code block has no parameters, you will see a message indicating "The selected code block has no parameters associated with it." and no input field will appear.
Output Variable: This option allows you to save the output of the code block to a variable, which can be used in the succeeding steps of the function workflow. Output variables are used to capture and store the results or values generated by a code block during its execution. They provide a way for a code block to capture & communicate its output to the calling code or other parts of the application.
USAGE
Suppose if you want to calcuate a factorial of a number then :-
Drag and drop a code block step from the palette to the canvas.
The properties panel will open on the right side of the screen canvas.
3. You can write a code for it under code block in the explorer section or you can use the already created code block.
You can select Code block name from the dropdown in the Properties panel and add any paramaters that you want to pass as a input to the code blocks. In this case it is $num. num is the number whose factorial who want to calculate.
The factorial of the number will be calculated in the code block and output will be returned back and can be stored in Output variable $result for further or later use.
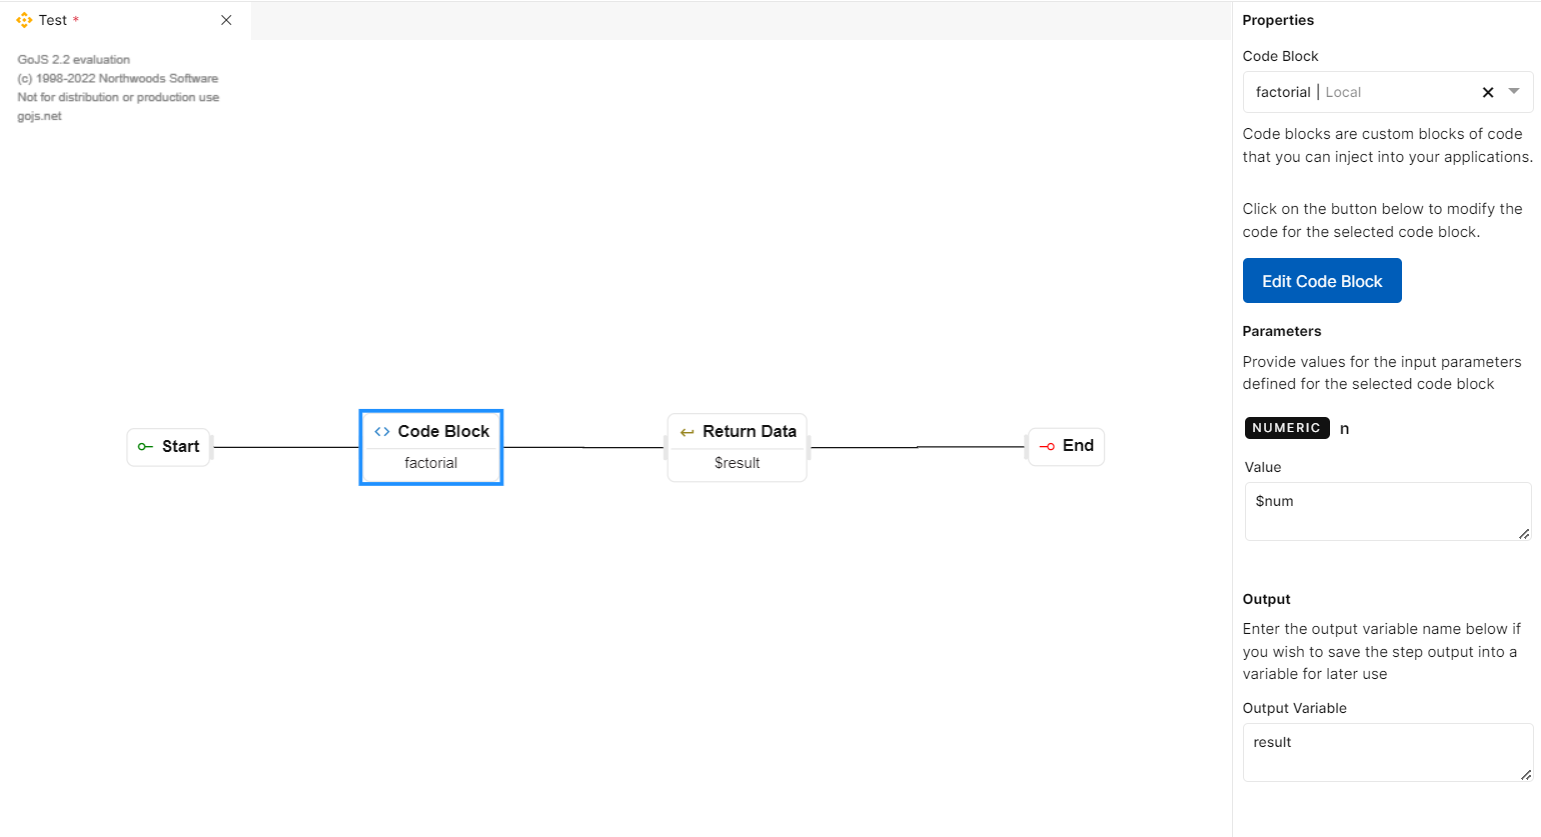
Fig 15: Code Block
Call Actions
Sub Function
The "Sub Function" step is used to call or execute a function within another function. This allows you to create modular and reusable workflows by breaking them into smaller, more manageable functions. The "Sub Function" step can be configured to call a specific function and can also capture the output from that function to use in the current workflow.
PROPERTIES
When you drag this function step to the canvas, you will get the properties list to select the function name. The following items are available in the properties panel:
Function: A dropdown menu that allows you to select an appropriate function. You can choose from the list of functions that were already created under the “Functions” section of the Explorer pane.
Parameters: If the selected function in the dropdown has any defined input parameters, an input field called ‘Value’ will appear for each parameter. This field allows you to provide necessary input values. The parameter used in the selected function will also be visible just above the “Value” field to verify before providing input. If the selected function has no parameters, you will see a message indicating "The selected function has no parameters associated with it." and no input field will appear.
Output Variable: This option allows you to save the output of the Sub-Function step to a variable, which can be used in the succeeding steps of the function workflow. Output variables are used to capture and store the results or values generated by a function during its execution. They provide a way for a function to capture & communicate its output to the calling code or other parts of the application.
USAGE
Let us say you have a workflow for a website that adds standings of clubs in a table and wants to display the added standing in the table so to fetch the updated standings we can call a “Sub Function“ that fetches the updated standings table.
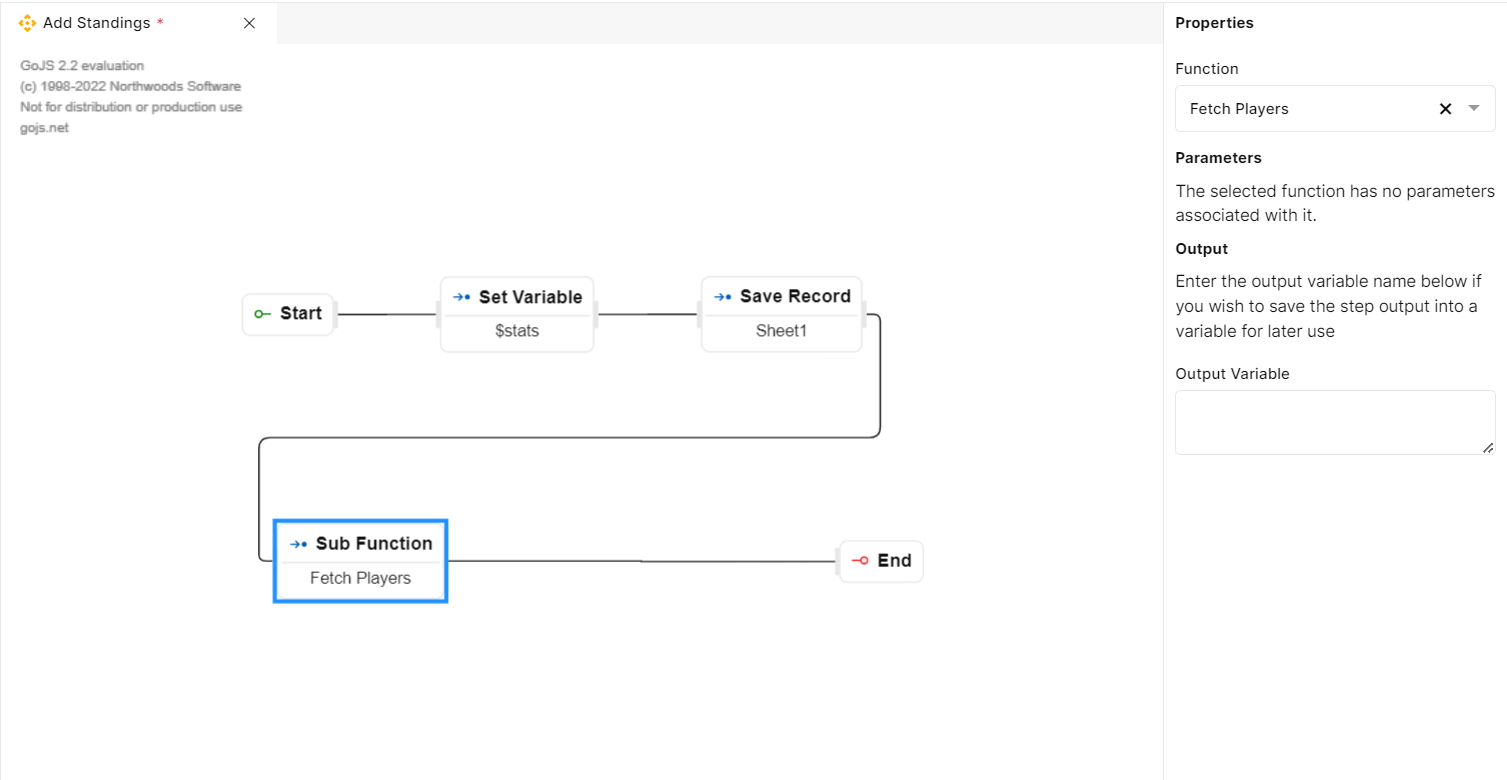
Fig 16: Sub Function
Control Actions
Control actions involve the use of conditional statements like "if" and "else" to determine how the software should respond to a particular user interaction.
Control Functions include nine function steps. The purpose for each step is provided below:
If
The "If" step allows you to define a logical condition that determines the flow of your application. When linking an “If” step to your workflow, there are two outcomes to it. Based on the “Condition Expression” of your “If” step either the upper link will be executed or the lower link. Steps that are connected to the upper link will be executed if the condition returns True. The lower link will be executed when the condition returns False.
PROPERTIES
When you drag this step to the canvas, you will get the properties panel to configure. The following item will be available in the properties panel:
Condition Expression: In the “Condition Expression” field, you can provide the logical condition that the system should evaluate. This condition is typically written as an expression that results in a Boolean (true or false) value. If the condition expression evaluates to True, the first link will be executed. On the contrary, if the condition expression evaluates to False the second link will be executed.
USAGE
Let's create an example to illustrate the use of the "Input" field within the "If" control function:
For example, we are using the "If" function step to check whether a player is eligible for selection based on two conditions:
The "age" should be greater than 18, ensuring that the person is of voting age. ($Age>18)
The "country" should be either the USA or Canada, indicating that the person is a citizen of either of these countries. ($Country == “USA” || $Country == “Canada”)
If both conditions are satisfied, the system will execute a set of steps and saves the player’s record. If any of the conditions are not met, the system will execute the second link of the “If“ step.
The use of the "Input" field allows for the creation of complex conditional statements, incorporating logical operators (&& for AND, || for OR) to evaluate multiple conditions simultaneously, ensuring a comprehensive and accurate decision-making process within the workflow.
If the condition returns False, the second link will be executed and the players record will be deleted.
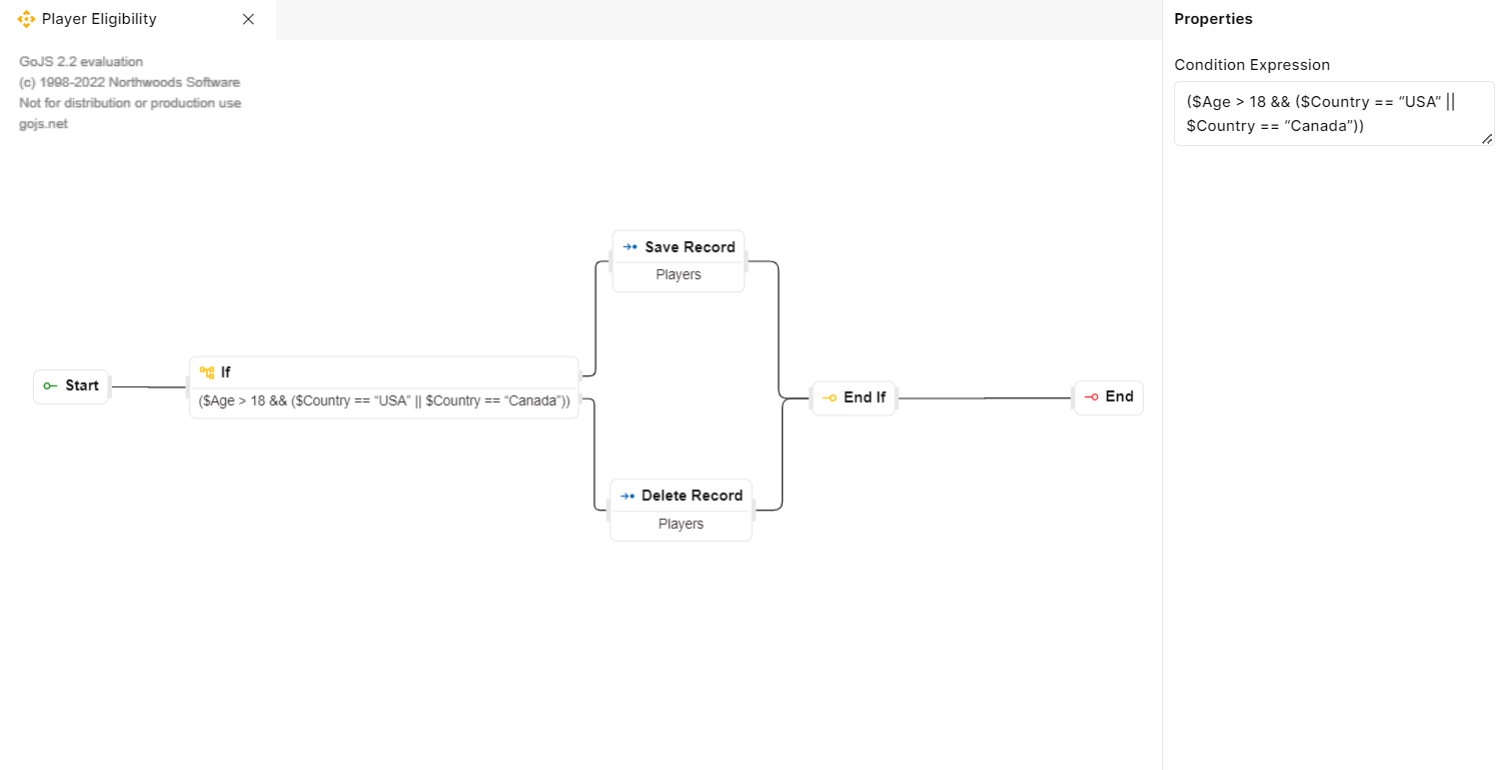
Fig 17: If
End If
Before an "End If" step, there is typically an "If" step where a condition is evaluated. The condition is based on data or variables within the workflow. The "End If" step serves to terminate a conditional branch within a workflow, ensuring that only the appropriate steps are executed based on the condition's outcome. There is no configuration required for this step.
USAGE
Let's say while building an application, you want to Save a Record when a certain condition is met. Here's how you would use the "End If" step to achieve this:
You create an "If" step as part of your workflow.
In the "Condition Expression" field, you specify the condition that will be evaluated and will execute the corresponding link.
After the evaluation of the “If” step we need to use the “End If “step to stop the execution of the “If” step.
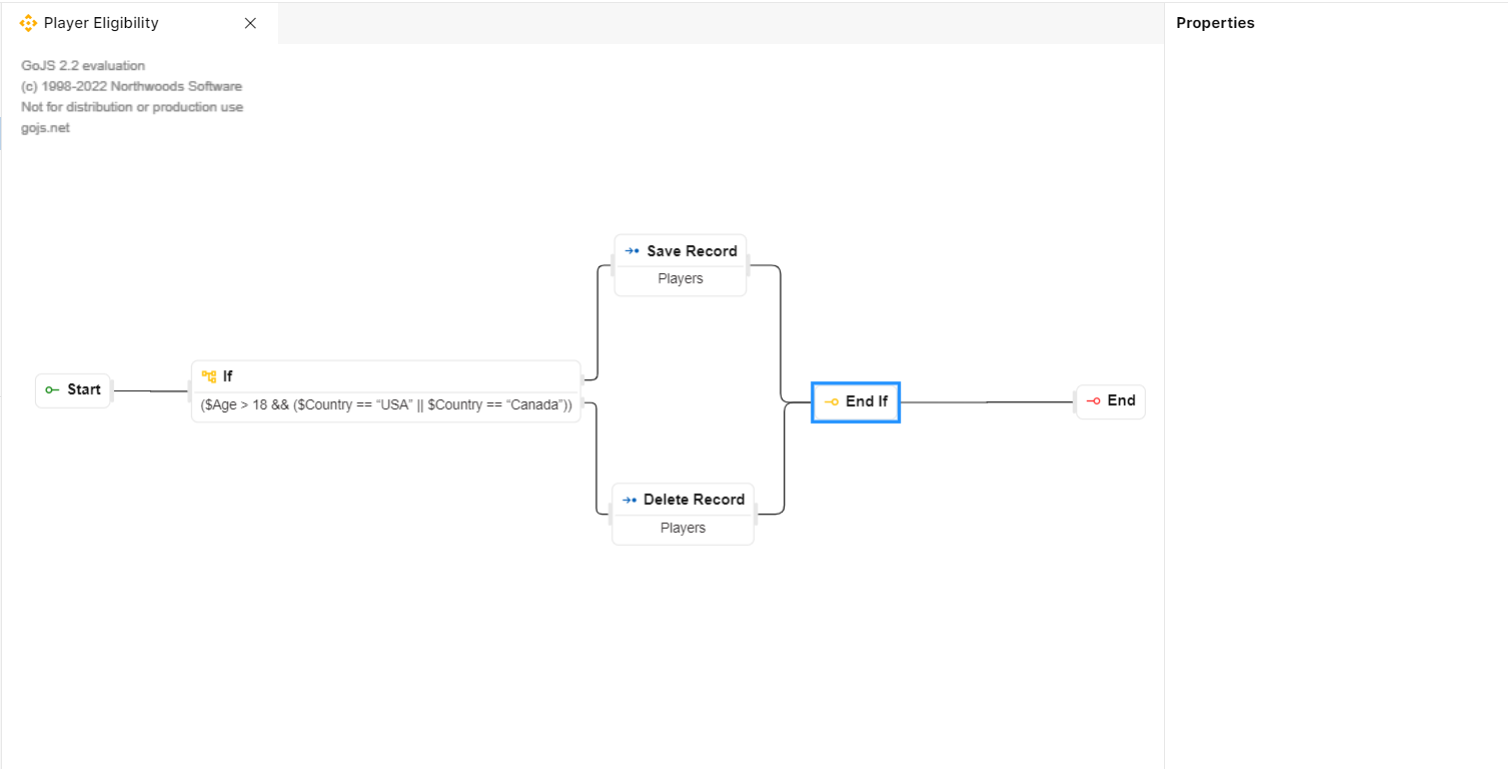
Fig 18: End-If
Loop
This function step is used to execute a particular set of actions within 'Loop' and 'End Loop' actions for the defined number of times. The user should specify the input for executing the loop and input can be a constant, a variable, or an expression. Looping will stop after the specified number of iterations.
PROPERTIES
When you drag this step to the canvas, you will get the properties panel to configure. The following items will be available in the properties panel:
·Input: This field is used to provide a condition for the loop step to be executed. The loop will continue to run until the end case is met.
·Loop Variable: This variable is used to reference the current iteration in the list during loop action.
USAGE
Let's say while building an application, you want to return players data one by one:
You create a "Loop" step as part of your workflow.
In the "Input" field, you specify the condition: $Players. This will cause the loop to run as per the number of $Players.
The loop variable refers to a single iteration of the loop. Suppose you are passing a variable $Players. You can name the loop variable as $player referring to each standing within the loop. For every loop, Return Data step will be called. After the iteration of the $player is over, the loop will end. We can place the end loop step after the Return Data step.
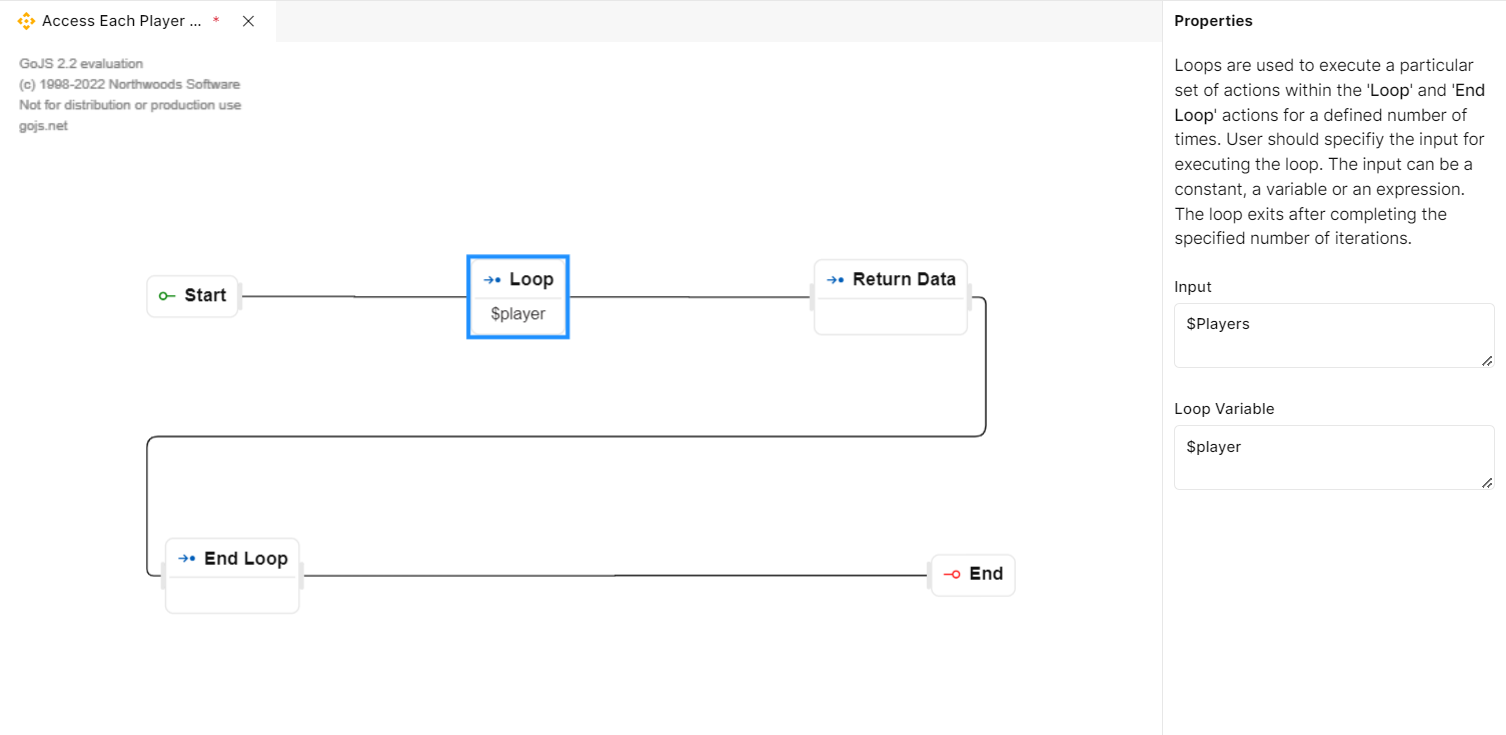
Fig 19: Loop
While
Use the while loop to execute a particular set of actions till a certain condition is met. Loops can be used to execute a particular set of actions within the 'While' and 'End Loop' actions. The user should specify the input for executing the loop. The input can be a boolean constant, a variable, or an expression. The loop exits after completing the specified number of iterations.
PROPERTIES
When you drag this step to the canvas, you will get the properties panel to configure. The following items will be available in the properties panel:
·Loop Condition: In this field, you can provide a condition for loop execution. The loop will execute until the condition returns True and it will stop as soon as the condition returns False.
USAGE
Suppose, you have a workflow to run a loop to return a player name on every step. The while loop step can be used in this case as below:
Drag and drop a while step from the palette to the canvas.
The properties panel will open on the right side of the screen canvas.
In the loop condition input field, you can provide a desired condition. Based on the set condition, the loop's execution will be decided. For example: Let’s say the condition is “$Players.SrNo < 5“. If the value of $Players.SrNo on the first iteration is Zero, the loop will be executed. However, the loop execution will stop if the values of $Players.SrNo reach 5.
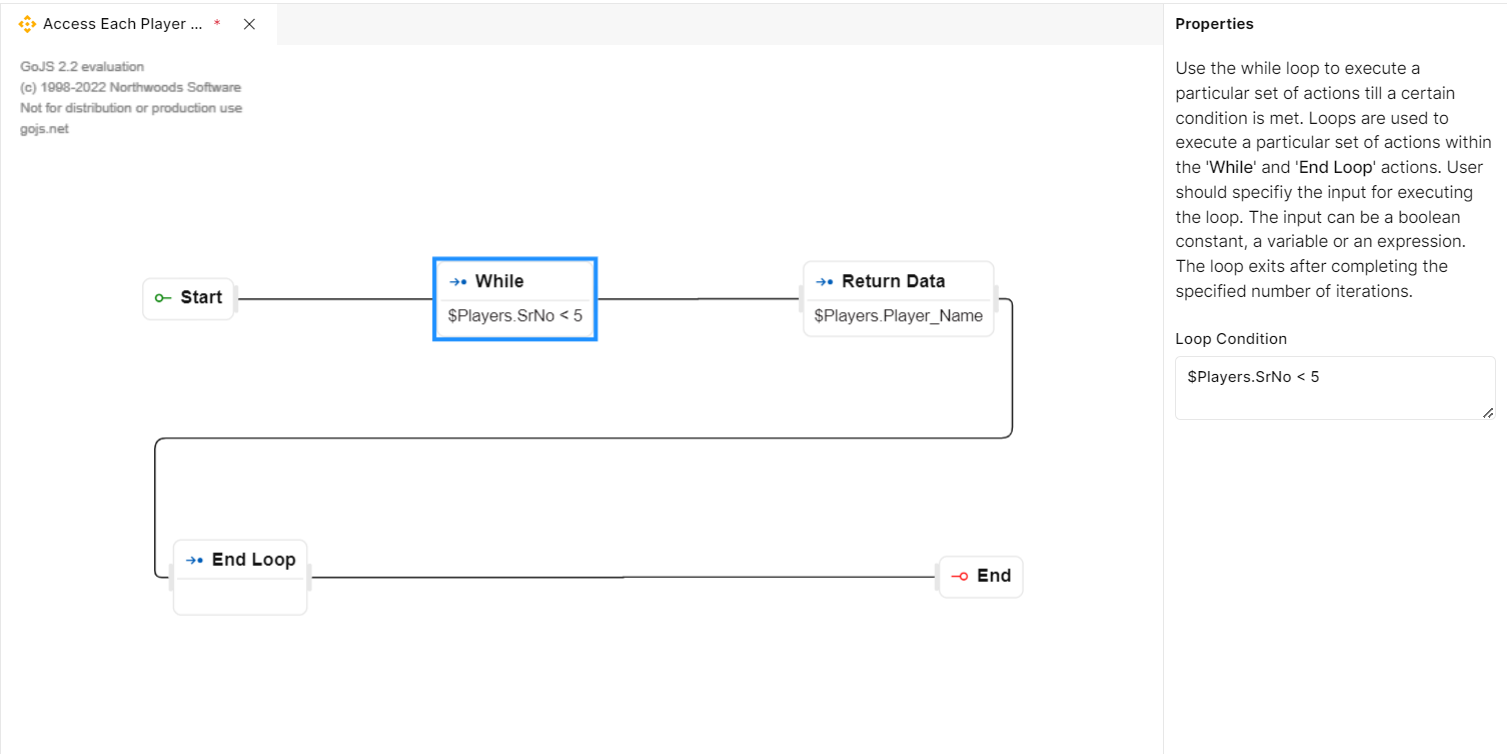
Fig 20: While
End Loop
As the name suggests the end loop function step stops the loop execution. To make use of this function you should drag and drop this step on the canvas right after a while or loop function. There is no configuration required for this step.
USAGE
To make use of this function step, simply place it after the loop or while step in the workflow. This will stop the execution of the loop.

Fig 21: End Loop
Set Variable
The “Set Variable” is used to define a new variable and can be used in loop constructs. These variables serve as containers to store data, values or information that you can use later in your workflow.
PROPERTIES
When you drag this step to the canvas, you will get the properties panel to configure. The following items will be available in the properties panel:
Type: In this Type dropdown section, you need to select the data type of variable you would like to create. For example: string, numeric, date, Boolean, etc. This ensures that the variable holds the correct type of data.
Name: In this field, you can provide a name for the variable you are creating. For example: $myname, $myAge, $newEntry, etc.
Value: In this field, you can provide a value to your variable. For example: If the type of your variable is string, you can enter “Anthony”. For numeric, it could be “12”.
USAGE
This step can be used to create a variable, which can be later used in the following steps. As in the below example we are creating a variable $number and assigning a value to it. This variable is used in the following steps to loop for a certain number of times and perform a certain operation.
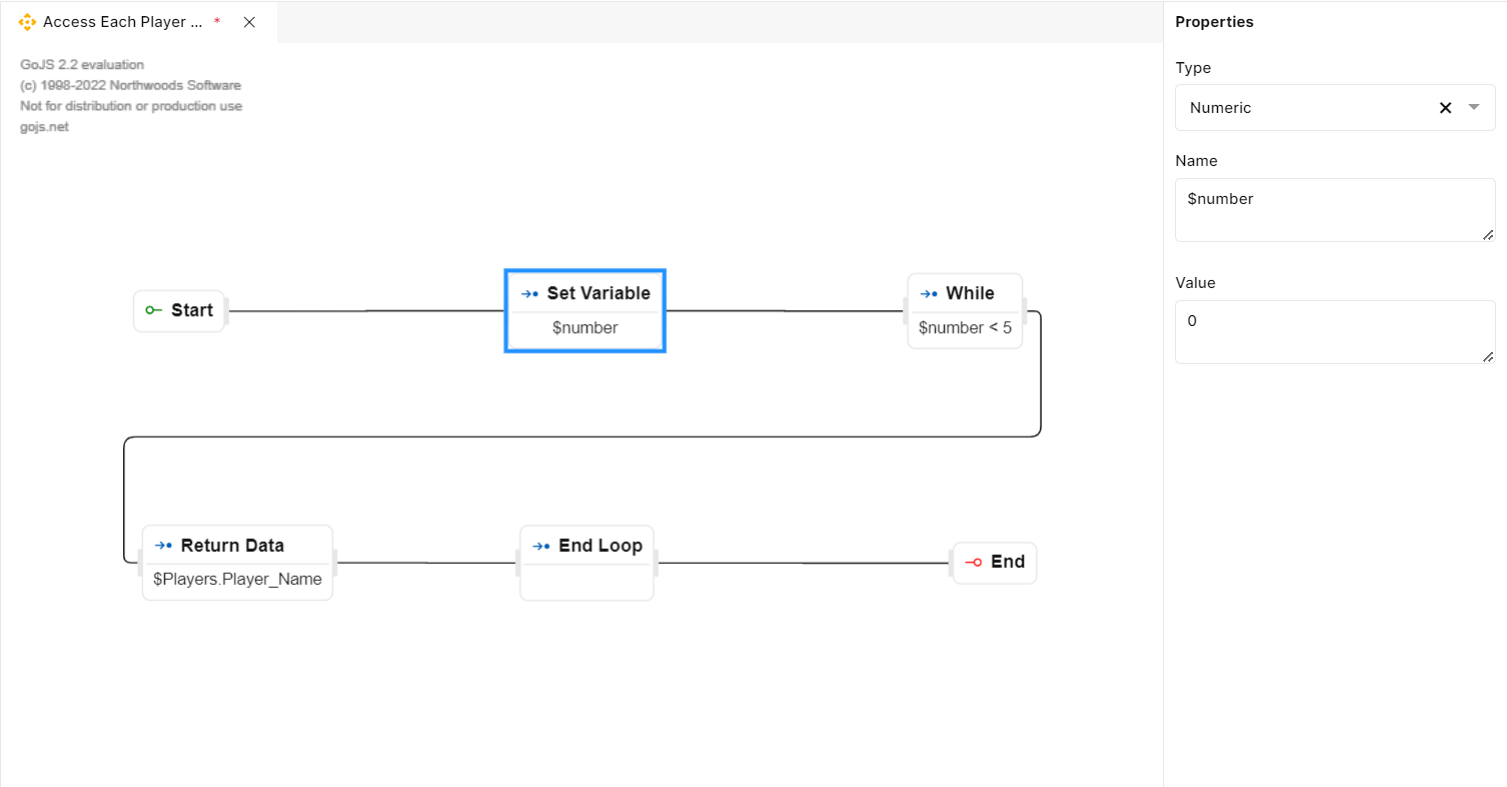
Fig 22: Set Variable
Return Data
The "Return Data" step allows you to send specific information or values from one part of your workflow to another.
PROPERTIES
When you drag this step to the canvas, you will get the properties panel to configure. The following items will be available in the properties panel:
Data: In this section, you specify what data or values you want to send from the previous step as a variable e.g., “$result”. So, in this variable is where you define what information is being transferred.
USAGE
Let’s Consider a scenario where we want to return the names of the first five players from a list of players. We can use either Loop or While step to iterate over the list of players and then return their names.
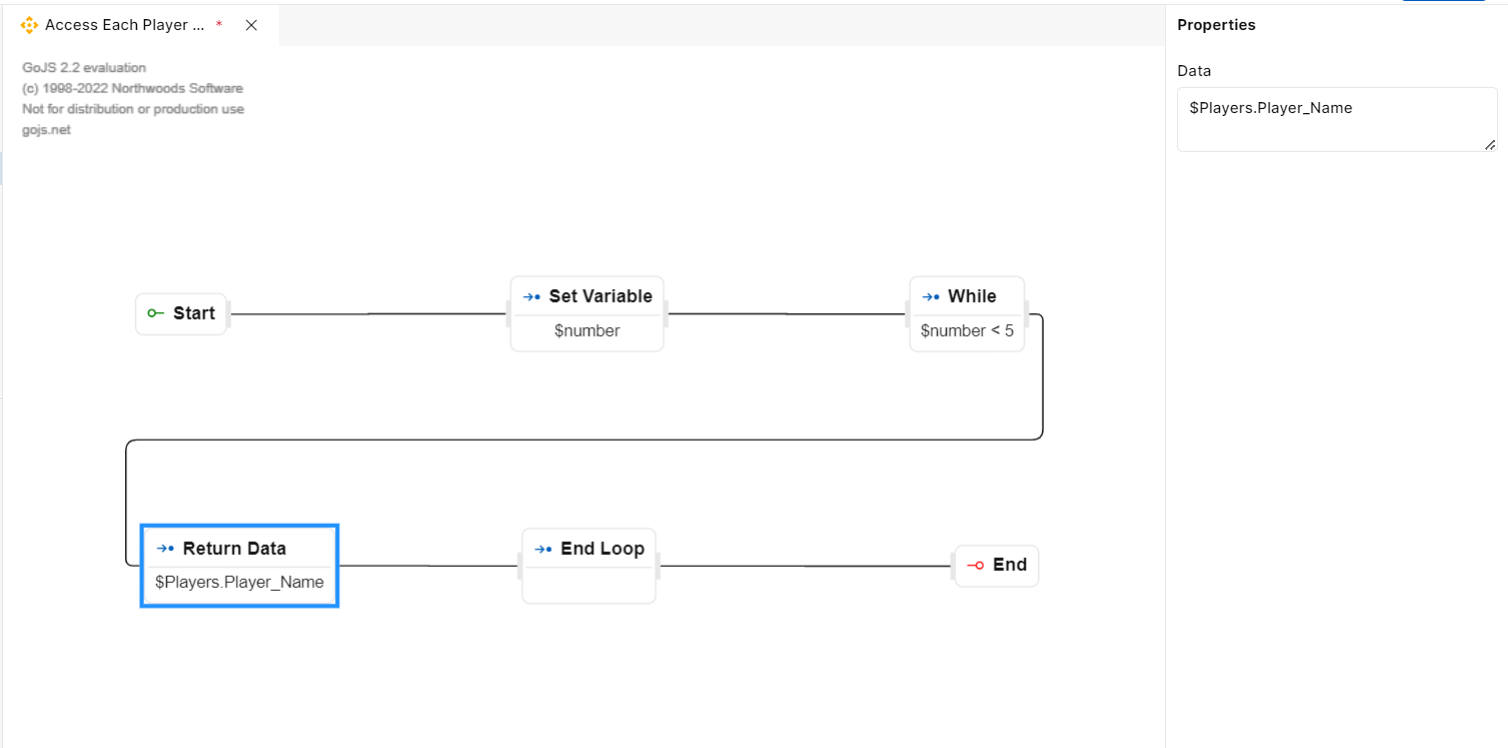
Fig 23: Return Data
Sleep
This function step allows you to disable the desired activity of your application and put it in sleep mode.
PROPERTIES
When you drag this step to the canvas, you will get the properties panel to configure. The following items will be available in the properties panel:
Type: In this input field you will be able to choose the time format. For example: Milliseconds, Seconds, Minutes, and Hours.
Duration: In this field, you can provide an integer value. This will be the duration during which your application will be in sleep mode.
USAGE
Let's say while building an application, you want to put the application workflow to sleep after returning player’s name.
You add function steps for returning player names.
In the function workflow, you can drop the sleep function step just before the end of the workflow.
As in the below screenshot, the workflow/activity will be put into sleep mode for 12 seconds after the End Loop step.
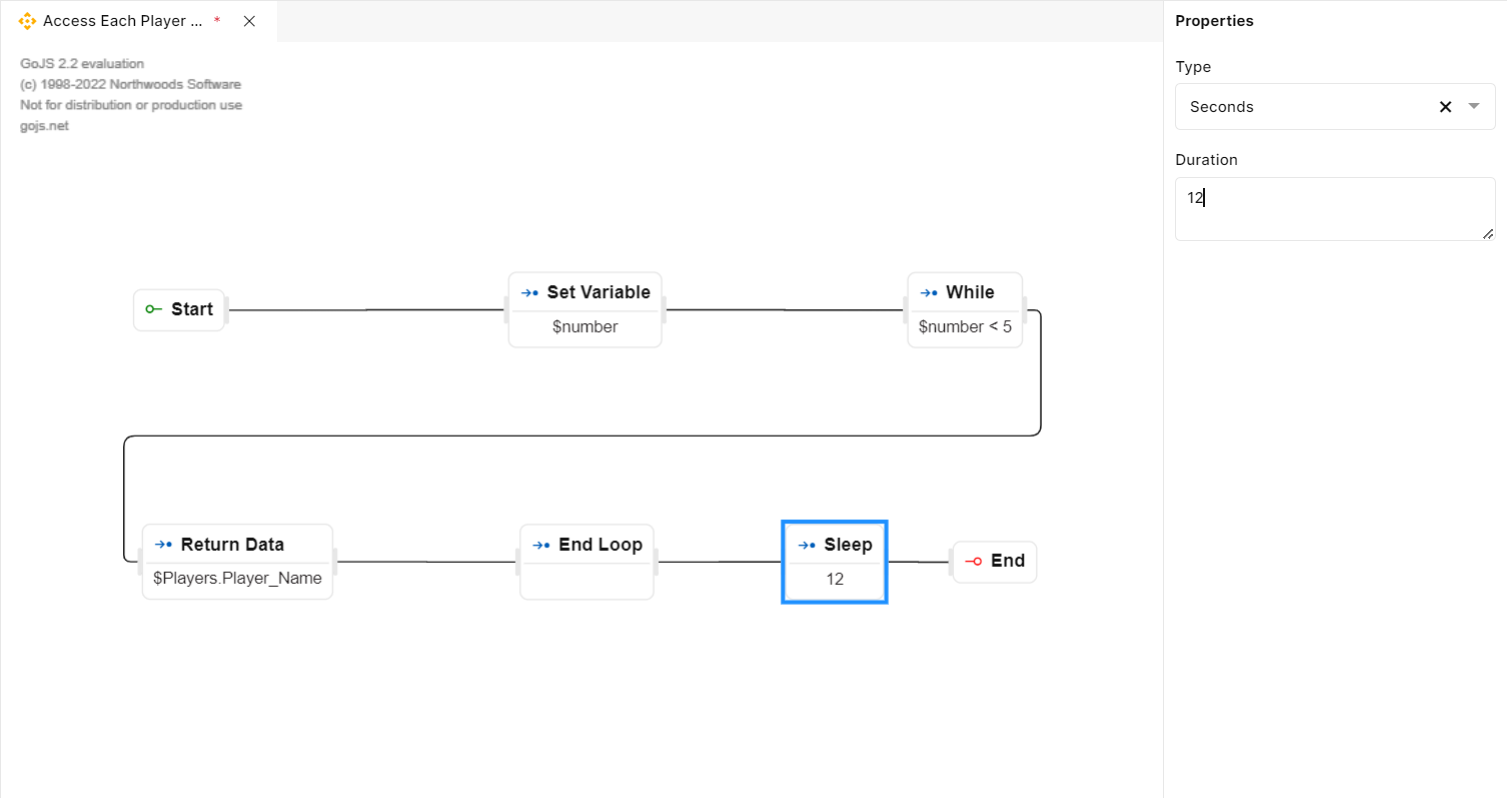
Fig 24: Sleep
Record Actions
The "Record Actions" section provides a comprehensive set of data manipulation capabilities for managing records within the application. These operations facilitate efficient data handling and ensure effective management of the information stored in the system.
Here's a brief explanation of each record function step:
Save Record
The 'Save Record' function step is a crucial operation in a database system that allows users to permanently save changes made to the data model.
PROPERTIES
When you drop the "Save Record" step in the functions canvas, a properties panel appears on the right side of the functions to configure the step. The following fields are available in the Properties panel:
Type: This is a dropdown list to choose a data model from the list of created data model tables in the database, specifying the type of record they intend to save or update in the database.
Value: This field allows users to enter a custom input or output from a previous step that contains the updated record details, which are to be saved in the database.
Output Variable: This option allows you to save the output of the Save Record step to a variable, which can be used in the succeeding steps of the function workflow. Output variables are used to capture and store the results, data, or values generated by a function during its execution. They provide a way for a function to capture & communicate its output to the calling code or other parts of the application.
USAGE
Suppose you have an online player management system, and you want to update and save the contact information of a specific player. Here's how the 'Save Record' function can be used in this scenario:
Type: From the dropdown list, you choose the "Players" data model, specifying that you intend to save or update the player’s record in the database.
Value: You enter the custom input or output variable from a previous step that contains the updated contact details of the player, such as their name, email address, and status.
Output Variable: You provide a unique variable name, such as "$newPlayer" in the text field. This enables easy access to the saved player data for subsequent operations or for displaying confirmation messages to the user.
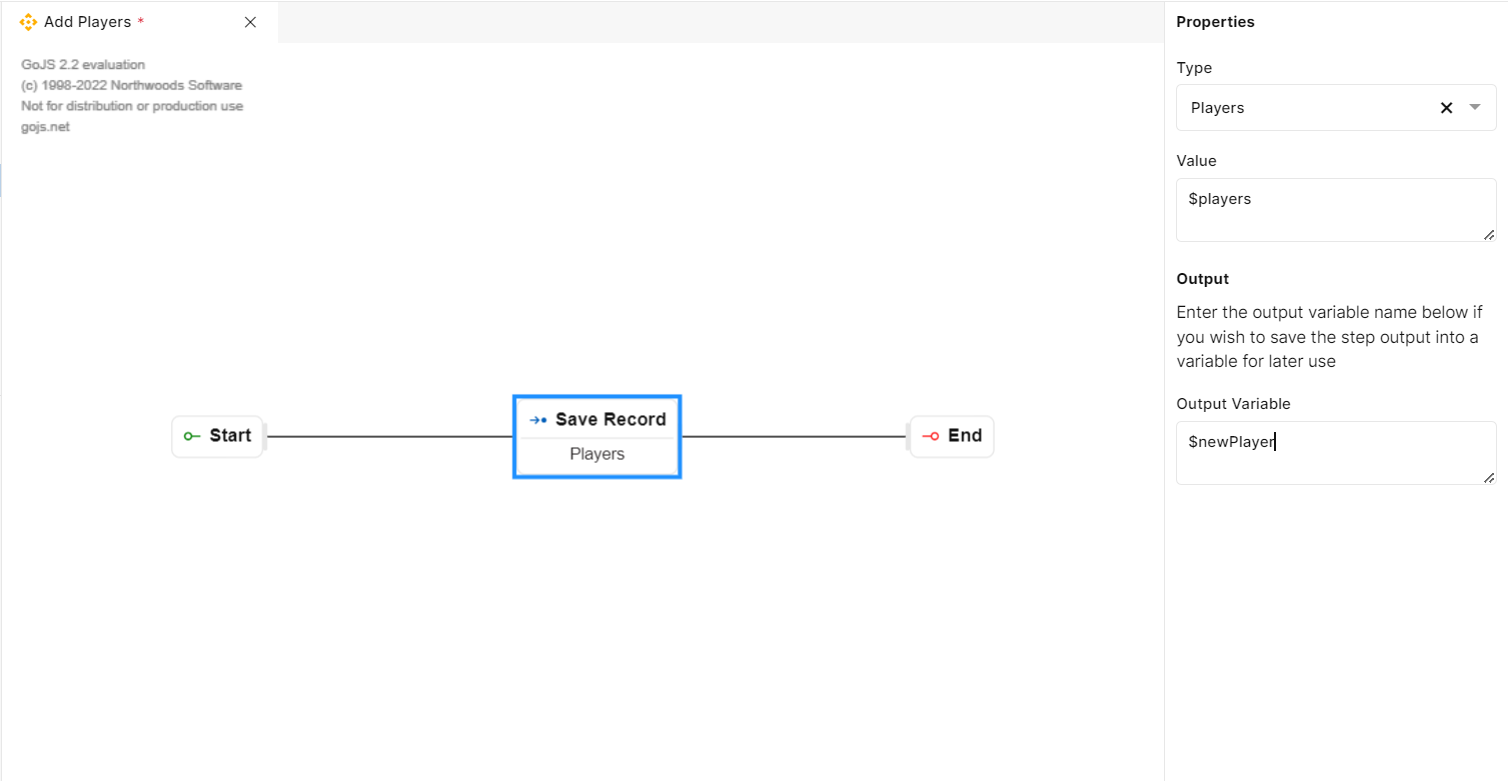
Fig 25: Save Record
Update Record
The 'Update Record' function step allows users to modify and update specific fields or attributes of a selected record, ensuring that the information within the record remains current and accurate, reflecting any changes made to the underlying data.
PROPERTIES
When you drop the "Update Record" step to the functions canvas, a properties panel appears on the right side of the functions to configure the step. The following fields are available in the Properties panel:
Type: This is a dropdown list to choose a data model from the list of created data model tables in the database, specifying the type of record they intend to update.
Record Value: This enables users to input custom data or select an output from previous steps to be used for the update operation.
Filter Column: Users can leverage this dropdown list to choose a particular column from the selected table.
Column Value: Here the user can specify the column value that needs to be updated.
Output Variable: This option allows you to save the output of the Update Record step to a variable, which can be used in the succeeding steps of the function workflow. Output variables are used to capture and store the results, data, or values generated by a function during its execution. They provide a way for a function to capture & communicate its output to the calling code or other parts of the application.
USAGE
Suppose you have a player database where you store player information such as their name, status, and salary. You want to update the status of a specific player with the serial number "32" from the "Players" data model. Here's how you would use the attributes for the 'Update Record' function:
Type: From the dropdown list, you select the "Players" data model, indicating that you intend to update a record within the players' dataset.
Record Value: In this case, you input the variable used for storing such as $players.
Filter Column: You utilize the "Filter Column" function to select the "salary" column from the Players dataset, enabling you to focus specifically on updating the salary attribute for player records.
Column Value: Here you can specify a hardcoded value or variable pointing to the identifier column value based on which updation needs to happen.
Output Variable: Enter a variable such as, "$playerSalary" to store the result. This allows you to utilize the updated salary information in other parts of the application or workflow if necessary.
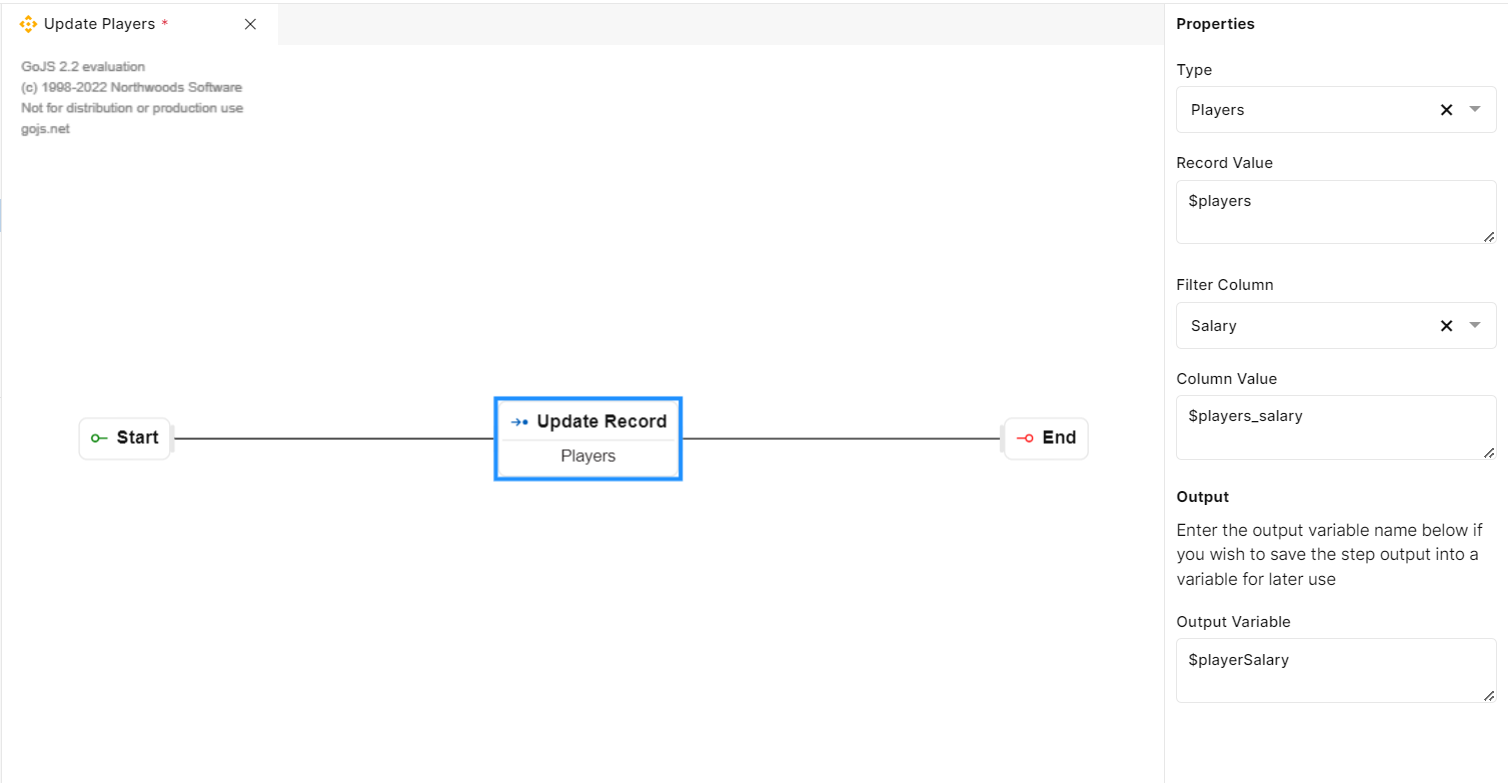
Fig 26: Update Record
Delete Record
The 'Delete Record' function step is an essential operation used to remove a specific record from the data model in the application. It performs deletion based on the record identifier found in the database table. If no matching records are found, the function step deletes the entire record set.
PROPERTIES
When you drop the "Delete Record" step in the functions canvas, a properties panel appears on the right side of the functions to configure the step. The following fields are available in the Properties panel:
Type: This is a dropdown list that allows users to select a relevant data model from the list of created data tables. This feature empowers users to designate the specific record type they intend to delete within the application, ensuring precise targeting and management of data within the system.
Filter Column: Users can leverage the 'Filter Column' dropdown list to select a particular column from the selected table.
Column Value: Users can provide a hardcoded value or a variable pointing to the record identifier allowing system to accurately locate and delete the intended data entry.
Output Variable: This option allows you to save the output of the Delete Record step to a variable, which can be used in the succeeding steps of the function workflow. Output variables are used to capture and store the results, data or values generated by a function during its execution. They provide a way for a function to capture & communicate its output to the calling code or other parts of the application.
USAGE
Suppose you are running a player management system, and you want to delete a specific task from the task list based on serial number. Here's how 'Delete Record' function comes into play:
From the 'Type' dropdown list, you select the "Players" data model, designating the specific record type you intend to delete within the application. This ensures that the deletion operation is precisely targeted at the task dataset within the project management system.
Under the 'Filter Column' dropdown list, you select the "SrNo" column from the “Players” table. By focusing on a specific data attribute, you ensure that the deletion process is centered on a particular Player identified by their serial number within the application.
You provide a unique value, such as "$Player001" for the specific player you wish to delete from the Players list. This guarantees the accurate and precise removal of designated players from the Player management system, ensuring that the correct player is targeted for deletion.
You can assign a variable name such as "$deletedPlayer" in the Output Variable text field. This allows for the storage and referencing of output data generated from the 'Delete Record' function to be used in subsequent steps of the workflow or for future analysis within the application.
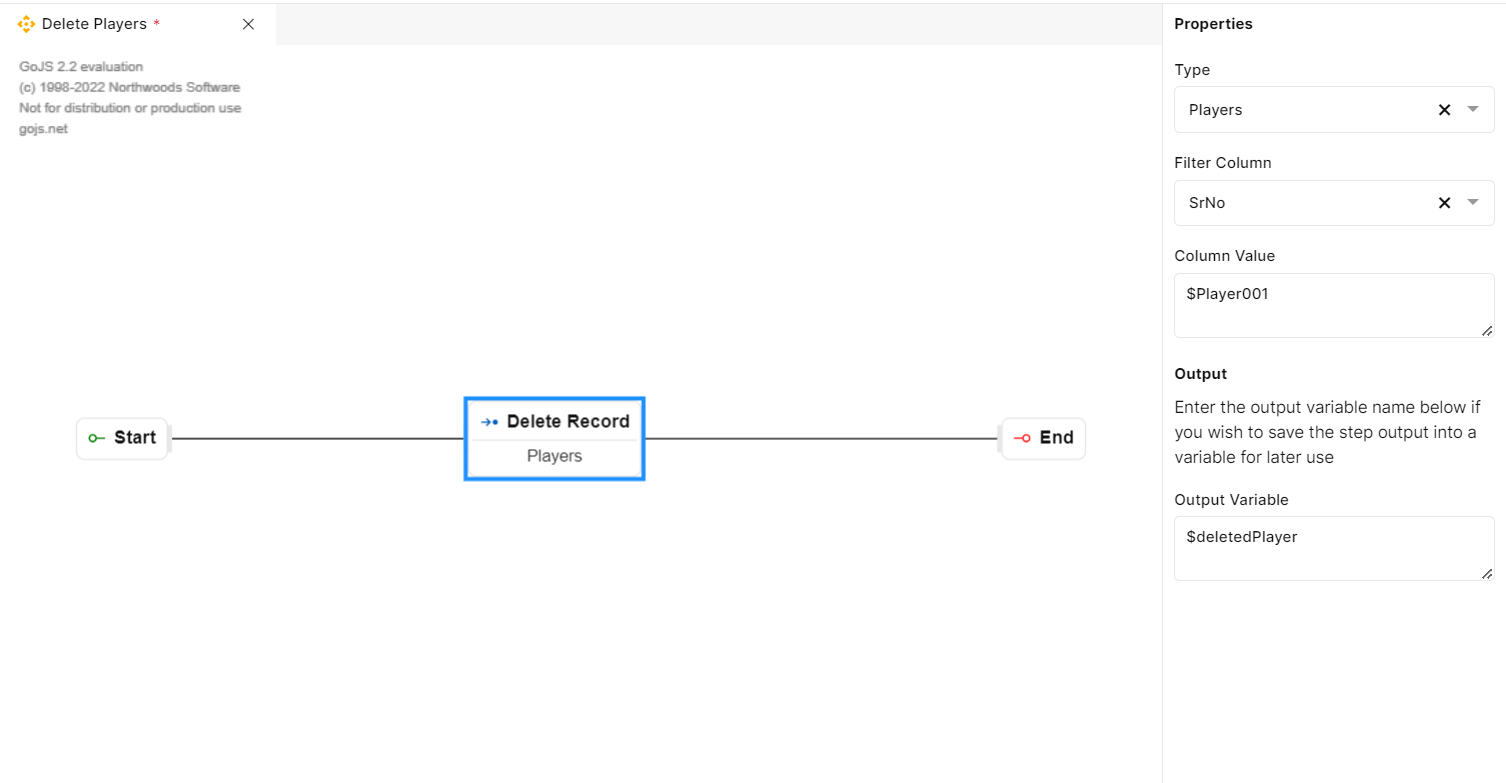
Fig 27: Delete Record
Find Single Record
The "Find Single Record" function step serves the purpose of locating a single record in the database based on the record type/data model key.
PROPERTIES
When you drop the "Find Single Record" step in the functions canvas, a properties panel appears on the right side of the functions to configure the step. The following fields are available in the Properties panel:
Type: This is a dropdown list that allows users to select a relevant data model from the list of created data tables for which they aim to retrieve one record. It enables users to specify the type of record they want to locate, ensuring that the search is precise and focused on the desired data model.
Filter Column: The available columns from the selected record type are displayed in this dropdown list. Users can select the appropriate column that aligns with the search criteria to narrow down the search and locate specific records efficiently.
Filter Value: This property allows users to input a value or retrieve output from a previous step, providing additional parameters for the search operation. Users can use this input field to specify values for the search operation.
Output Variable: This option allows you to save the output of the Find-Single Record step to a variable, which can be used in the succeeding steps of the function workflow. Output variables are used to capture and store the results, data or values generated by a function during its execution. They provide a way for a function to capture & communicate its output to the calling code or other parts of the application.
USAGE
Suppose you are managing a player management system for an upcoming function, and you want to locate a specific player’s information based on their unique salary. Here's how you can utilize the properties of the "Find Single Record" function step:
You use the dropdown list to select the "Players" data model, indicating that you want to locate a specific player within the inventory system. This ensures that the search operation is precise and directed towards the Players dataset within the database.
From the available Filter columns within the "Players" data model, you select the "SrNo" column. This choice enables you to narrow down the search and locate the specific player efficiently based on its SrNo.
You input the Filter value, such as "$Player002" into the input field. This additional parameter helps refine the search operation, ensuring that the system retrieves specific player information based on the provided SrNo.
You can name a variable such as, "$selectedPlayer" and can store the output from the "Find Single Record" function. This enables you to reference and utilize the retrieved player information for subsequent operations or analysis within the inventory management system.
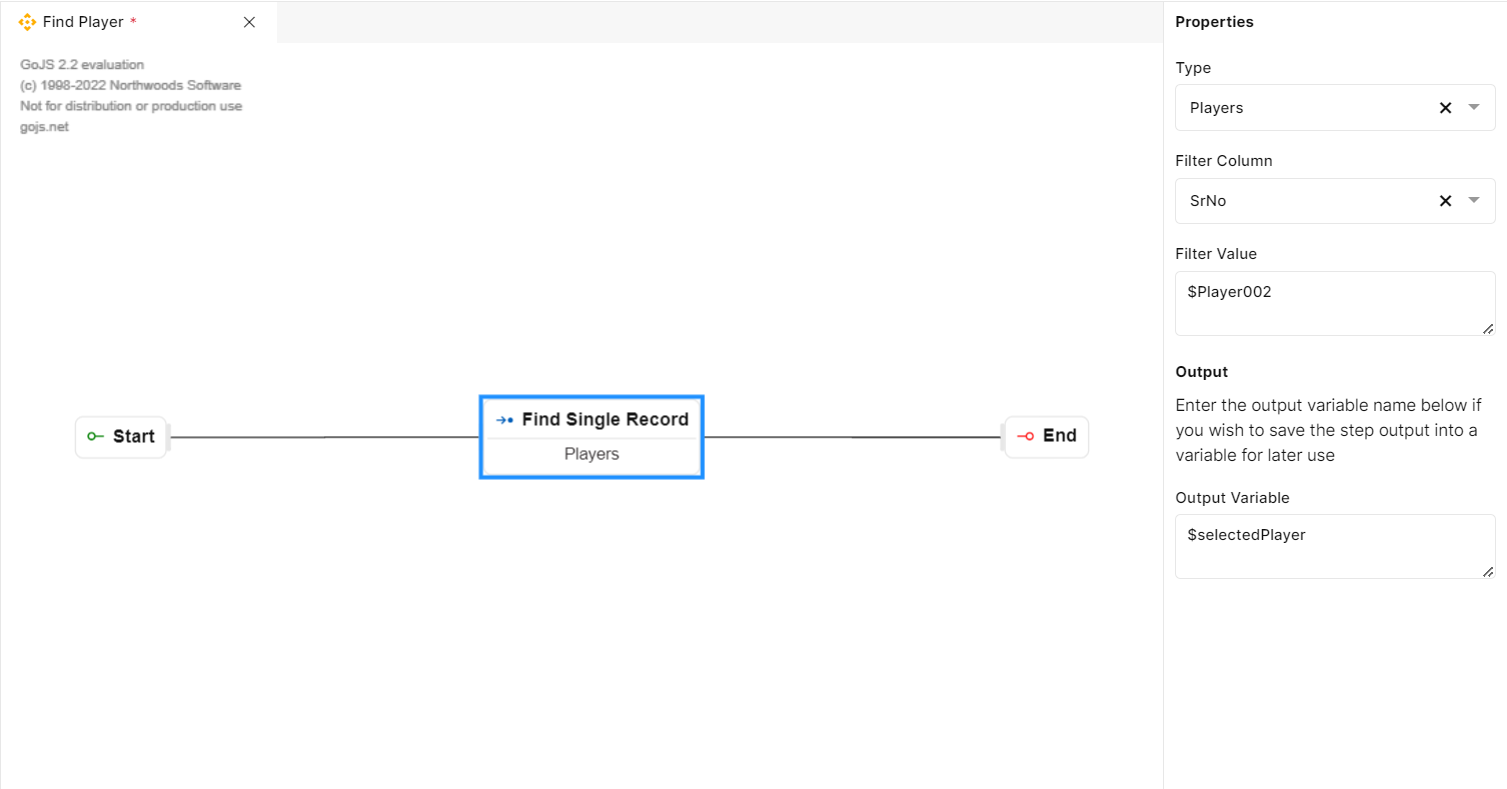
Fig 28: Find Single Record
Find All Records
The "Find All Records" function step is a crucial step that enables users to retrieve all records associated with a specific data model key from the database.
PROPERTIES
When you drop the "Find All Records" step in the functions canvas, a properties panel appears on the right side of the functions to configure the step. The following fields are available in the Properties panel:
Type: This is a dropdown list that allows users to select a relevant data model from the list of created data tables for which they aim to retrieve all the records. This ensures that the search operation is accurately targeted towards the desired data set.
Output Variable: This option allows you to save the output of the Find All Record step to a variable, which can be used in the succeeding steps of the function workflow. Output variables are used to capture and store the results, data or values generated by a function during its execution. They provide a way for a function to capture & communicate its output to the calling code or other parts of the application.
USAGE
Let’s say you are managing a Player database system for a league competition, and you want to retrieve all the player records associated with a particular club. Here's how you can utilize the properties of the "Find All Records" function step:
You use the dropdown list to select the "Players" data model, specifying the specific data model from which you intend to retrieve all the player records. This ensures that the search operation is focused on the player dataset within the system.
By creating a variable named "$AllPlayers" you can store the output from the "Find All Records" function. This allows you to reference and utilize the retrieved players' data for subsequent operations or analysis within the system's workflow.
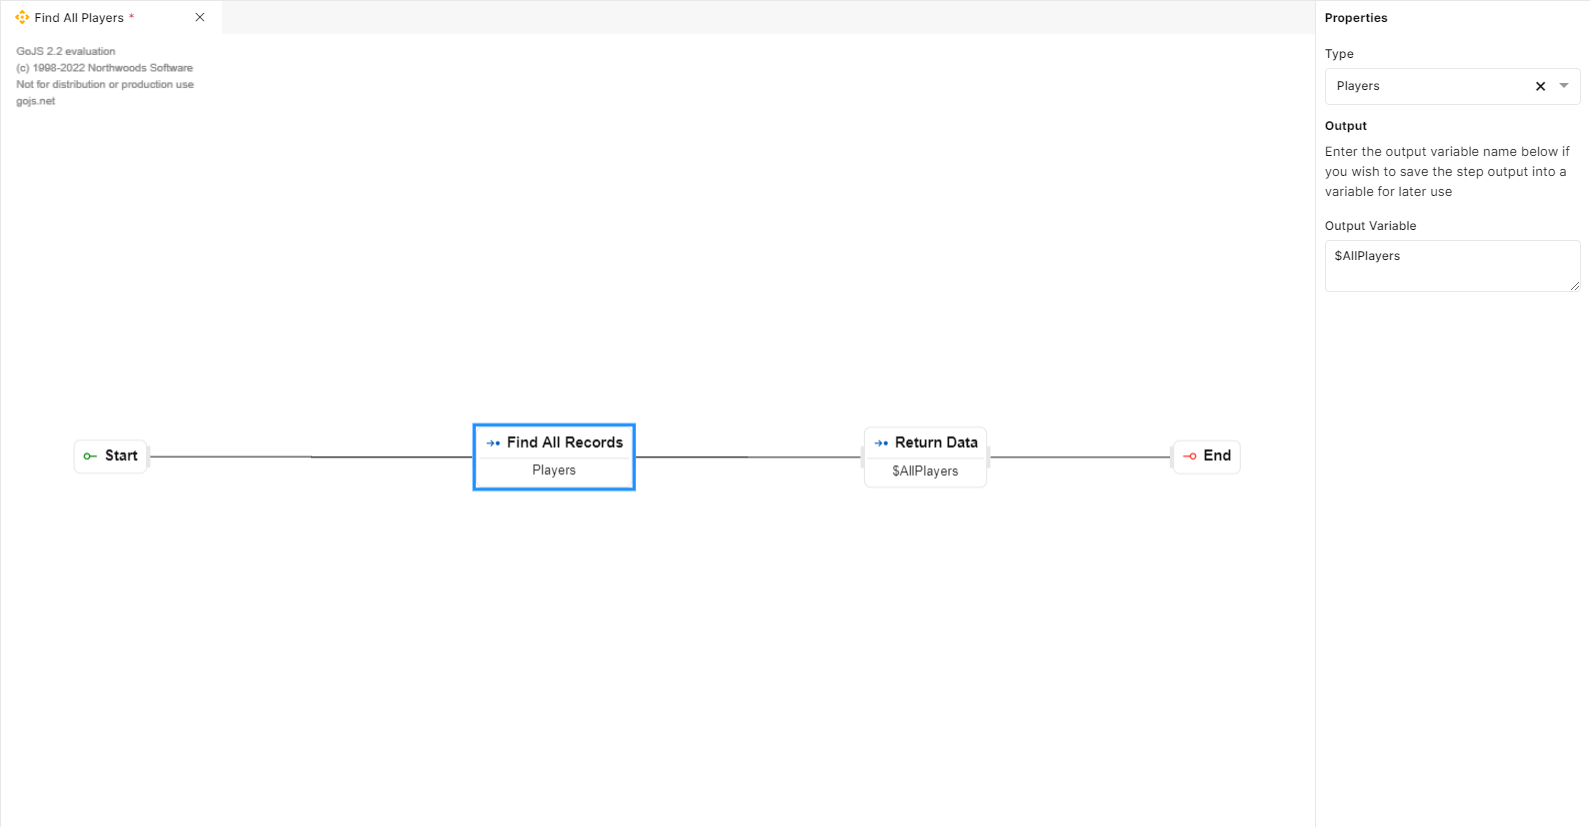
Fig 29: Find All Records
Find Multiple Records
The "Find Multiple Records" function step is an essential tool used to retrieve multiple records from a database based on specific criteria.
PROPERTIES
When you drop the "Find Multiple Records" step in the functions canvas, a properties panel appears on the right side of the functions to configure the step. The following fields are available in the Properties panel:
Type: This dropdown allows users to select multiple tables from the list of created tables in the database from which they wish to retrieve records, providing the flexibility to gather data from different sources simultaneously.
Filters: This feature allows users to specify filtering criteria by selecting the column, operator, and value for refining the search results, enabling a more targeted and precise record retrieval process.
Column: Users can choose an appropriate column from the selected table, enabling them to focus the search on specific attributes within the dataset.
Operator: The operator dropdown list offers various comparison and relational operators, allowing users to define specific conditions for the record retrieval process. Below are the supported operators.
Greater than: When developer selects ‘greater than’ from the dropdown and enters desired value in the value field, data that is greater than the entered value (excluding the entered value) will be filtered.
Less than: When developer selects ‘less than’ from the dropdown and enters desired value in the value field, data that is less than the entered value (excluding the entered value) will be filtered.
Greater than or equal to: When developer selects ‘greater than or equal to’ from the dropdown and enters desired value in the value field, data that is greater than the entered value or equals the entered value will be filtered.
Less than or equal to: When developer selects ‘less than or equal to’ from the dropdown and enters desired value in the value field, data that is less than the entered value or equals the entered value will be filtered.
Equals: When developer selects ‘equal to’ from the dropdown and enters desired value in the value field, data that is exactly equal to the value entered will be filtered.
Does Not Equal: When developer selects ‘not equal to’ from the dropdown and enters desired value in the value field, data that is not equal to the value entered will be filtered.
Is Null - When developer selects ‘is null’ from the dropdown, count of blank records will be filtered. The value input field will be disabled when you select this option.
Is Not Null - When developer selects ‘is not null’ from the dropdown, count of all the records that are not blank will be filtered. The value input field will be disabled when you select this option.
Value: Users can input a custom value or retrieve output from a previous step to establish the search criteria, ensuring that the search operation aligns with the specified parameters.
Filters: This section displays all the added filters, providing users with an overview of the current filtering criteria. Users can remove any unnecessary filters by clicking the delete icon (
) and edit existing filter by clicking the edit icon (
)
Output Variable: This option allows you to save the output of the Find-Multiple Records step to a variable, which can be used in the succeeding steps of the function workflow. Output variables are used to capture and store the results, data or values generated by a function during its execution. They provide a way for a function to capture & communicate its output to the calling code or other parts of the application.
USAGE
Let’s say you are managing the salaries of players on a player management platform, and you want to retrieve a list of players who have salaries exceeding $300000. Here's how you can utilize the properties of the "Find Multiple Records" function step:
You utilize the ‘Type’ dropdown list to select "Players" table, enabling you to retrieve data from the players table.
You specify the filtering criteria by selecting the "Salary" column, setting the operator to "greater than" and entering the value "$300000" to filter players who have salaries exceeding this amount.
The system displays an active filter, indicating that you are retrieving players based on transactions exceeding $300000. This allows you to review and manage the filtering criteria before initiating the search.
You can create a variable named "$highestPaid" to store the output from the "Find Multiple Records" function step. This allows for convenient reference and utilization of the retrieved player data for subsequent analysis or targeted transfer business campaigns within the industry.

Fig 30: Find Multiple Records
Set Record Value
The “Set Record Value” function step allows the developer to create a new record and store it in a variable. This new record can be used in the following steps as per the application requirement.
PROPERTIES
When you drop the "Set Record Value" step in the functions canvas, a properties panel appears on the right side of the functions to configure the step. The following fields are available in the Properties panel:
Variable Name: In this field, you need to specify a variable to store the record type with values the user is creating
Record Type: In this dropdown, you need to select the type of data you want to create. On selecting the required data type. It will create input fields with the keys of the selected data type. In these input fields, developers can specify the details of selected data type to be added and used in subsequent steps.
USAGE
Suppose you have a player management application. In your application workflow, you want a feature where the user can create a new record of a Player from the Players database. In such cases, the “Set Record Value“ function step can be used
Drag the “Set Record Value“ step onto the canvas.
Set a variable name as per your choice. eg, $newPlayer.
Choose the Record Type from the dropdown provided.
This will create an input field with the Keys associated with the data set.
You can enter the values of players you want to add in these fields & use the variable name to store the data to use it in subsequent steps.
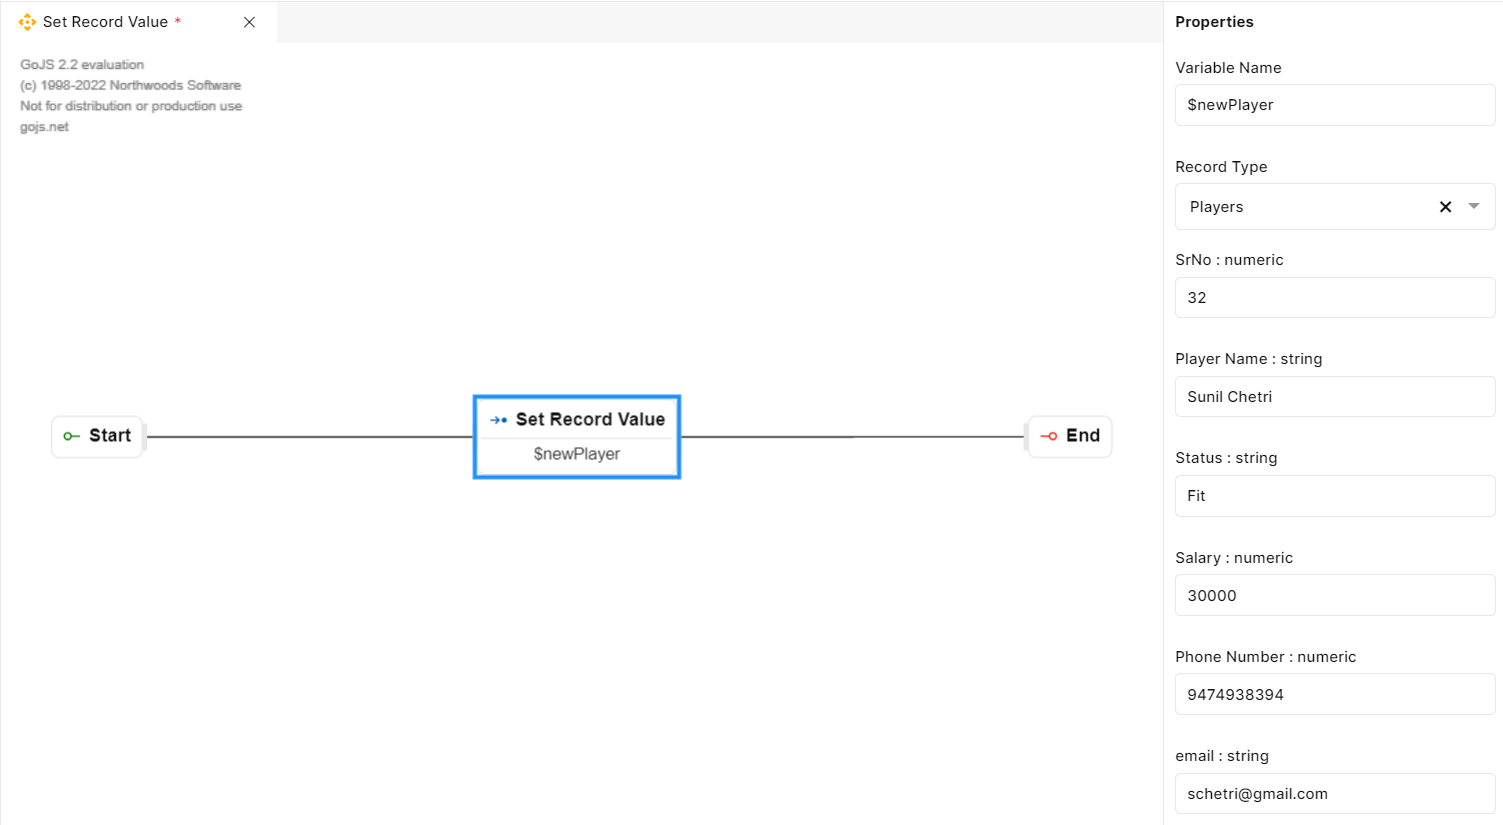
Fig 31: Set Record Value
Comms Functions
Comms Functions (Communication functions) help you to implement various interactive capabilities between the application and its external environment.
Comms functions include below four function steps:
Send Email
The send email function step is used to send an email from the application. This function helps the developer to build an automatic alert/ comms generation facility based on the business/ operational requirements within the application.
PROPERTIES
When you drop the "Send Email" step to the functions canvas, the properties panel appears on the right side of the functions canvas to configure the step. The following fields are available in the Properties panel:
To: The recipient's email address to whom the email is to be sent.
Subject: The subject or title of the email, providing a concise summary of its content.
Body: The main content or message of the email that conveys the intended information to the recipient.
SMTP Configuration: The "SMTP Configuration" field allows you to select a configuration from the dropdown list of servers that have been already added in the Resources section. Note: Details provided in the Resources section cannot be modified in the Send Email step properties. Changes/modifications can only be made in the Resources section.
Here are the steps for adding an SMTP Configuration in the resources section:
Go to the Resources Section by navigating from My workspace ➔ Explorer ➔ Resources ➔ Email Servers (Manage) ➔ Add Email Server.
Provide Server details:
Host: The SMTP server address that is responsible for sending the email.
Port: The port number to establish the connection for the SMTP server. The port number typically ranges from 0 to 65535, with a default value of 587.
Username: The username associated with an email account that’s used to send emails.
Password: The password corresponding to the provided username for authentication and access to the email account.
Click on Add Server to reflect in the dropdown list.
By filling in these SMTP configuration fields, users can ensure that the application can securely send emails to recipients using the provided email server.
USAGE
In this example, we'll send an email alert to a specified recipient using a configured SMTP server.
Step 1: Create an SMTP Configuration in Resources
Navigate to the Resources section in the explorer, specifically the Email Servers (Manage) section.
Go to My Workspace ➔ Explorer ➔ Resources ➔ Email Servers (Manage) ➔ Add Email Server.
Provide the necessary SMTP server details:
Host: smtp.example.com (replace with the actual SMTP server address)
Port: 587 (or the appropriate port for your SMTP server)
Username: your_email@example.com
Password: YourEmailPassword
Click on "Add Server" to save the SMTP configuration.
Step 2: Use the "Send Email" Function in the Application
In the functions canvas, drop the "Send Email" step and configure it using the Properties panel:
To: Enter the recipient's email address to whom the email alert should be sent (e.g., recipient@example.com). In this example we are sending mail to the provided email address, which is sunilchetri@gmail.com.
Subject: Provide a concise subject or title for the email, summarizing its content (e.g., "System Alert: Critical Event").
Body: Compose the main content or message of the email, conveying the relevant information (e.g., "Dear User, This is to inform you about a critical event in the system...").
SMTP Configuration: From the dropdown list, select the SMTP configuration that you previously added (e.g., "your_email@example.com").
Note: Ensure that the provided SMTP server details, such as the host, port, username, and password are accurate and correspond to a valid and accessible SMTP server for sending emails.
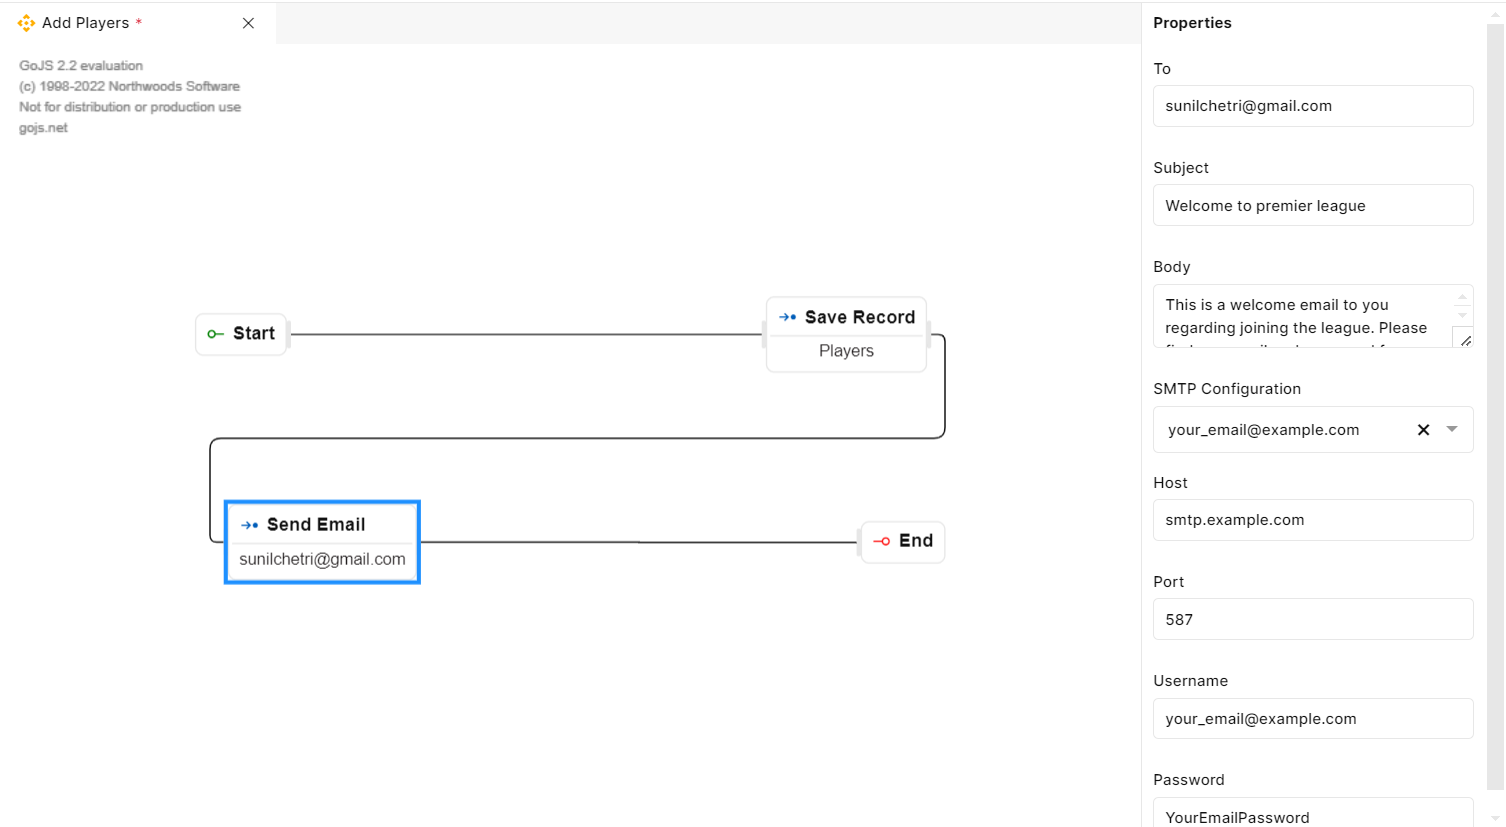
Fig 32: Send Email
REST API Call
The REST API Call function step is used to integrate and interact with external applications/ systems that support REST API calls. This helps the application to access data and its processing logic available in the API which will be accessed through this call.
This comms function helps in extending the application’s business and operational capabilities by leveraging already available processing capabilities within the enterprise.
PROPERTIES
When you drop the "REST API Call" step to the functions canvas, the properties panel appears on the right side of the functions to configure the step. The following fields are available in the Properties panel:
Endpoints: The "Endpoints" field allows you to select an endpoint from the dropdown list of endpoints that have been already added in the Resources section.
Here are the steps for adding an endpoint in the resources section:
Go to the Resources Section by navigating from My workspace ➔ Explorer ➔ Resources ➔ Rest API Endpoints (Manage) ➔ Add Endpoint.
Provide Endpoint Details:
a. Endpoint Name: Specify a meaningful name for the endpoint, which will be displayed in the dropdown list for selection.
b. Endpoint Type: Select the appropriate HTTP method (e.g., GET, POST, PUT, DELETE) from the dropdown menu, reflecting the type of interaction with the API.
c. URL: Enter the REST Call API URL, which serves as the address for accessing the desired endpoint.
d. Path Parameter: Configure any path parameters that need to be sent along with the URL. Click on "Add Parameter" to save the configured parameters.
e. Headers: Configure the list of allowed keys in the request header and then click "Add Header" to save the configured headers.
f. Query Params: Set up the query parameters to be sent as key-value pairs along with the URL. Click "Add Parameter" to save the configured query parameters.
g. Body: Configure the fields to be sent as part of the request body. Add each field individually and then click "Add Field" to save the configuration.
h. Response: Define the response type and specify the fields present in the response.
Success Status Code: Set the status code that signifies a successful result for the endpoint.
Response Type: Select the appropriate response type from the dropdown menu, such as Object List, Object, or string.
Response Field Name: Define the variable name to store the response from the endpoint.
i. Save Changes: Clicking on "Save Changes" will add the configured endpoint, which will then be displayed in the dropdown list of REST Call function properties.
By following these steps, you can effectively set up and manage endpoints, enabling seamless integration and communication between your application and external APIs.
USAGE
Suppose you are building an e-commerce application that requires integration with a product inventory management system. You want to fetch the product details from the inventory system's API to display them on your application. Here's how you can add an endpoint for this purpose:
Go to the Resources Section:
Access the path My workspace ➔ Explorer ➔ Resources ➔ Rest API Endpoints (Manage) ➔ Add Endpoint.
Provide Endpoint Details:
a. Endpoint Name: "PlayersList"
b. Endpoint Type: "GET"
c. URL: "https://list-api.com/players"
d. Path Parameter: None
e. Headers: Accept: application/json
f. Query Params: None
g. Body: None
h. Response:
o Success Status Code: 200
o Response Type: JSON
o Response Field Name: "$playerDetails"
i. Save Changes: Click on "Save Changes" to add the "PlayersList" endpoint.
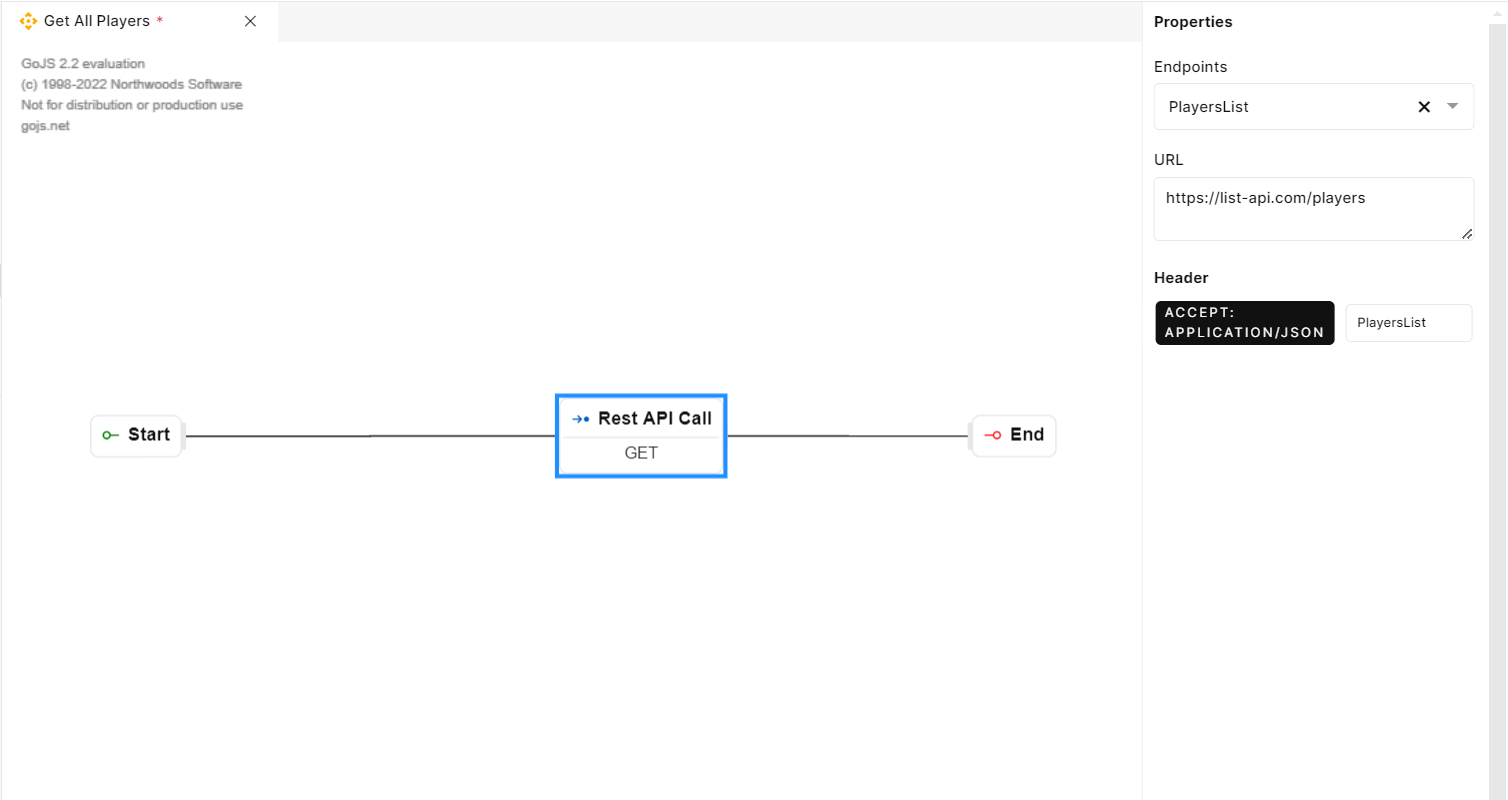
Fig 33: REST API Call
SQL Call
External SQL calls help you to execute SQL commands on an external DB. To execute the SQL command, a connection with the desired DB needs to be established.
PROPERTIES
When you drop the "SQL Call" step to the functions canvas, the properties panel appears on the right side of the functions canvas to configure the step. The following fields are available in the Properties panel:
Host: Enter an appropriate hostname in this text box.
Port: Enter an appropriate port name in this text box.
Username: Enter your official user ID in this text box.
Password: Enter a valid password in this text box.
Database: You can enter the relevant database in this text box.
Query: You can enter your SQL query in this multi-line text box.
Output Variable: This option allows you to save the output of the SQL Call step to a variable, which can be used in the succeeding steps of the function workflow. Output variables are used to capture and store the results, data or values generated by a function during its execution. They provide a way for a function to capture & communicate its output to the calling code or other parts of the application.
USAGE
Let’s consider a scenario where we want to fetch data for all employees from the sales department. We can use properties as below,
The host is set to "http://myhostname.com" indicating the specific hostname where the database is hosted.
The port is set to "3306" specifying the appropriate port number for the database connection.
The username is set to "myusername" representing the official user ID associated with the database access.
The password is set to "mysecretpassword" ensuring secure access to the database with the appropriate authentication credentials.
The database is set to "mydatabase" indicating the targeted database for query execution.
The query is specified as "SELECT * FROM employees WHERE department='Sales'" representing a sample SQL query designed to retrieve all records from the employees table where the department is labeled as "Sales."
You can also store the data by entering a variable name in the “Output Variable“ field.
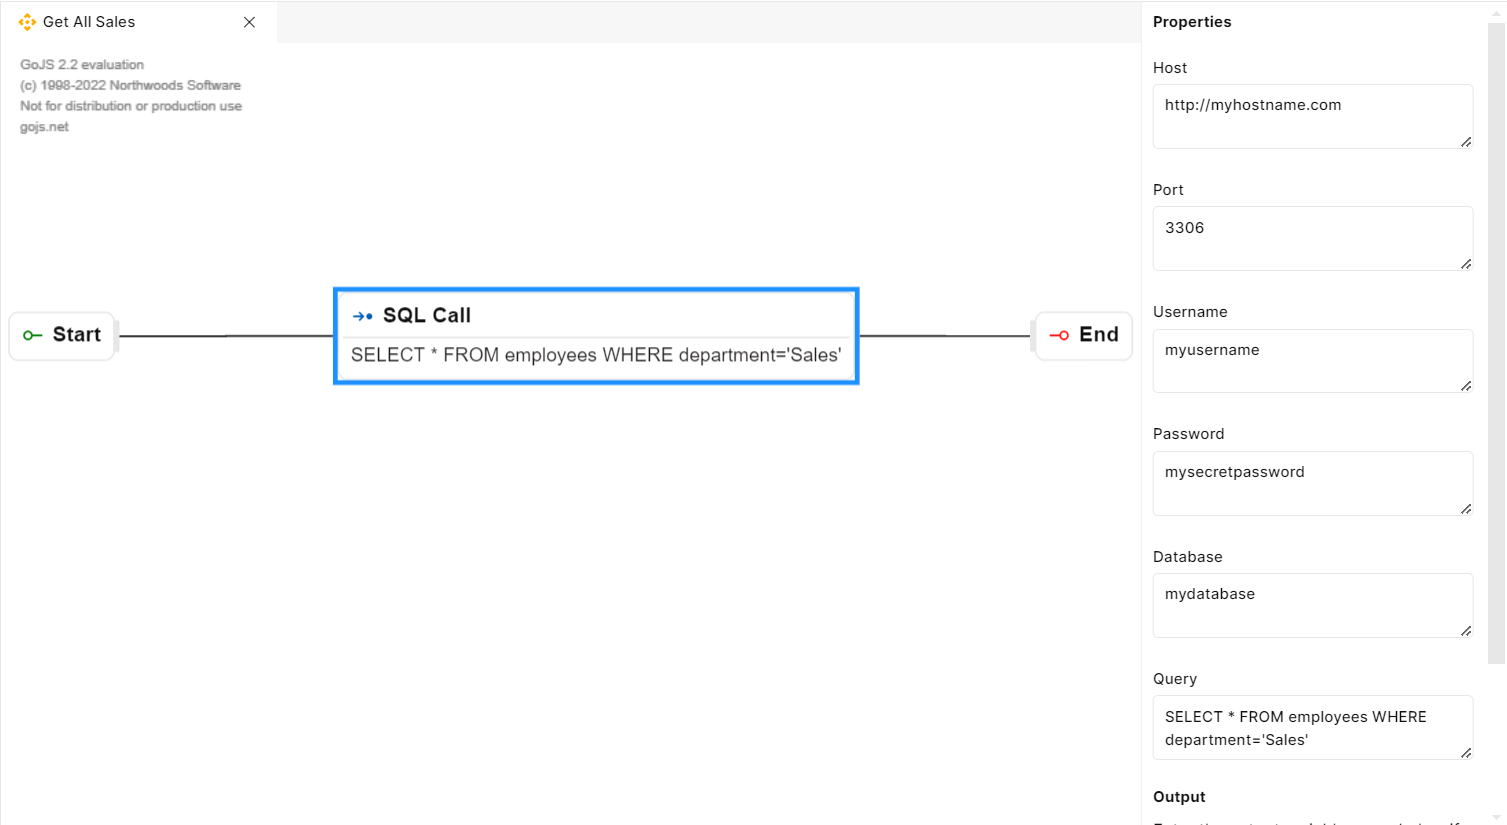
Fig 34: SQL Call
Ansible Call
"Ansible Call" refers to the strategic integration of Ansible, an automation tool, into organizational workflows to enhance operational efficiency, streamline processes, and ensure consistency in the management and deployment of IT resources. It involves incorporating Ansible automation scripts, playbooks, or tasks into business processes to automate routine tasks, such as configuration management, application deployment, and system orchestration.
PROPERTIES
When you drop the "Ansible Call" step to the functions canvas, a properties panel appears on the right side of the functions canvas to configure the step. The following fields are available in the Properties panel:
Playbook File: Specify the location and name of the Ansible playbook file that contains the instructions for the software deployment. For instance, you could set it as "/path/to/playbook.yaml" to indicate the YAML file containing the required tasks and configurations.
Inventory File: Define the path and name of the Ansible inventory file that lists the target servers for software updates. You might set it as "/path/to/inventory.ini" to specify the INI file that includes the necessary server details.
Output Variable: This option allows you to save the output of the Ansible Call step to a variable, which can be used in the succeeding steps of the function workflow. Output variables are used to capture and store the results, data or values generated by a function during its execution. They provide a way for a function to capture & communicate its output to the calling code or other parts of the application.
USAGE
Suppose you have an Ansible playbook named "update.yaml" that includes the necessary steps for deploying software updates. Additionally, you have an inventory file named "servers.ini" that lists the servers where the updates need to be applied. You can configure the Ansible Call function as follows:
Playbook File: "/path/to/update.yaml"
Inventory File: "/path/to/servers.ini"
Output Variable: Enable the checkbox and provide the variable name as "$deploymentStatus".
By setting up the Ansible Call function in this manner, you can effectively trigger the deployment process for the software updates across the designated servers and monitor the deployment status through the specified output variable.
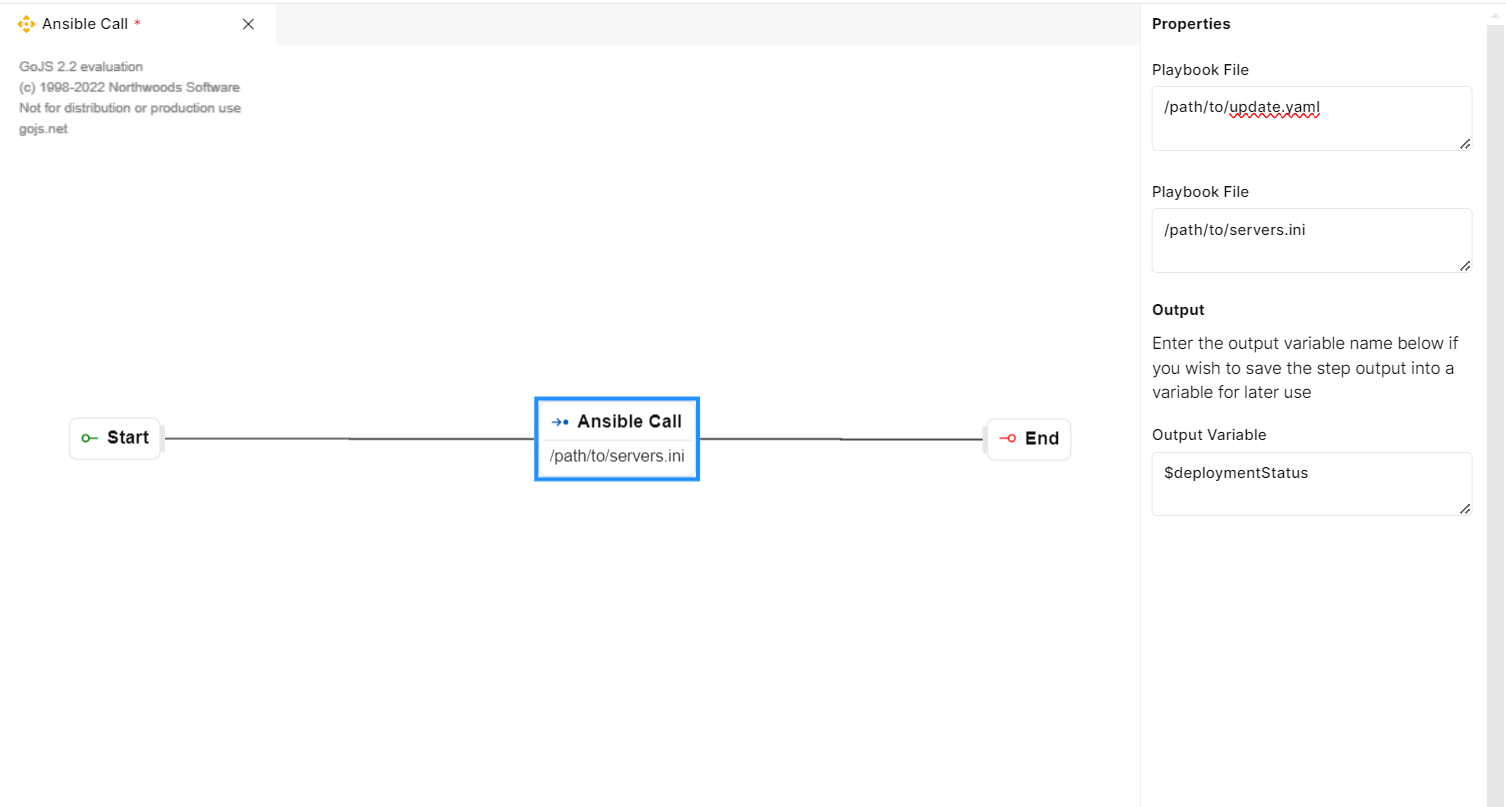
Fig 35: Ansible Call
Retrieve Actions
The “Retrieve Actions” step allows access to external files and to consume their contents. Retrieve functions include six sub-function steps, The Purpose of each of the four function steps are as follows:
Read External File
The "Read External File" function step is a feature that allows users to access and consume the contents of external files. It provides a mechanism for reading and extracting data from files stored in external locations. By implementing the "Read External File" function in this manner, you can seamlessly incorporate external file data into your application, enabling effective data analysis and manipulation capabilities.
PROPERTIES
When you drop the "Read External File" step to the functions canvas, the properties panel appears on the right side of the functions canvas to configure the step. The following fields are available in the Properties panel:
URL: This property enables users to input the URL of the file they wish to access and read. Users should provide a complete and valid URL address that points to the location of the target file. The step uses this URL to establish a connection and retrieve the contents of the file for further processing or analysis.
Output variable: This option allows you to save the output of the Retrieve External File step to a variable, which can be used in the succeeding steps of the function workflow. Output variables are used to capture and store the results, data or values generated by a function during its execution. They provide a way for a function to capture & communicate its output to the calling code or other parts of the application.
USAGE
Let's explore an example of using the "Read External File" function to read the contents of a CSV file from a specified URL and store the data in a variable.
Step 1: Create a CSV File in an External Location
Assume you have a CSV file named "example_data.csv" stored at the following URL:
https://example.com/data/example_data.csv. This file contains sample data with columns like "Name" "Age" and "City."Step 2: Use the "Read External File" Function in the Application
In the functions canvas, drop the "Read External File" step and configure it using the Properties panel:
URL: Enter the complete URL of the CSV file you want to read. In this case, it's https://example.com/data/example_data.csv.
Output Variable: In this text field will appear; provide a unique variable name, for example, $csvData.
Step 3: Use the Extracted Data in Subsequent Steps
Now that the data from the external CSV file is stored in the variable
csvData, you can use it in subsequent steps of your application workflow.
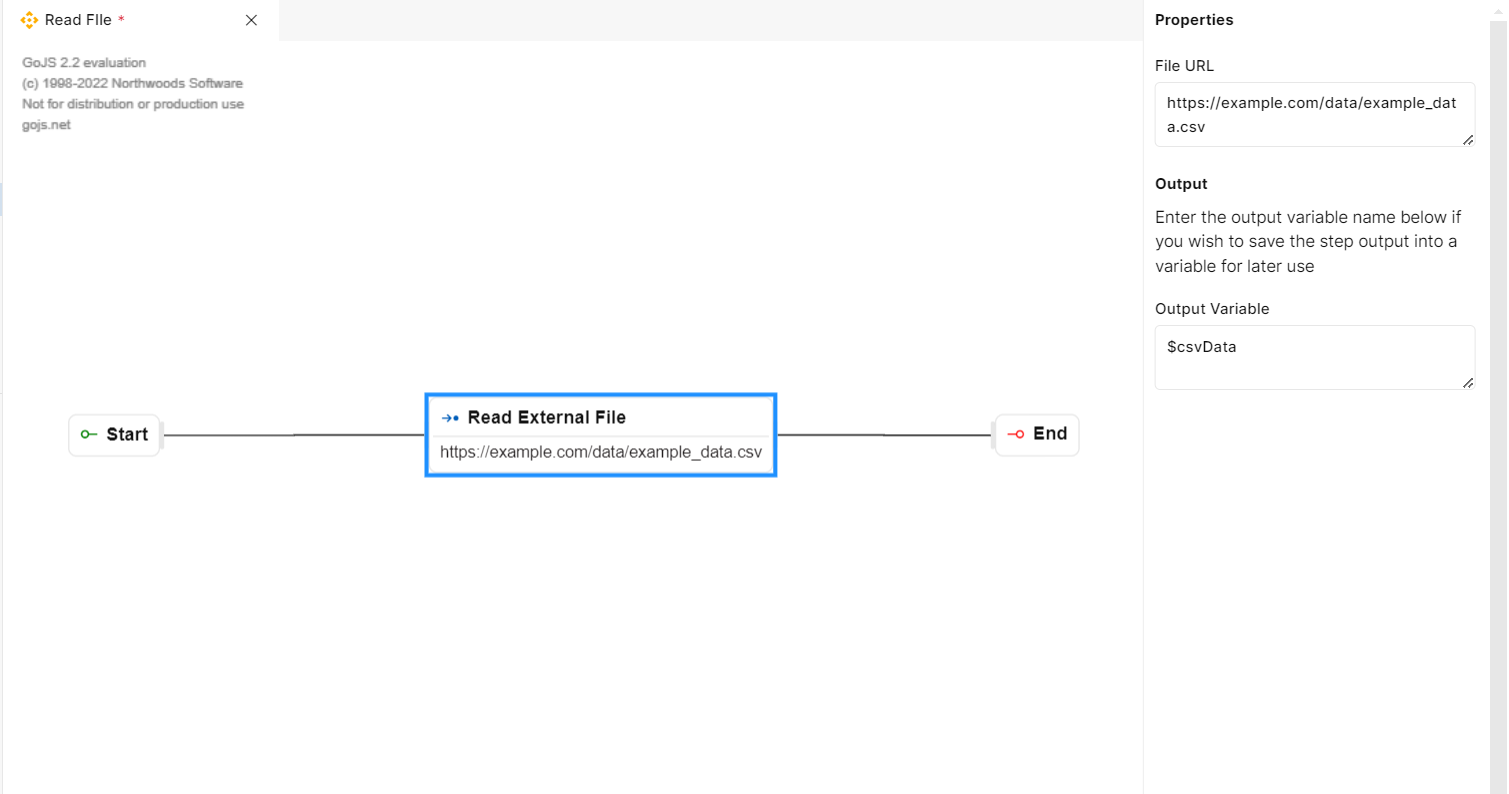
Fig 36: Read External File
Write to File
The "Write to File" function step allows you to create and write data to a new file. This is particularly useful when you need to store information for later reference or analysis.
PROPERTIES
When you drop the "Write to File" step to the functions canvas, the properties panel appears on the right side of the functions canvas to configure the step. The following fields are available in the Properties panel:
File Name: You can specify the name of the file that you want to create or write to. The file name should be unique and reflect the data or purpose associated with the file.
Content: This field allows you to input the data that you want to write to the file. You can include text, numerical data or any other relevant information that needs to be stored or processed within the file.
Output Variable: This option allows you to save the output of the Write to File step to a variable, which can be used in the succeeding steps of the function workflow. Output variables are used to capture and store the results, data or values generated by a function during its execution. They provide a way for a function to capture & communicate its output to the calling code or other parts of the application.
USAGE
Let's consider a situation where you have a data processing application that generates reports periodically. You want to create a new file to store the latest report data for future reference. Here's how you can use the "Write to File" function step:
File Name: Specify the name of the file you want to create, such as "latest_report.txt". Make sure the file name is unique and descriptive of the data it will contain.
Content: Input the latest report data into this field. This could include various types of information, such as sales figures, customer data, or any other relevant metrics. For example, you might input the following report data:
a. Date: October 25, 2023
b. Total Sales: $150,000
c. New Customers: 25
In Output Variable text field, provide a unique variable name, for example, $writtenData.
Using the "Write to File" function in this way allows you to create and store the latest report data in a file, ensuring that the information is readily available for future analysis and comparison.
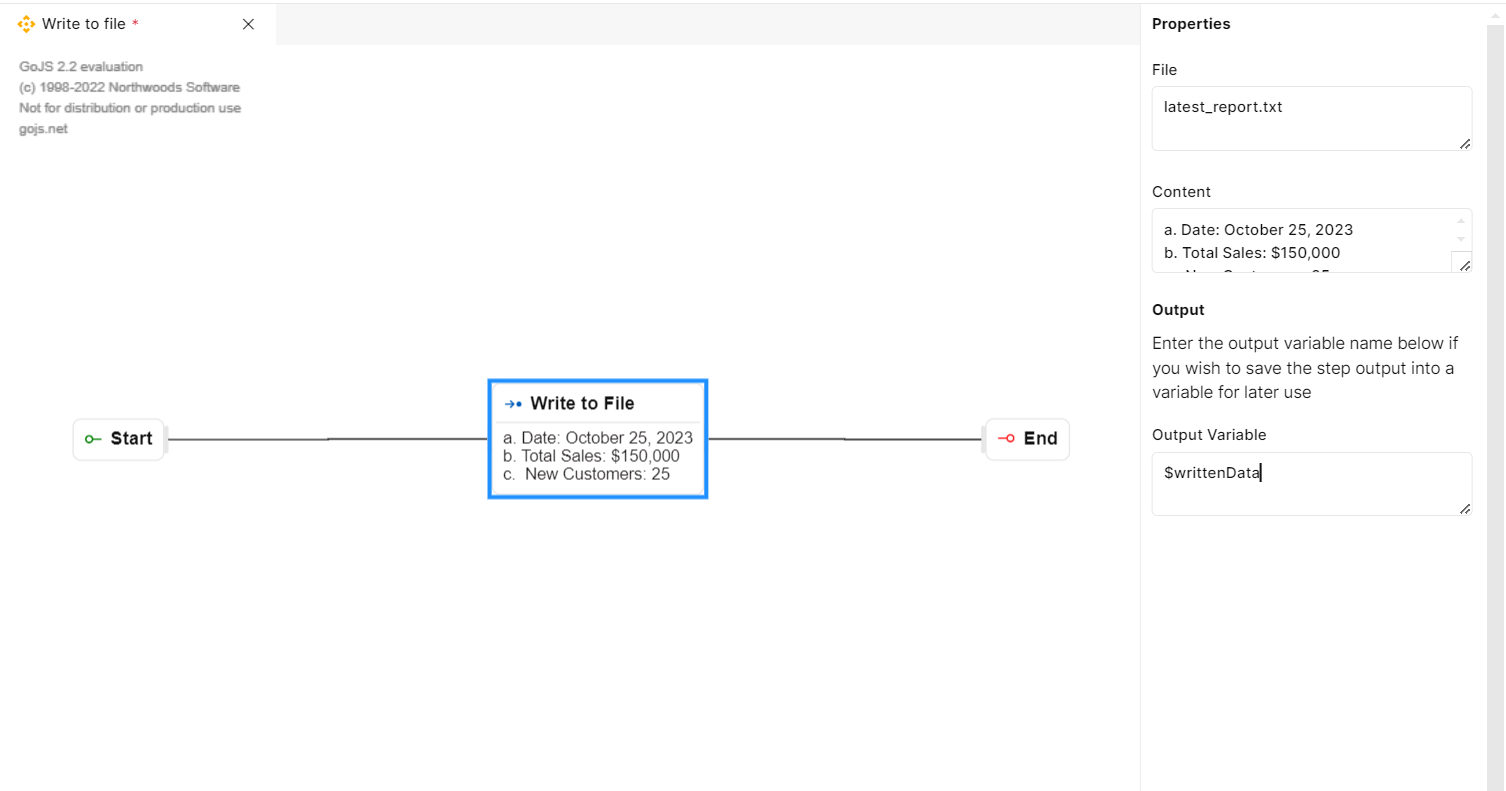
Fig 37: Write To File
Append to File
The "Append to File" function step is used to add new content to an existing file without overwriting the existing data. This function is helpful when you want to continuously update a file with new information over time.
PROPERTIES
When you drop the "Append to File" step to the functions canvas, the properties panel appears on the right side of the functions canvas to configure the step. The following fields are available in the Properties panel:
File Name: Specify the name of the file to which you want to append new content. Make sure the file name corresponds to the existing file you want to update.
Content: Enter the new data or content that you want to append to the file. This can include text, numerical data or any other relevant information you wish to add to the existing file.
Output Variable: This option allows you to save the output of the Append to FIle step to a variable, which can be used in the succeeding steps of the function workflow. Output variables are used to capture and store the results, data or values generated by a function during its execution. They provide a way for a function to capture & communicate its output to the calling code or other parts of the application.
USAGE
Let's say you have a log file that keeps track of various system functions in your application. To continuously update this log file, you can use the "Append to File" function.
You specify the log file name under the File field.
Then input the latest system function details, such as error messages, system notifications or any other relevant information under Content. This ensures that the log file retains a complete history of system functions over time.
Enter a variable such as “$additionalSales“ in the “Output Variable“ text field to store the content.
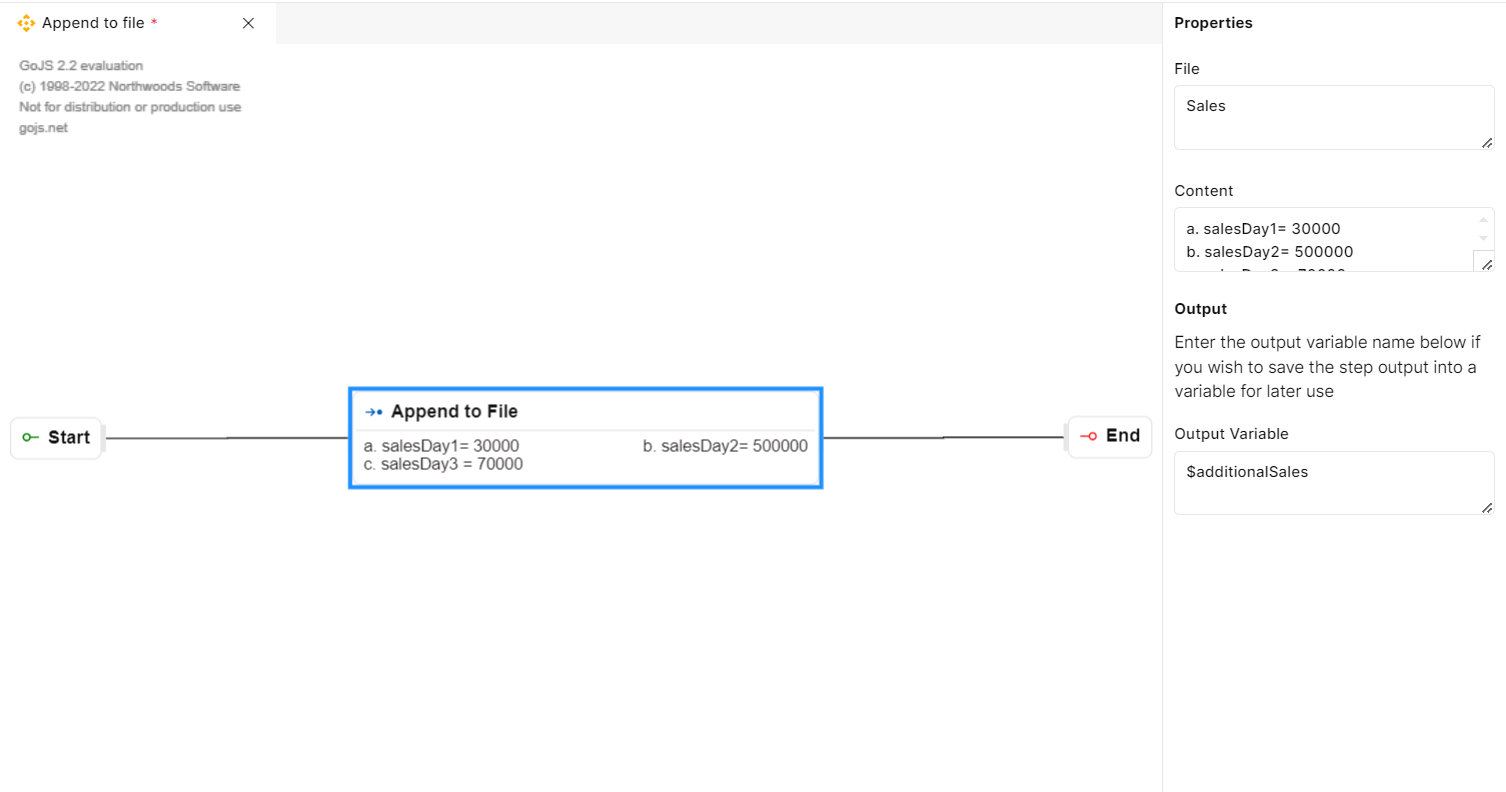
Fig 38: Append To File
Get Chart Data
The "Get Chart Data" function step allows you to retrieve data from a specified data source and format it to present in charts. It provides a versatile way to extract and organize data for visual representation.
PROPERTIES
When you drop the "Get Chart Data" step to the functions canvas, the properties panel appears on the right side of the functions canvas to configure the step. The following fields are available in the Properties panel:
Chart Type: Select the type of chart you want to generate, such as a line chart, bar chart, or pie chart.
Data source Table: Specify the table or data source from which you want to retrieve data for the chart.
X-axis: Choose the data column that will be used as X-axis on the chart.
Y-axis: Select the data column that will be used as Y-axis on the chart.
Function: Define the function that should be applied to the data, such as sum, min, max, average or count.
Add Column: It adds above details & will show as below,
Name: It will display Y-Axis as the name.
Function: It will display the function which we have selected.
Action: It will allow you to delete the above column.
·Filter: Add additional filters to the chart, specifying the column, operator, value and desired action for each filter.
Column: Select the column name from the dropdown list on which the filter is to be applied.
Operator: Select an operator to apply criteria on the selected column name.
Value: Provide a value for the above operator depending on the criteria you would like to set.
Add Filter: It adds above details & will display as below,
Column: It will display the above selected column.
Operator: It will display the above selected operator.
Value: It will display the value added above.
Action: It will allow you to delete the above filter.
Output variable: This option allows you to save the output of the Get Chart Data step to a variable, which can be used in the succeeding steps of the function workflow. Output variables are used to capture and store the results, data or values generated by a function during its execution. They provide a way for a function to capture & communicate its output to the calling code or other parts of the application.
USAGE
Let's provide a more detailed example based on the clarification that the "Get Chart Data" function is used for fetching data in the backend and manually updating charts. In this example, we'll consider a scenario where a user enters a specific product name in a text field, and the bar chart displays the sales data for given product.
Step 1: Setup
Assume you have a screen with a bar chart component representing the total salaries of players, a text field for the user to input a player name, and a button to trigger the search.
Step 2: Configure the Chart using the "Get Chart Data" Function
In the functions canvas, drop the "Get Chart Data" step and configure it using the Properties panel:
Chart Type: Select "Bar Chart" from the dropdown list to generate a bar chart.
Data source Table: Choose "Players" as the data source table.
X-axis: Select the "Player Name" column as the X-axis data.
Y-axis: Choose the "Salary" column as the Y-axis data.
Function: Choose "Count" to calculate the total salary for each player.
Add Column: Click on "Add Column" to add the configuration for the Y-axis. It might look like this:
Name: Displayed as Y-axis name, set to "Total Salary."
Function: Displays the selected function, set to "Count."
Action: Allows you to delete this column if needed.
Filter: Add a filter to focus on a specific subset of data. For example, filter data for a specific date range:
Column: Select "Sr No"
Operator: Choose "Between."
Value: Provide the SR No range for the filter.
Add Filter: Click on "Add Filter" to add the configuration for the filter. It might look like this:
Column: Displays the selected column, set to "SalaryNo"
Operator: Displays the selected operator, set to "Between."
Value: Displays the provided Sr No range.
Action: Allows you to delete this filter if needed.
Output variable: Save the chart data to an output variable, for example,
$chartData: object.
Step 3: Configure Screen
Add a bar chart representing the total salary of players
Add a text field for the user to input a player name
Add a button that upon clicking triggers an event to update the chart based on the entered product
Step 4: Event Configuration
When the button is clicked, the created event is triggered.
The event handler fetches the entered product from the text field.
It then uses the "Get Chart Data" function to fetch data for the specified product, applying the necessary filters.
The fetched and formatted data is stored in a new variable ($updatedChartData).
The "Set Element Data" function is used to update the bar chart with the newly obtained data.
This example demonstrates how the "Get Chart Data" function is utilized to dynamically fetch and format data based on user input and how the "Set Element Data" function is used to manually update the bar chart with the newly obtained data. This approach allows for interactive user input to drive dynamic updates in the displayed chart.
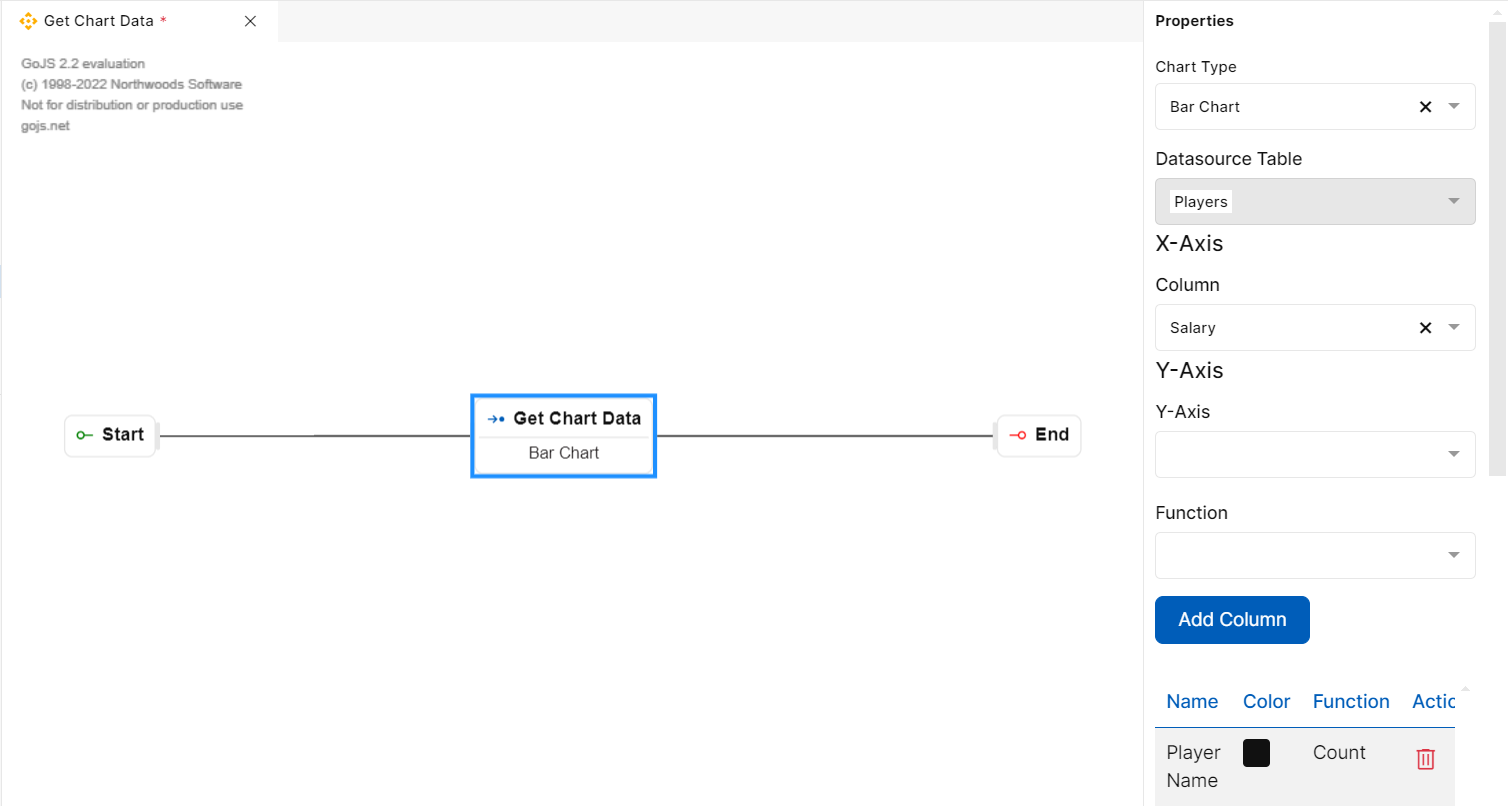
Fig 39: Get Chart Data
Scheduler Functions
The ‘Scheduler Functions’ feature enables the execution of functions at predetermined time intervals, providing an automated way to perform tasks or processes based on predefined scheduling criteria. Here is a detailed explanation of the scheduling functions step involved:
Create Schedule
This function allows you to schedule a function where you can mention all the scheduling details.
PROPERTIES
When you drop the "Create Schedule" step to the functions canvas, the properties panel appears on the right side of the functions canvas to configure the step. The following fields are available in the Properties panel:
Function Name: Users can choose a specific function name to which the scheduler needs to be applied. This ensures that the designated function is executed automatically based on the defined scheduling parameters.
Start Date: Users can specify the date from which the scheduler should begin its operation. This property ensures that the scheduler initiates its tasks from the specified start date, allowing for precise control over when the scheduled functions are activated.
Seconds: This property allows users to specify the seconds interval for the scheduler. Users can define the frequency at which the function should be executed within a minute by setting the seconds parameter accordingly.
Minutes: Users can mention the minutes interval for the scheduler, determining the specific minutes within an hour when the function should be executed.
Hours: Users can specify the hours' interval for the scheduler, defining desired hours within a day when the function should be executed.
Day of Month: Users can mention the day of the month to schedule the function, ensuring that the function is executed on specific days of the month as defined by the scheduler parameters.
Month: Users can specify the specific month in which the function should be scheduled, ensuring that the function is executed during the specified month as defined by the scheduler parameters.
Day of Week: Users can mention the specific day of the week to schedule the function, allowing execution of function on particular days of the week, as specified by the scheduler properties.
USAGE
Let's consider a scenario where a particular Add Standings function needs to be executed every day at 9 AM, starting from January 1, 2024. In this case, the scheduler function would be set with the following parameters:
Function: Add Players
Start Date: 01/01/2024
Seconds: 0
Minutes: 0
Hours: 9
Day of Month: Every day
Month: All months
Day of Week: All days of the week
By configuring the scheduler function in this manner, the DataUpdateFunction would be automatically executed every day at 9 AM, starting from January 1, 2024, ensuring the timely and accurate execution of the data update tasks.
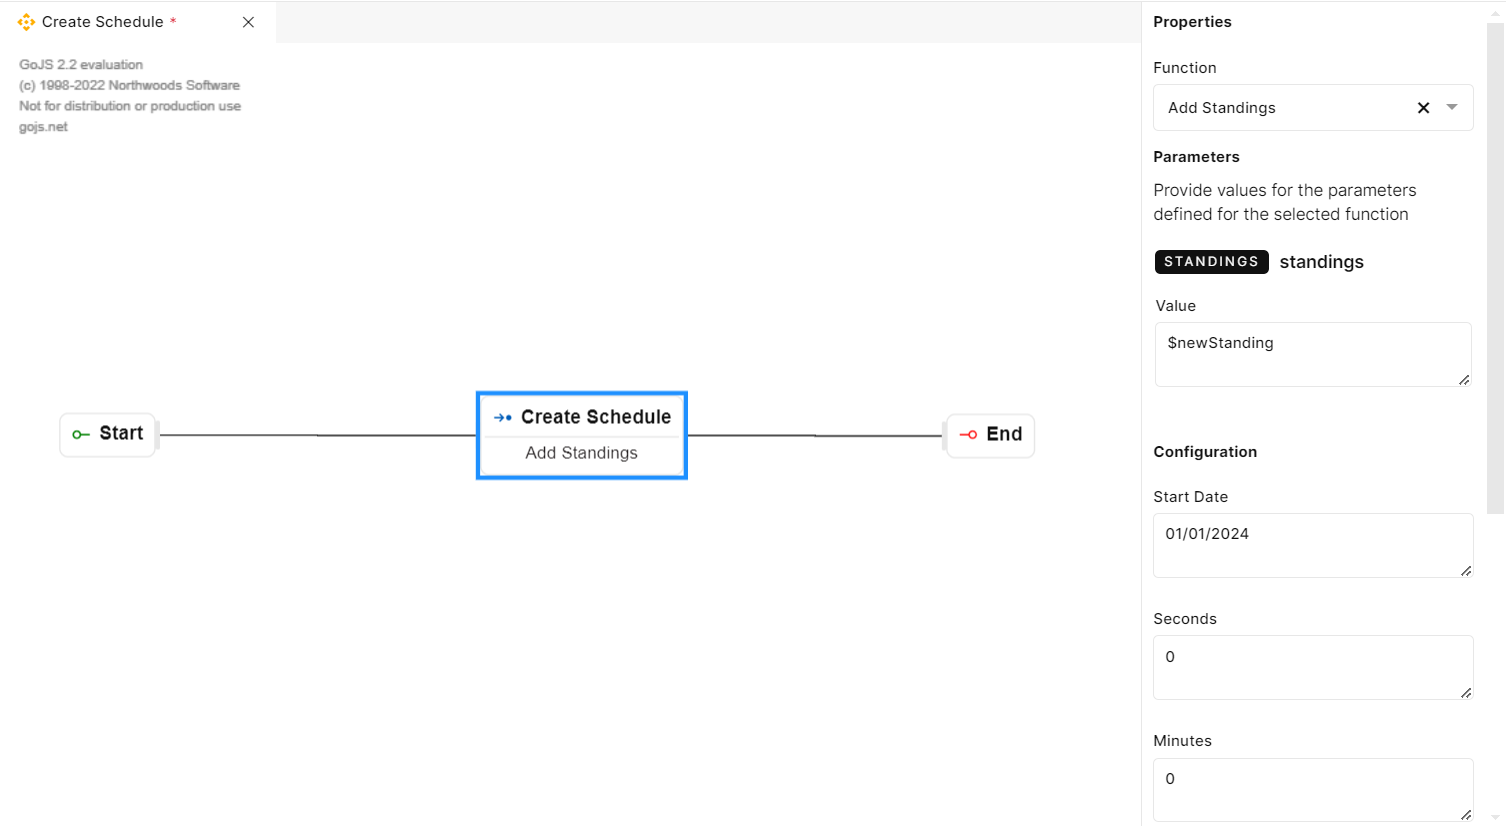
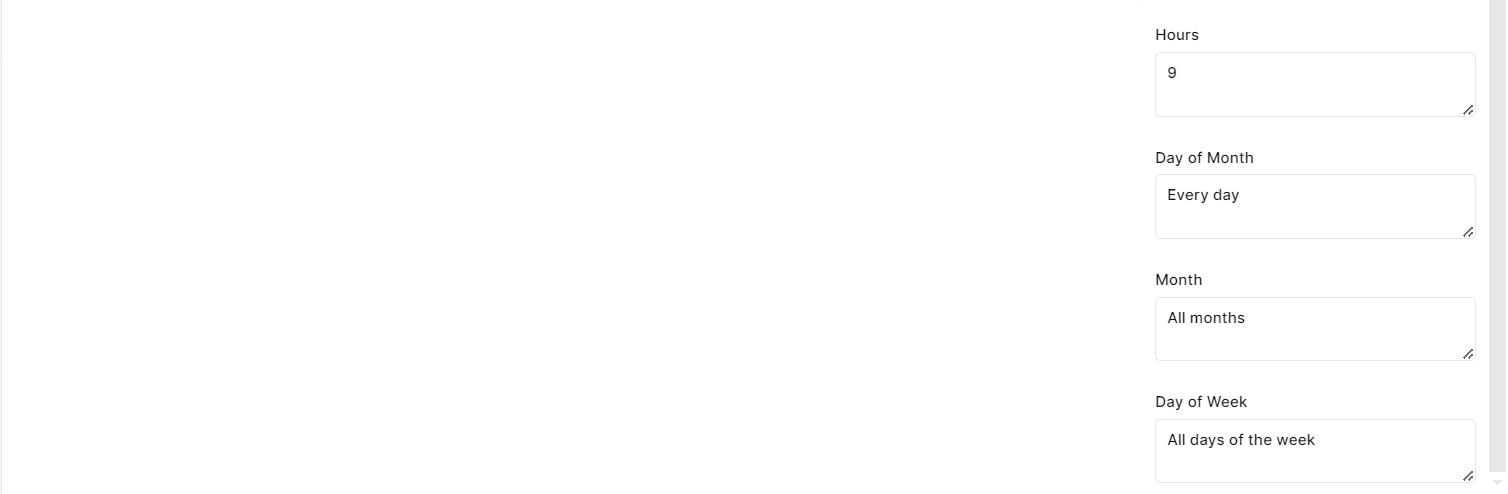
Fig 40: Create Schedule
Delete Schedule
This function allows you to delete a schedule on a function under some conditions of an application.Suppose if a user has a Create schedule function in an application and he wantes to delete the schedule under some conditions then he should use Delete Schedule.
PROPERTIES
When you drop the "Delete Schedule" step to the function editor canvas, the properties panel appears on the right side of the function editor to configure the step. The following fields are available in the Properties panel:
Function Name: Users can choose a specific function name to which the scheduler needs to be deleted.
USAGE
Let's consider a scenario where a particular Add Standings function is executed every day at 9 AM, starting from January 1, 2024. So to remove the schedule of such function we can use Delete Schedule. We can select the function name from the dropdown whose schedule you want to delete.
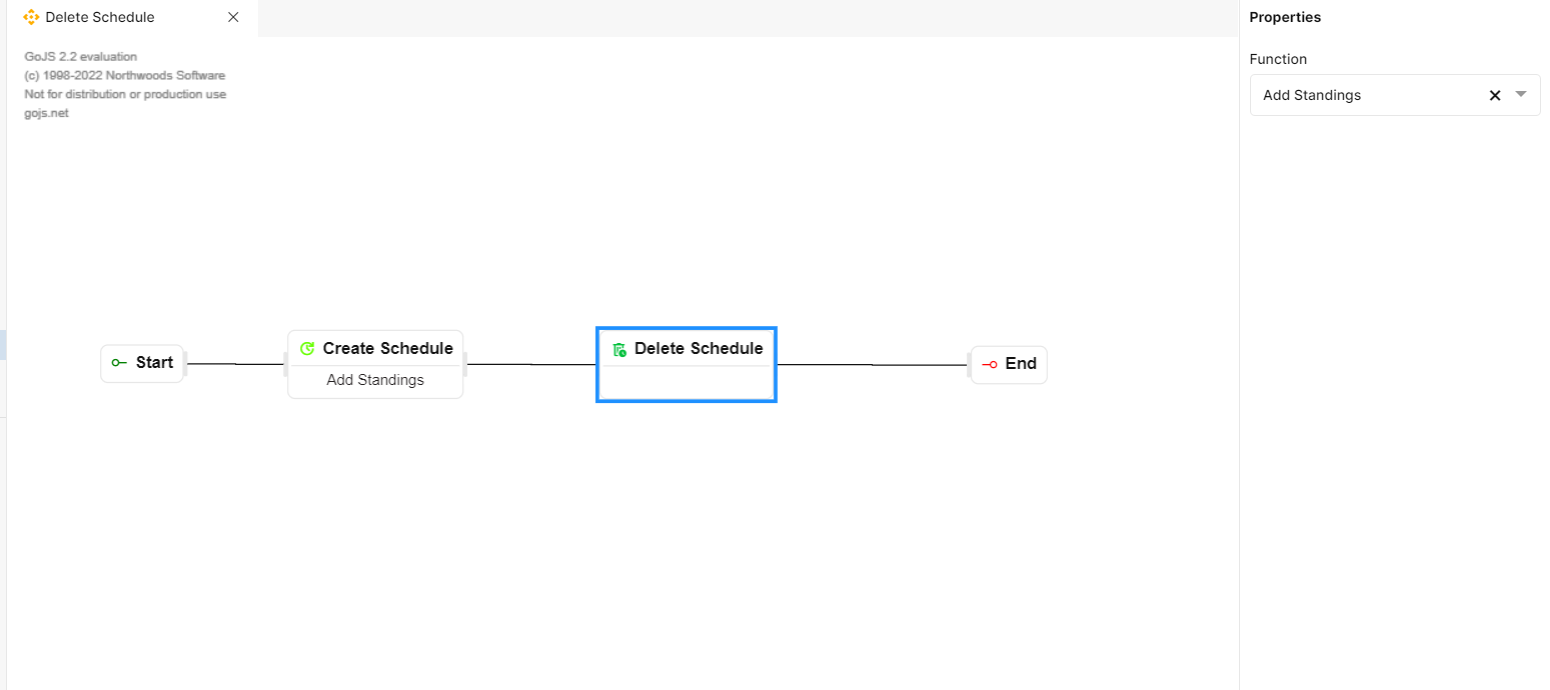
Fig 41: Delete Schedule