Resources
Email Servers
This is an external component which can be configured here and reused in Functions or Deployment form of your application.
Email Server section is used to add, update & delete SMTP Configuration details that is required to send emails.
Add Email Server
To add an Email Server,
Go to Explorer pane and Click Email Servers under Resources
Click Add Email Server. You will get Add Email Server popup
Enter the desired Host, Port, Username & Password
Host, Port, Username & Password fields are mandatory
Click Add Server. You will get a success message stating, Email Server added successfully
Update Email Server
To update an existing Email Server,
Click on the pencil icon against the server and make changes in the desired field
Click Update Server. The email server will be updated successfully
You can also search for a server by entering a relevant keyword in the search box. The search results will be displayed below the search box
Delete Email Server
To delete an Email Server,
Click on the delete icon against the server
You will get Delete Email Server popup
Click Confirm to delete the server or click Cancel to go back
Once you click Confirm, the email server will be deleted and it will no longer appear in the server list
The connection information provided here will reflect in SMTP Configuration of Send Email step in Functions & SMTP details section in deployment form
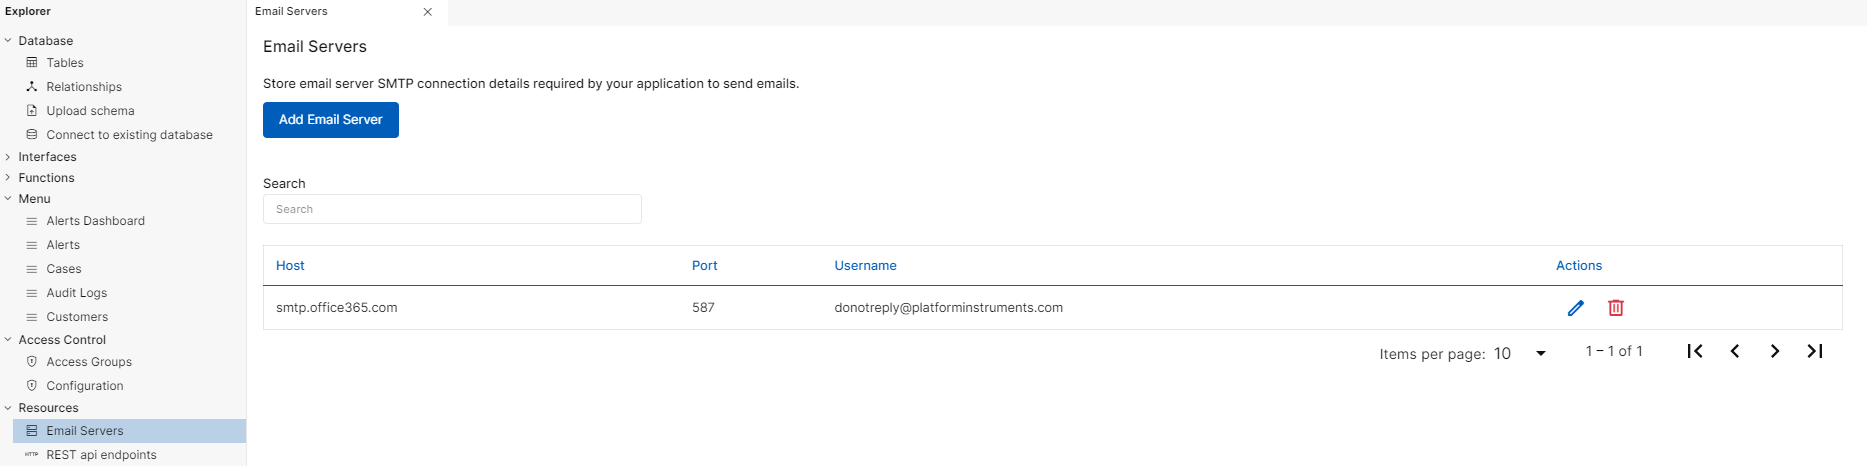
Fig 1: Email Servers
Email Servers
REST API Endpoints
Overview
This is an external component which can be configured or defined here and used in Functions or REST API Virtual Table of your application.
Endpoint information can be defined here, whereas the actual value should be provided in the REST Call step of Functions or in the REST API Virtual Table of Data Model Editor.
REST API Endpoints section is used to add, update & delete different types of endpoints such as,
GET All
GET One
POST
PUT
DELETE
Configuration Fields
Fields available to configure the endpoints are not mandatory. Configuration of above endpoints in PIES Studio depends on the endpoint data. Below are the fields available to configure endpoint.
Path Parameter - Parameters present within the path of endpoint, before the query string (?) represents the path parameter. This is an input field used to specify the resource that needs to be fetched
Header - This field is usually related to authorization. In PIES studio, this is an input field to specify the keys in request header
Query Params - Parameters present in the query string of endpoint, after the (?) represents the query parameter. This is an input field to specify the key names needed to sort/filter the resource
Body - This input field is used to submit object in the request body (usually JSON). Body section is frequently used in PUT and POST type endpoints
Response - This section is used to provide success code for API request & to choose the type of response
Fields - For Object & Object list response types, fields present in the response can be added in this section
Add Path Parameter, Headers, Query Params, Body, Response & Fields only if your endpoint requires the same.
Steps shown below under Endpoint Types are only for you to understand the functionality. Your endpoint might require different configuration based on endpoint data.
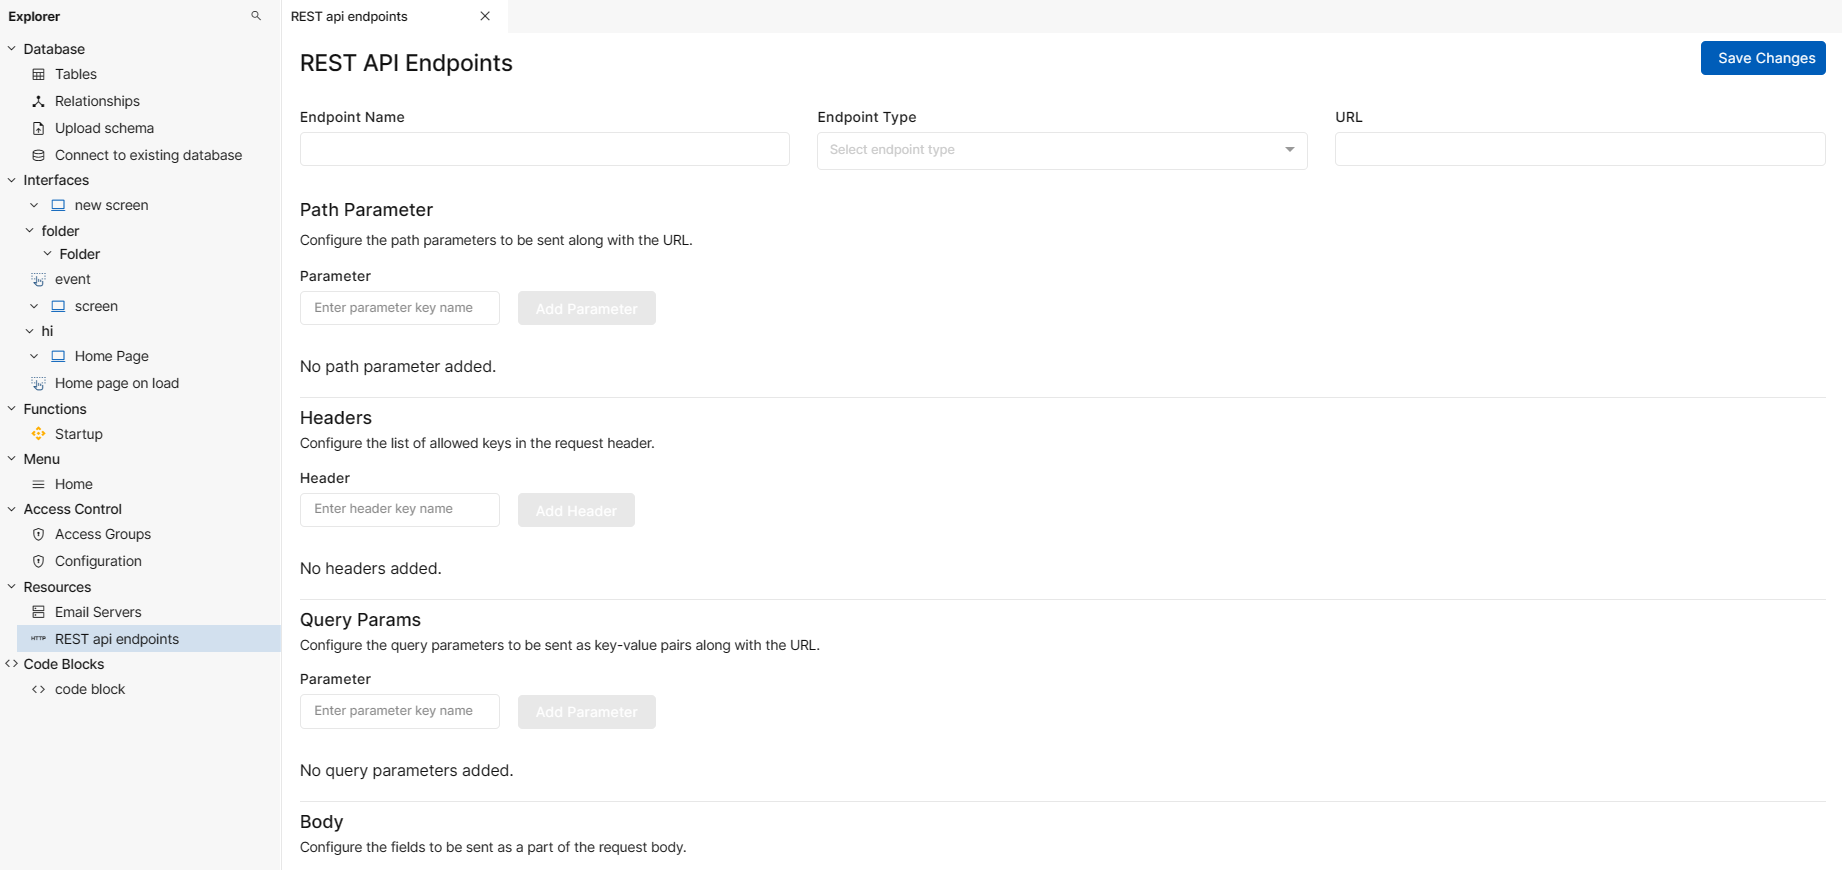
Fig 2: REST API Endpoints
Endpoint Types
GET All
This endpoint returns a list of JSON objects as response. This endpoint can in turn be used to read all the records in the API table in Data Model Editor.
To create a GET All type endpoint,
Go to Explorer pane and click on REST API Endpoints under Resources
Click Add Endpoint
Provide an endpoint name in Endpoint Name field and select GET as the type of endpoint in Endpoint Type dropdown
Enter the endpoint URL in URL field
Endpoint Name, Endpoint Type & URL fields are mandatory
Go to Headers section and add the list of header keys in the request header. You can configure any number of allowed keys here
Added header keys will be displayed in the list below. Click on delete icon if you wish to delete the added header key(s). You will get a Delete Header popup. Click Confirm to proceed or Cancel to go back
Go to Response section. You can see that the Success Status Code is set to 200 by default. This indicates that on runtime only when the success code is 200, the API request has been successful. Any other code will indicate that the API request has failed. You can also change the success code if desired
Choose the type of response in Response Type dropdown. For GET All endpoint choose Object List as the response type. This response represents a list of objects.
Go to Fields section and add all the fields present in the response. The added fields will be displayed in the list below. Click on delete icon if you wish to delete the added field(s). You will get a Delete Response Field popup. Click Confirm to proceed or Cancel to go back
Field names are case sensitive. Enter the field name as it is in the response.
After providing the above details click Save Changes. The added GET type endpoint will now be visible under REST API Endpoints
REST API Endpoint - GET ALL
GET One
This endpoint returns a single JSON object as response and accepts a path parameter in the API endpoint URL. This endpoint can in turn be used to read a single record from the API table in Data Model Editor.
To create a GET One type endpoint,
Go to Explorer pane and click on REST API Endpoints under Resources
Click Add Endpoint
Provide an endpoint name in Endpoint Name field and select GET as the type of endpoint in Endpoint Type dropdown
Enter the endpoint URL in URL field
Endpoint Name, Endpoint Type & URL fields are mandatory
Go to Path Parameter section & add the required parameter keys. You can specify multiple path parameter keys here. This field accepts hardcoded value and a variable. For example, If you choose to use a variable, you can configure the same while using this endpoint in the Functions.
Added header keys will be displayed in the list below. Click on delete icon if you wish to delete the added parameter key(s). You will get a Delete Path Parameter popup. Click Confirm to proceed or Cancel to go back
In the URL field, all words followed by : symbol will represent the path parameter
Go to Headers section and add the list of header keys in the request header. You can configure any number of allowed keys here
Added header keys will be displayed in the list below. Click on delete icon if you wish to delete the added header key(s). You will get a Delete Header popup. Click Confirm to proceed or Cancel to go back
Go to Response section. You can see that the Success Status Code is set to 200 by default. This indicates that on runtime only when the success code is 200, the API request has been successful. Any other code will indicate that the API request has failed. You can also change the success code if desired
Choose the type of response in Response Type dropdown. For GET One endpoint choose Object as the response type. This response represents a single object.
Go to Fields section and add all the fields present in the response. The added fields will be displayed in the list below. Click on delete icon if you wish to delete the added field(s). You will get a Delete Response Field popup. Click Confirm to proceed or Cancel to go back
Field names are case sensitive. Enter the field name as it is in the response.
After providing the above details click Save Changes. The added GET type endpoint will now be visible under REST API Endpoints
REST API Endpoint - GET ONE
POST
This endpoint accepts a JSON object as the request body. This endpoint in turn can be used to insert new data in the API table in Data Model Editor.
To create a POST type endpoint,
Go to Explorer pane and click on REST API Endpoints under Resources
Click Add Endpoint
Provide an endpoint name in Endpoint Name field and select GET as the type of endpoint in Endpoint Type dropdown
Enter the endpoint URL in URL field
Endpoint Name, Endpoint Type & URL fields are mandatory
Go to Headers section and add the list of header keys in the request header. You can configure any number of allowed keys here
Added header keys will be displayed in the list below. Click on delete icon if you wish to delete the added header key(s). You will get a Delete Header popup. Click Confirm to proceed or Cancel to go back
Go to Body section and all the required fields that has to be sent as a part of request body. Request body fields are case sensitive. Add the fields as it is in the endpoint.
Added request body fields will be displayed in the list below. Click on delete icon if you wish to delete the added fields. You will get a Delete Field popup. Click Confirm to proceed or Cancel to go back
Go to Response section. You can see that the Success Status Code is set to 200 by default. This indicates that on runtime only when the success code is 200, the API request has been successful. Any other code will indicate that the API request has failed. You can also change the success code if desired
Choose the type of response in Response Type dropdown. For POST endpoint choose Object as the response type. This response represents a single object.
Go to Fields section and add all the fields present in the response. The added fields will be displayed in the list below. Click on delete icon if you wish to delete the added field(s). You will get a Delete Response Field popup. Click Confirm to proceed or Cancel to go back
Field names are case sensitive. Enter the field name as it is in the response.
After providing the above details click Save Changes. The added POST type endpoint will now be visible under REST API Endpoints
REST API Endpoint - POST
PUT
This endpoint accepts a JSON object as the request body. This endpoint in turn can be used to update the API table data in Data Model Editor.
To create a PUT type endpoint,
Go to Explorer pane and click on REST API Endpoints under Resources
Click Add Endpoint
Provide an endpoint name in Endpoint Name field and select PUT as the type of endpoint in Endpoint Type dropdown
Enter the endpoint URL in URL field
Endpoint Name, Endpoint Type & URL fields are mandatory
Go to Path Parameter section & add the required parameter keys. You can specify multiple path parameter keys here. This field accepts hardcoded value and a variable. For example, If you choose to use a variable, you can configure the same while using this endpoint in the Functions.
Added header keys will be displayed in the list below. Click on delete icon if you wish to delete the added parameter key(s). You will get a Delete Path Parameter popup. Click Confirm to proceed or Cancel to go back
In the URL field, all words followed by : symbol will represent the path parameter
Go to Headers section and add the list of header keys in the request header. You can configure any number of allowed keys here
Added header keys will be displayed in the list below. Click on delete icon if you wish to delete the added header key(s). You will get a Delete Header popup. Click Confirm to proceed or Cancel to go back
Go to Body section and all the required fields that has to be sent as a part of request body. Request body fields are case sensitive. Add the fields as it is in the endpoint.
Added request body fields will be displayed in the list below. Click on delete icon if you wish to delete the added fields. You will get a Delete Field popup. Click Confirm to proceed or Cancel to go back
Go to Response section. You can see that the Success Status Code is set to 200 by default. This indicates that on runtime only when the success code is 200, the API request has been successful. Any other code will indicate that the API request has failed. You can also change the success code if desired
Choose the type of response in Response Type dropdown. For PUT endpoint choose Object as the response type. This response represents a single object.
Go to Fields section and add all the fields present in the response. The added fields will be displayed in the list below. Click on delete icon if you wish to delete the added field(s). You will get a Delete Response Field popup. Click Confirm to proceed or Cancel to go back
Field names are case sensitive. Enter the field name as it is in the response.
After providing the above details click Save Changes. The added PUT type endpoint will now be visible under REST API Endpoints
REST API Endpoint - PUT
DELETE
This endpoint accepts a JSON object as the request body. This endpoint in turn can be used to delete the API table data in Data Model Editor.
To create a DELETE type endpoint,
Go to Explorer pane and click on REST API Endpoints under Resources
Click Add Endpoint
Provide an endpoint name in Endpoint Name field and select PUT as the type of endpoint in Endpoint Type dropdown
Enter the endpoint URL in URL field
Endpoint Name, Endpoint Type & URL fields are mandatory
Go to Path Parameter section & add the required parameter keys. You can specify multiple path parameter keys here. This field accepts hardcoded value and a variable. For example, If you choose to use a variable, you can configure the same while using this endpoint in the Functions.
Added header keys will be displayed in the list below. Click on delete icon if you wish to delete the added parameter key(s). You will get a Delete Path Parameter popup. Click Confirm to proceed or Cancel to go back
In the URL field, all words followed by : symbol will represent the path parameter
Go to Headers section and add the list of header keys in the request header. You can configure any number of allowed keys here
Added header keys will be displayed in the list below. Click on delete icon if you wish to delete the added header key(s). You will get a Delete Header popup. Click Confirm to proceed or Cancel to go back
Go to Response section. You can see that the Success Status Code is set to 200 by default. This indicates that on runtime only when the success code is 200, the API request has been successful. Any other code will indicate that the API request has failed. You can also change the success code if desired
Choose the type of response in Response Type dropdown. For DELETE endpoint choose String as the response type. This response represents data of type string.
After providing the above details click Save Changes. The added DELETE type endpoint will now be visible under REST API Endpoints.
REST API Endpoint - DELETE