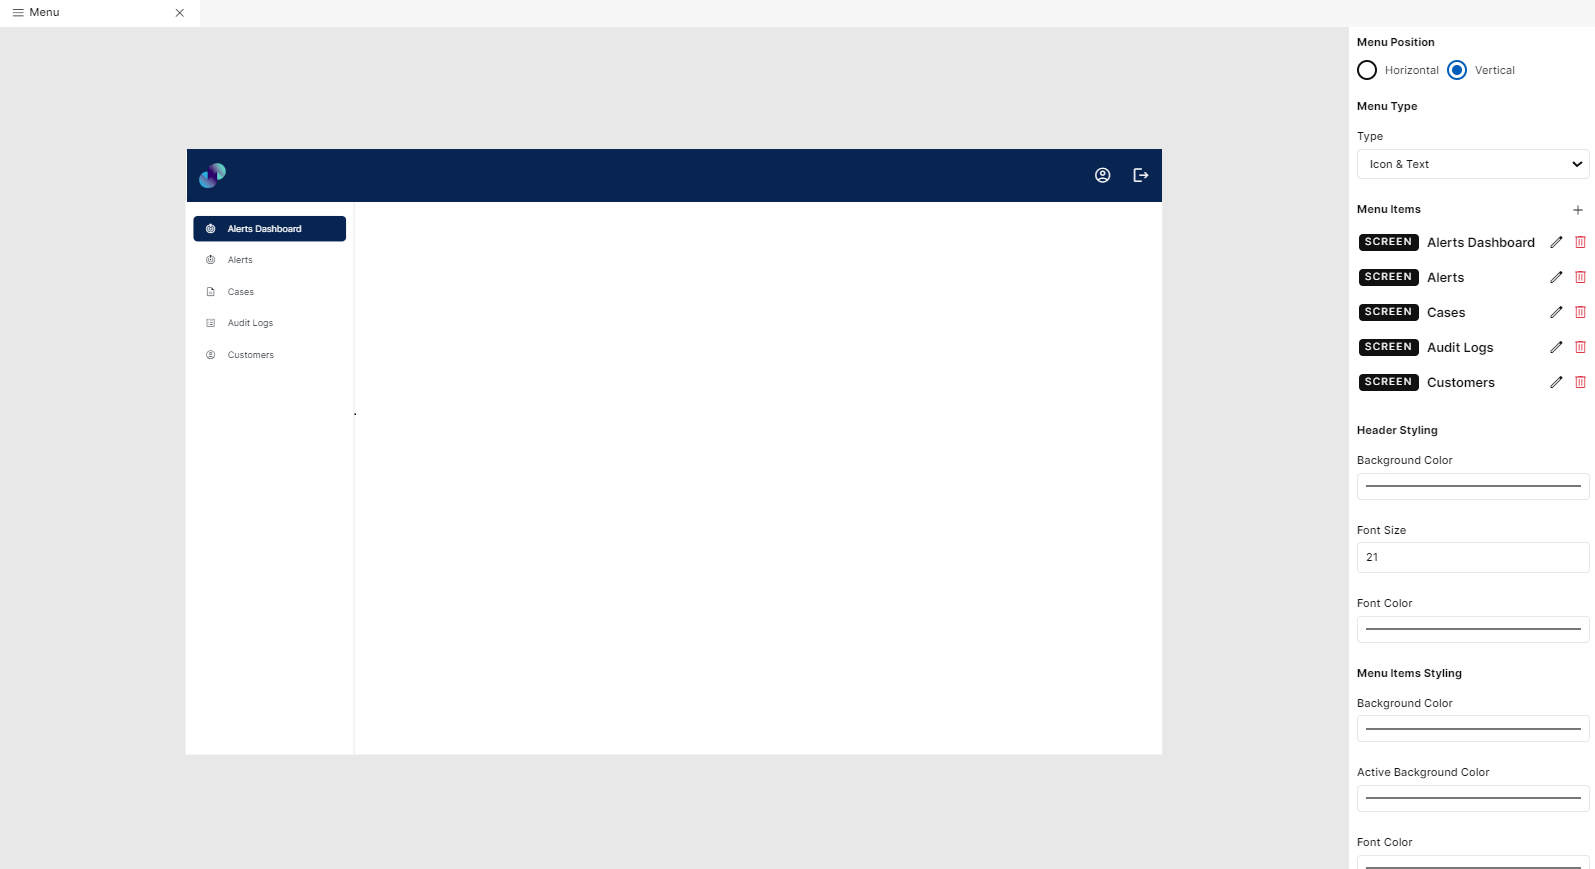
Explorer - Menu
This module is used in configuring & styling the menu for your application’s screen.
To configure Menu,
Click Menu under Explorer pane. You will be get Menu Editor page
You can start configuring application's Menu using right pane in Menu Editor
Menu Position
You can position menu horizontally or vertically. Vertical positioning will place the menu items one below the other. Horizontal positioning will place the menu items one next to the other. By default Vertical positioning will be selected and you can change if desired
Menu Type
Under Menu Type, you will get three different types of menu - Icon, Text, Icon & Text
If you want to have just the icon as menu item, choose Icon from the dropdown and if you want to have only text as menu item, choose Text from the dropdown. If you wish to have both Icon & Text as menu item, choose Icon & Text from the dropdown
Menu Items
This section is used to add menu items to the application Menu. Click plus icon to start adding. Upon clicking plus icon, you will get Add Parameter popup with below fields to add Menu item.
Tooltip/Title - Enter a name to be displayed in the menu. For Icon type menu, title will be displayed when hovered over the icon in deployed application. For Text & Icon & Text menu types, title will be displayed in the menu directly as is
Icon - Default Icon is set to Home. However, you can select an icon from the list of material and font awesome icons (For Icon, Icon & Text Menu Types).
Redirect To - The values in this dropdown (Screen/URL) helps you to choose whether the user should be re-directed to a specific screen created in the app or to website addresses by mentioning URL
Select Screen - When you select Screen in the Redirect To field, a separate dropdown field called Select Screen will be provided to select one of the created screens. In deployed app & Screen Editor, the user will be taken to the selected screen when they click on the added menu item
Enter URL - When you select URL in the Redirect To field, a separate field called Enter URL will be provided to enter the desired URL. In deployed app & Screen Editor, the user will be redirected to the page specified in URL when they click on the added menu item. Ensure you enter a valid URL
Click Save after providing above details.
You can add as many menu items as desired. Added Menu items will appear under Menu Items along with its redirection type. You can edit the added menu item by clicking pencil icon against desired menu item. Make desired changes & click Save. To delete a menu item, click on delete icon against the desired item. Make sure you double check before deleting. This action cannot be undone, and you need to add the deleted menu item again.
Header Styling
Background Color - Click on Background Color and choose a desired color from the color palette to set a color for Header background
Font Size - This field is applicable for admin & logout icons on the header. Font size is set to 24 by default. You can either manually modify font size or by using increment & decrement arrows
Font Color - This field is applicable for admin & logout icons on the header. Click on font Color field and choose a desired color from the color palette for admin & logout icons
Menu Items Styling
Background Color - Click on Background Color and choose a desired color from the color palette to set a color for menu background
Active Background Color - Click on active background color to choose a background color for menu item which is currently selected on runtime
Font Color - Font color field is applicable for font color of menu items which are not currently selected on runtime. Click on font color and choose a desired color of your choice from the color palette. Make sure font color & background color is not the same
Active Font Color - Click on active font color to choose a font color for menu item which is currently selected on runtime
Icon Size - This field is applicable only for Icon and Icon & Text Type menu. Size of icon is set to 17 by default. You can either manually modify icon size or by using increment & decrement arrows. The size set here will be the size of the icon in menu item. You can preview the sizes on screen canvas & modify the sizes according to your preference
Font Size - This field is applicable only for Text and Icon & Text Type menu. Size of text is set to 14 by default. You can either manually modify font size or by using increment & decrement arrows. The size set here will be the size of text in menu item. You can preview the sizes on screen canvas & modify the sizes according to your preference
Click Save Changes under File to add Menu to your Screens.

Fig 1: Menu Configuration
https://youtu.be/ZUJHsbH_Q78?si=ZzXlhO1i86sRseW0
Menu in Screen Editor
Once the Menu items are added, go to Interfaces and click on any of the created screens.
You can also switch between screens directly from menu bar. Click on the desired menu item and you will be redirected to the configured screen or URL.

Fig 2: Menu added in Screens
