Database
Database is an avenue to design and build your applications data storage capabilities. PIES Studio supports multiple relational database products like MySQL, Oracle, Terradata, Postgres, Microsoft SQL Server & Snowflake servers.
To build a database, first step is to create table(s). Database section helps you build data storage structures in three different ways:
Upload Schema - Creating a data storage model by importing the structure from files like XLS
Connect to Existing Database - Creating database by connecting to existing databases
Add Table Manually - Creating a table directly in PIES Studio
Upload Schema
Upload Schema section is used to upload files from the supported file formats. The supported file formats are Excel, MySQL, Oracle, Terradata, Postgres, Microsoft SQL Server & Snowflake servers.
To upload a file,
Click on Upload Schema under Database section of Explorer pane
Click Browse and select the desired file
Ensure that the file is not password protected.
Click Start Import
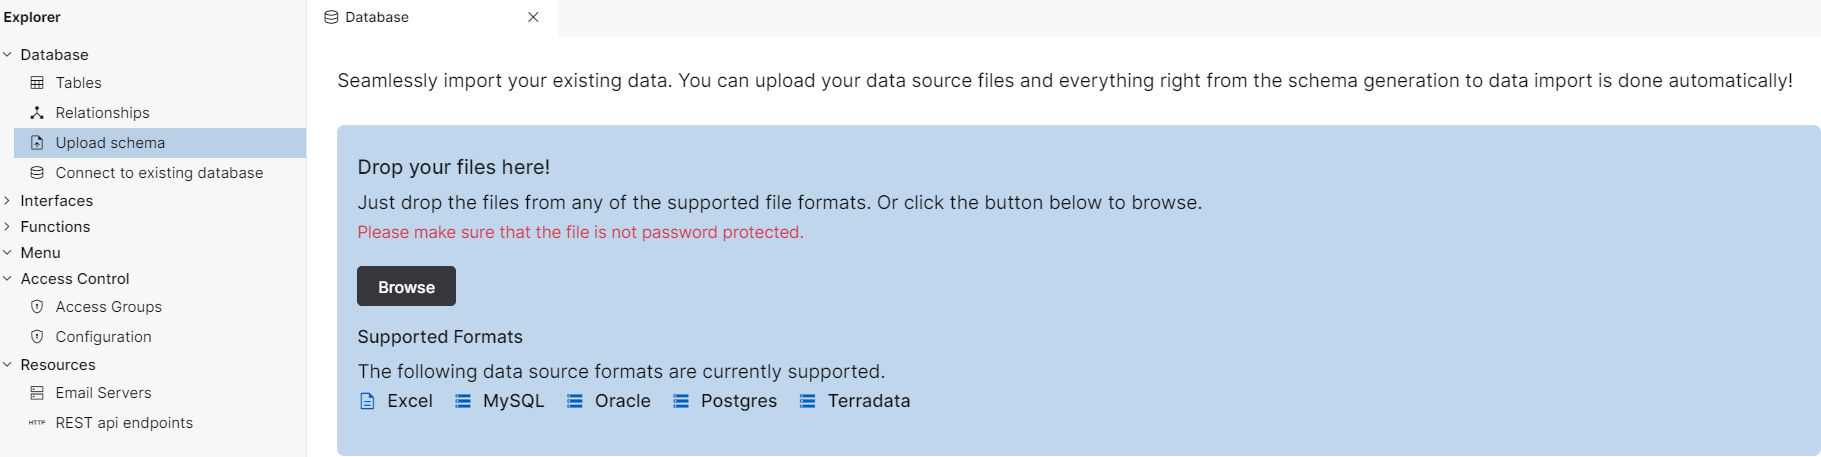
Fig 1: Upload Schema
All the sheets in your excel file will be imported as tables. Tables created by importing an excel file will reflect under Tables section in a category called Internal Tables one below the other
When a table is imported, a column called id gets created automatically and marked as primary key if your table does not have an id column on its own. If your table has a column called named id, system will not auto generate the id column.
If you wish to add more tables to the existing ones, you can either delete existing tables, modify your excel file and then reupload the same file by following the above mentioned process or you can manually add the tables directly in PIES studio. Click here to understand how to add table manually
If you upload a new file containing a completely different table name compared to existing, the new tables will get appended with the existing ones. If you upload a file containing the same table name & exact same tables or a file where few tables are removed from the current table set, the existing ones will continue to remain. If you upload a file containing the same table name & a file where few tables are added to the existing tablet set, the existing table list will be updated with the new table(s).
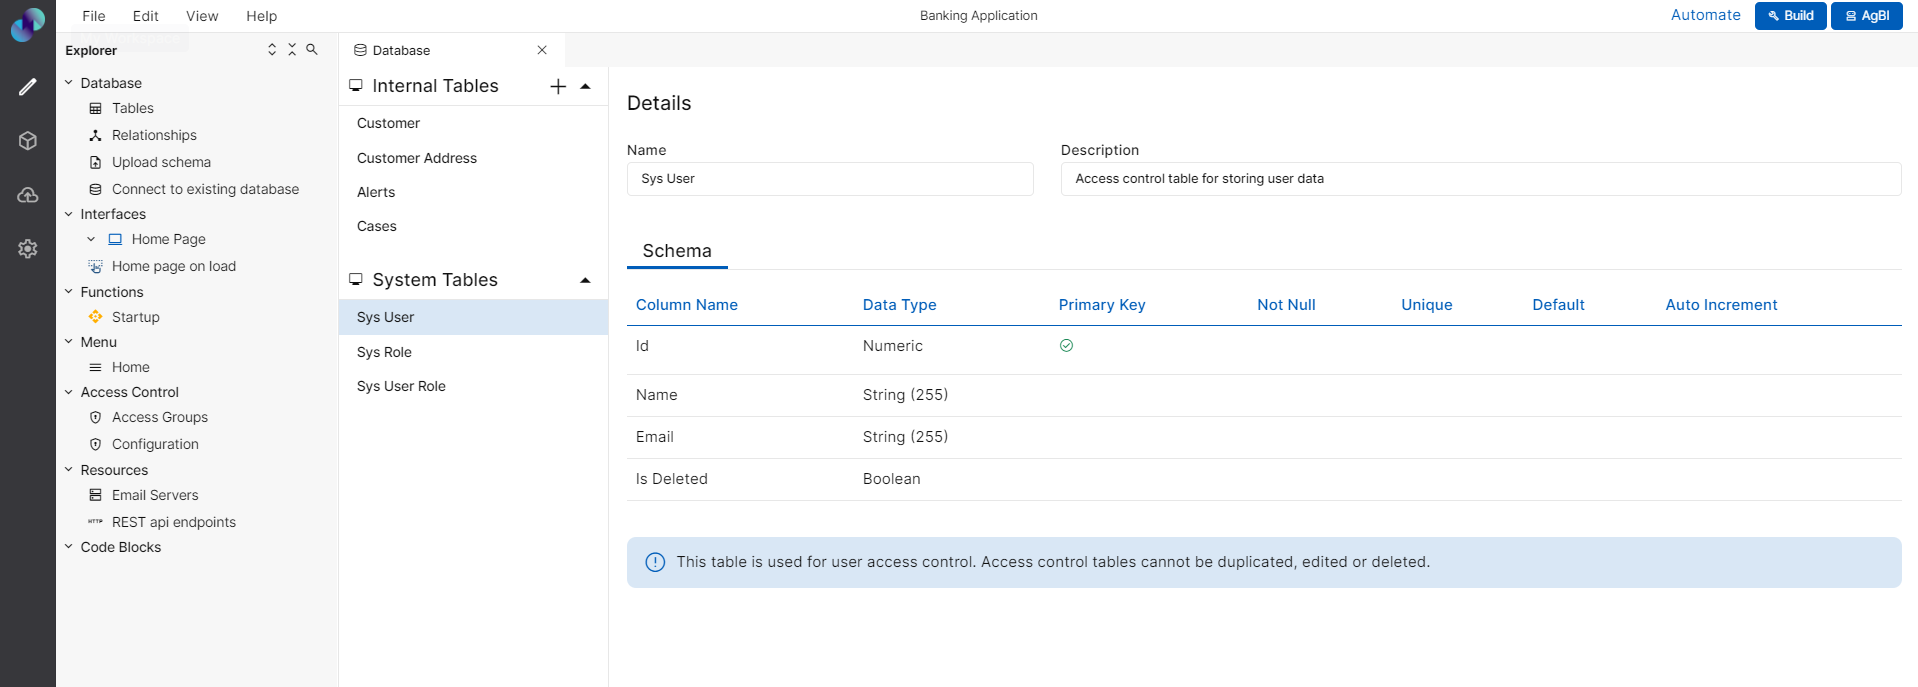
Fig 2: Upload Schema - Internal Tables
Upload Schema - Internal Tables
Connect to Existing Database
Connect To Existing Database section is used to import data from your existing database.
To connect to an existing database,
Click Connect To Existing Database under Database section of Explorer pane
Choose the desired database provider under Database Provider
Provide Database related information like Username, Password, Host, Port & Database name. For postgre Sql, schema will be public by default. you can change the same if required
Click Advanced to provide additional database related information in Parameters field in the format
<param1>&&<param2>Now, click Connect. You will get a success message stating, Connected to your existing database successfully
Ensure you have read and write access to the database.
Once your application is connected to a database, all the input fields will be disabled
Tables created by connecting to existing database will reflect under Tables section in a category called External Tables one below the other. Schema & Data of these tables cannot be edited, duplicated or deleted
Primary Key and Foreign Key will be created automatically and relationship between the tables will also be auto generated.
To disconnect the existing database connection, go to Connect To Existing Database and click Disconnect
You will get Disconnect Database popup
Click Disconnect .The database will be disconnected and the imported tables will be deleted form Tables section
Click Cancel to go back
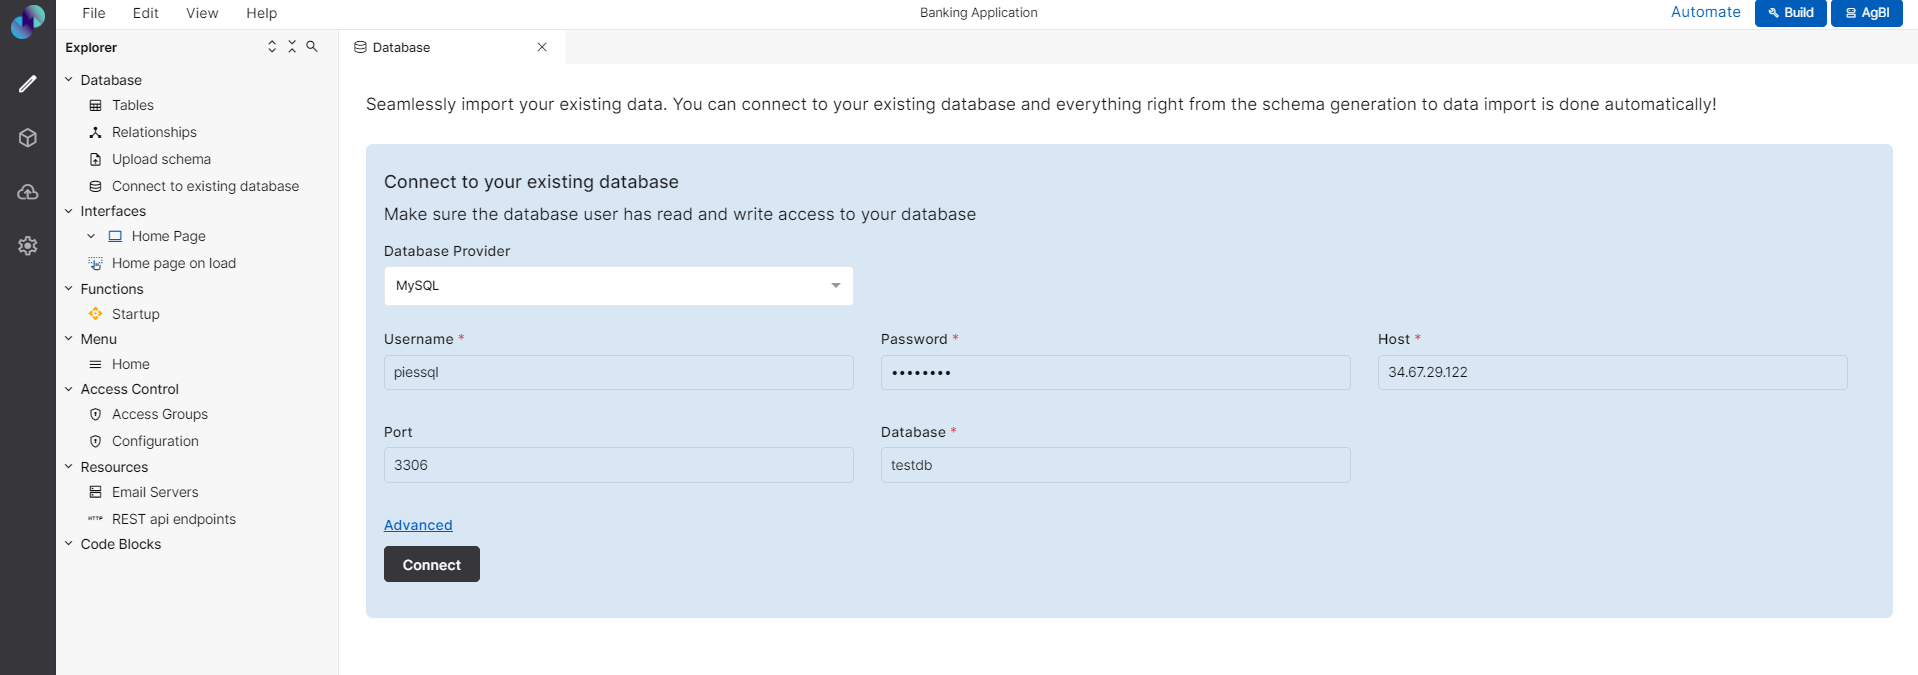
Fig 3: Connecting to Existing Database
Connect to Existing Database
Add Table
Data Table
To add a data table directly in PIES Studio,
Click on Tables under Database section of Explorer pane
Click on plus icon (refer Fig 3) and choose the Table Type as Data Table. Click Next, you will be taken to Table Details page

Fig 4: Add Table
Enter a table Name and Description that matches your table
To add columns to the table, enter a column name in the Name field and choose the appropriate data type from Data Type dropdown
You can also apply formula to your columns instead of adding hard coded values. You can do this by entering a column name and selecting Formula in data type dropdown.
Once you select formula, you will be asked to choose column type. Select a type of your choice under Formula Column Type. You can refer to the list of accepted formulas from the help text and provide a formula in Enter Formula field. Currently, Numeric, Date & String functions are supported by PIES Studio.
Formula Type example: Let’s see an example where I want to add new column with an alphabet A prefixed to an existing Alert id column. To do that, I don't have to manually add every single record from Alert id prefixed by A. Instead, I can use formula field.
I will provide this in the formula field, “A” + $Alertid. This is because, any hard coded value should be provided within double quotes and any existing column name should be prefixed by dollar sign.
Click Add Column. You can add as many columns as desired. Created columns will be visible under active columns. Click save. Table will be added successfully
Note: id, created by, created at, updated by, updated at columns gets created automatically and cannot be deleted. You can use id column as primary key for your table and avoid creating a separate primary key column.
Click on the created table under Internal Tables. Columns that we just created will reflect under schema. You can now add or delete records to the table under Data tab.
Provide a user id for created by & updated by fields. Select a date for created at & updated at fields. These are auto generated during runtime. After providing necessary inputs click Add Record button. Record gets added to the table successfully. Note: Formula field will not be available to add data as they will appear automatically based on the formula applied.
Click on delete icon against the desired record to delete a record. This action cannot be undone so make sure to delete the intended record.
Refer Data section for more information on how to add or delete records.
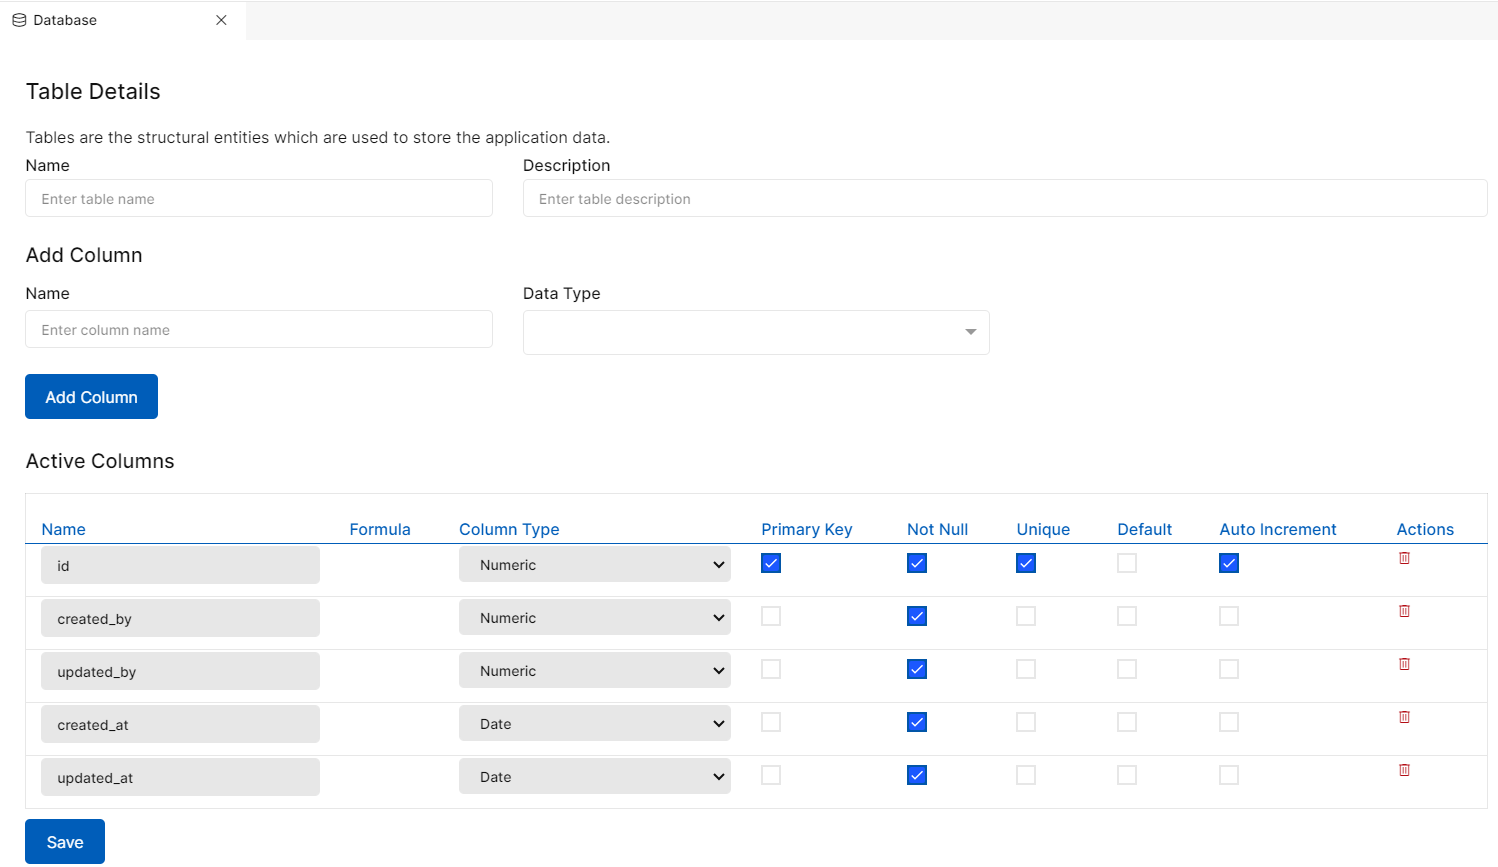
Fig 5: Table Details
Adding Data Table
Virtual Table - Data Model
This section is used to create a virtual table based on the underlying source table. You can define a virtual table with a specific criterion applied to one of the underlying table's columns. This helps in filtering out certain records on the basis of the applied criteria.
To add a virtual data table,
Click on Tables under Database section of Explorer pane
Click on plus icon (refer Fig 3) and choose the Table Type as Virtual Table
Under Table Data Source, choose Data Model as virtual table type
Enter a virtual table name in Name field
Under Data Sources, you can add source table & columns. To do so, click Add Source. You must select atleast one data table & column in order for the virtual table to work as expected. Multiple column selection is also allowed. The columns you select here will be the columns displayed in table element properties of screen editor when you choose this virtual table as data table source
You can also rename the column name in the Alias field for any added column. Under function, You can also apply one of the available aggregate functions to the column if desired
When you add more than one source table, you will get an option to join the tables based on matching records
To do so, click Add Source again & select desired table & columns. Now, turn on Join Table toggle switch. Under Join Type dropdown, if you select Inner Join, the related data from Source & Destination will be available in result set. Similarly for Left Join, all the records from Source & matching records from Destination will be available. For Right Join, all the records from Destination & matching records from Source will be available
Under Group By, you can select one or more columns from added data sources. The result set will be grouped by the columns selected in this field
Under Filters section, you can apply filter to the result data set. Virtual table will only return records that satisfy the applied filters
Choose a table & column where you want to apply filter. Select a function if you want to apply it to the column & select desired operator. Enter a value to apply filter to the result data set. The value you enter here should match the entry in data table
Click Add Filter. The filter will reflect under Active Filters. You can delete the added filter using delete icon. Click Save Changes to add the table or Cancel to go back
Upon confirmation, you will get a success message stating virtual table created successfully. Added table will reflect under Virtual Tables category of Tables section
After adding virtual table, you can go to the table Settings and edit or delete the table if required. You can click on Edit Table to delete any of the added filters. Click delete icon against desired filter & click Save
Note: A Virtual Table must contain atleast one filter.
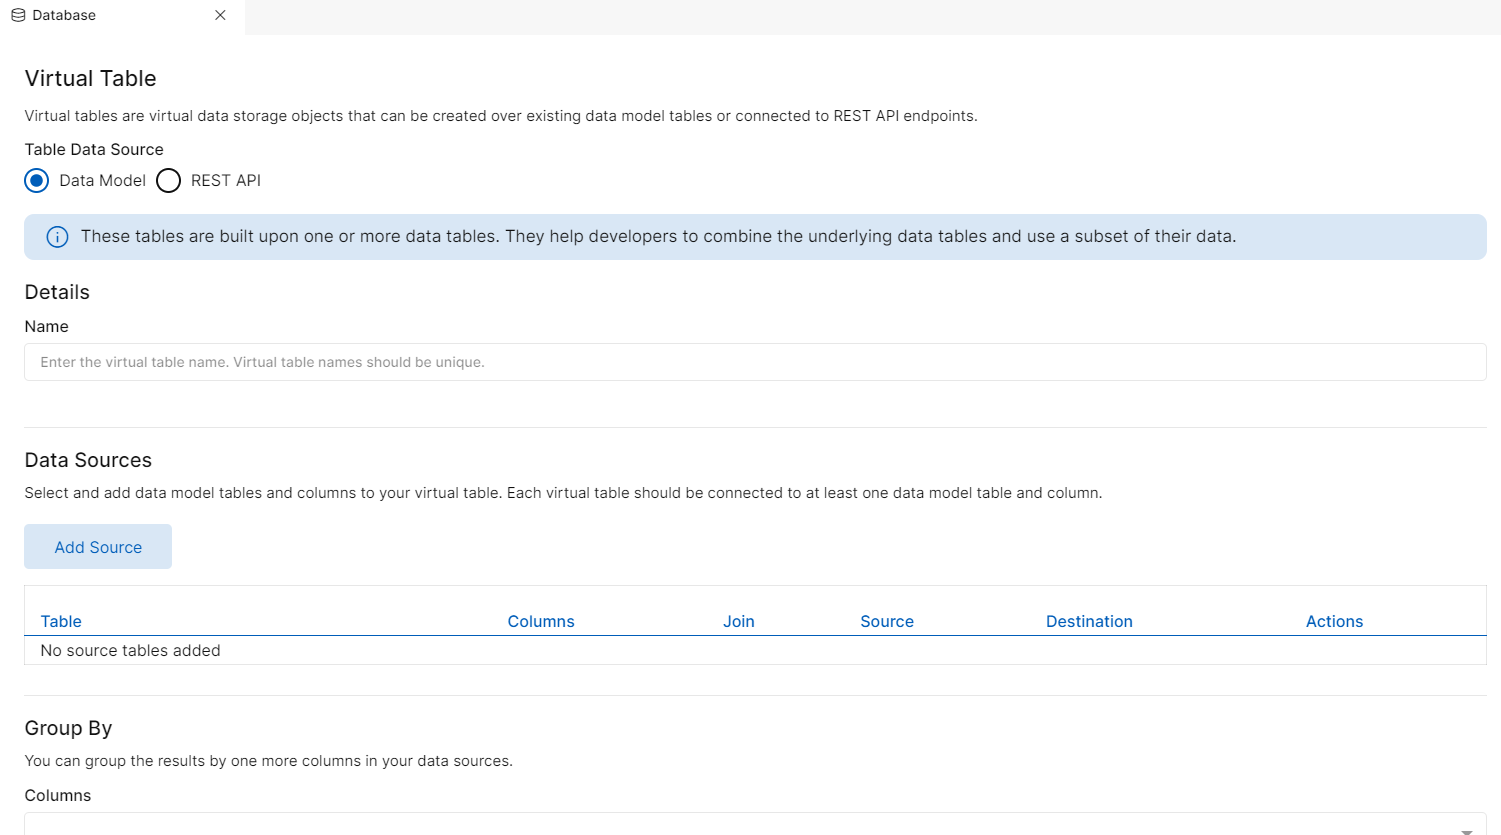
Fig 6: Virtual Table - Data Model
Virtual Data Table
Virtual Table - REST API
Before you create a REST API table, make sure to add REST API Endpoints under Resources section.
To add a REST API Virtual table,
Click on Tables under Database section of Explorer pane
Click on plus icon (refer Fig 3) and choose the Table Type as Virtual Table
In Table Data Source, Choose REST API as virtual table type
Enter a virtual table name in Virtual Table Name field. Virtual Table Type appears automatically
Enter a column name in Name field and select the data type from Data Type dropdown
Table Column Name need not be the same as the API response fields.
Click Add Column. Repeat the same process for the required number of columns. The added columns will appear under Active Columns
Now, go to Endpoint Configuration section to configure the endpoints.
For Get endpoint, choose the API endpoint that corresponds to GET from the dropdown
Ensure to choose the correct API endpoint for each section i.e. Get should only be mapped to GET endpoint type, Create should only be mapped to POST API endpoint type, Update should only be mapped to PUT API endpoint type, Delete should only be mapped to DELETE API endpoint type & Get All should only be mapped to GET all API endpoint type.
Provide the required parameter in Value field of Path Parameter section. This field accepts both hardcoded value & a variable
Next, enter the header value in Value field of Headers section
Under Response Mapping, configure mapping between the created columns and the API response. Choose the appropriate column for each response field. Even when the response fields are changed in API endpoint, the REST API table will remain undisturbed because of this mapping
Repeat the same process for rest of the endpoints (Create, Update, Delete, Get All) and click Save. You will be taken to Tables section where you can view the created REST API table. You can also edit, duplicate & delete the configured table by using Edit Table, Duplicate this Table & Delete Table options respectively.
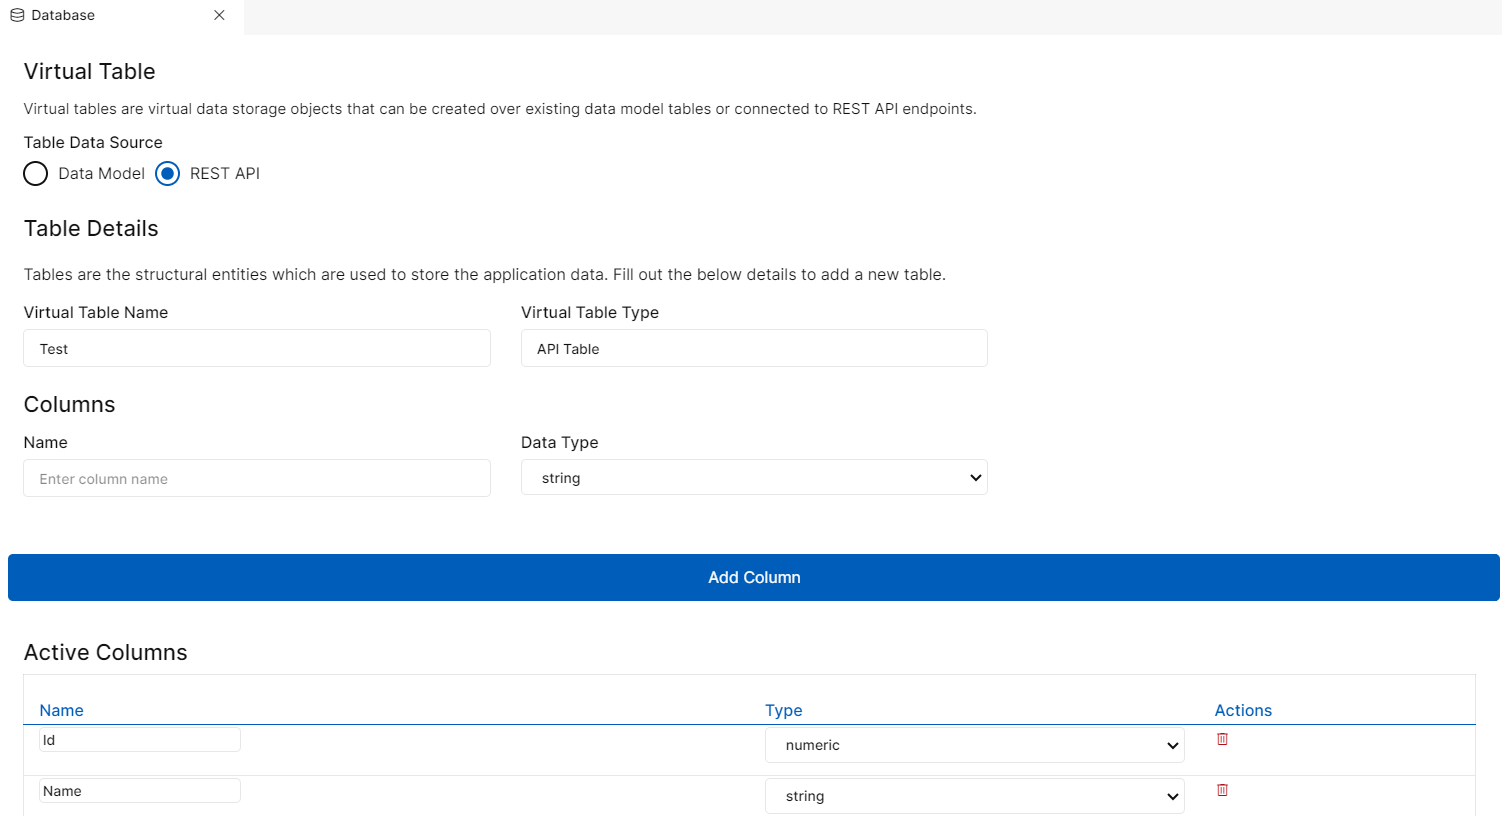
Fig 7: Virtual Table - REST API
Tables
Tables are the tabular structural entities that are used to store application data. The tables that you add via any of the above three methods are listed in this section.
There are four sub sections under Tables:
Internal Tables
Tables added by uploading schema & manually added data tables directly in PIES studio are a part of this section
External Tables
Tables added by connecting to existing databases will be a part of this section
System Tables
System generated User Access Control tables - Sys User, Sys Role, Sys User Role, Manual Tables are part of this section. These tables cannot be edited or deleted as they are used for User Access Control
Virtual Tables
Manually added virtual tables will be a part of this section
Each Table consist of two tabs - Schema & Data
Schema
This shows you the structural definition of the table that you have created to store the data. Under Schema, you can edit, duplicate and delete a table.
Edit Table
To modify existing table, click on Edit Table. Here, you can add columns, delete columns or you can edit existing columns. To add a column to existing table, provide column name, select appropriate data type and click Add Column. You can find the newly added column at the end of existing columns.
To edit existing columns, you can check or uncheck the checkboxes against desired column. You can also provide default values to columns by clicking Default checkbox and provide a default value to the column. This implies, as and when data gets added to that column on runtime, it will automatically take the default value that you have provided.
To delete a column, click on delete icon against the desired column. You will get delete confirmation popup. Click Confirm to proceed with deletion or click Cancel to go back. Upon confirmation, the column will be deleted successfully.
Duplicate Table
To Duplicate a table, click Duplicate this table under Schema. You will get duplication confirmation popup. Click Ok to continue or Cancel to go back. Upon confirmation you will see a success message, Table duplication successful and the duplicated table will be placed at the end of existing tables. The duplicated table will contain the original table’s name followed by copy.
Delete Table
To delete a table, click Delete Table under Schema. You will get a deletion confirmation popup. Click Confirm to proceed with deletion or Cancel to go back. Upon confirmation, your table will be deleted successfully.
Data
This tab is used to view the currently available data in the table. You can also add or delete records in the table using this tab.
Add Record
To add a record, go to Add Record section
Provide a user id for created_by & updated_by fields. The id's are usually the same for both the fields during creation
Select a date for created_at & updated_at fields. It is ideal to select current dates during creation
Note: created_by, updated_by, created_at & updated_at fields are auto generated during runtime.
Provide required inputs depending on the columns available in your table
Once you have provided the required inputs, click Add Record button
Record gets added to the table successfully
Delete Record
You can delete the existing or newly added records by clicking on delete icon against the desired record. Note: This action cannot be undone so make sure to delete the intended record.
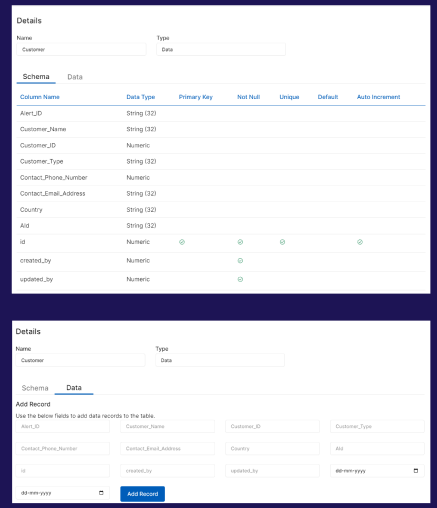
Fig 8: Schema & Data
Tables - Schema & Data
Relationships
You can build and define relationships between the tables you have created.
Create Relationship
After creating a table, go to Relationships section under Database of Explorer pane. You will see the system generated tables and the tables you have created. Relationship between system generated tables are auto generated. Rearrange the created tables as desired.
To define relationship between tables, take the mouse to the triangle icon against the desired column name of source table. This will be the controlling column in this relationship. Drag the line to link it to the desired column in destination table. A blue line will be created linking the two columns in two separate tables.
Interpretation of relationship: The arrow that originates from the right-hand side of the table/column is the controlling table/column in this relationship.
The arrow that ends on the left-hand side of the table/column where the link terminates is the dependent column. The data values in foreign key will always be dependent on the controlling column.
When you create a relationship between two tables, the table definition gets updated automatically in Schema tab of Tables. You can also edit the created relationship by clicking Edit Table. Check or uncheck the checkbox to edit the created relationship and click Save.
These keys get deleted automatically when the relationship between two tables is deleted.
Delete Relationship
To delete a created relationship, click on the desired link and click delete icon or press delete in keyboard. The link will be deleted successfully. In order to modify existing relationship, you need to delete existing relationship & recreate.
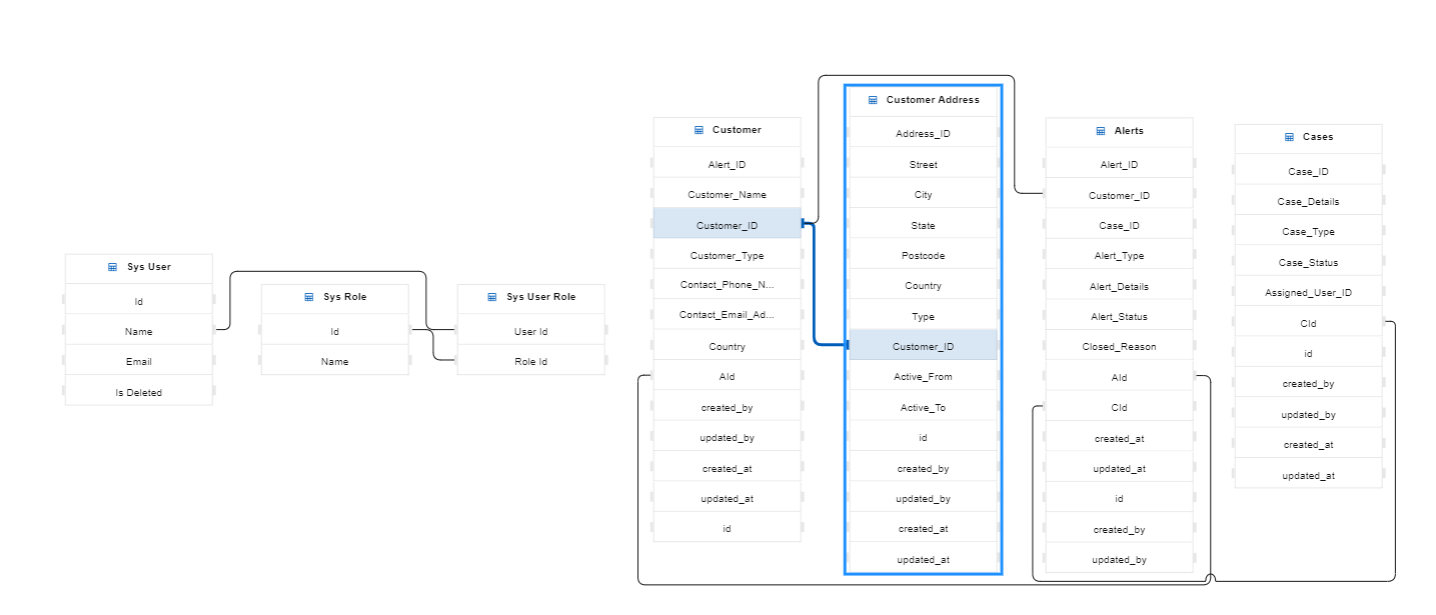
Fig 9: Relationship between tables
Relationships between Tables